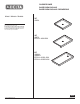
SHOWER BASE BASE PARA DUCHAS BASE PARA DUCHAS / REGADERAS Model / Modelo / Modéle 36” 40054 Write purchased model number here. Retain these instructions for future use. Escriba aquí el número del modelo comprado. Conserve estas instrucciones para usarlas en el futuro. Inscrivez le numéro de modèle ici. Conservez ces instructions pour consultation. 48” 40074 B78311-4834-WH 60” 40094L 40094R B78311-6032L-WH B78311-6032R-WH 79983 www.deltafaucet.com 1 3/2/16 79983 Rev.
! REQUIREMENTS FOR SUCCESSFUL INSTALLATION KNOWLEDGE BASE: Framing Plumbing These instructions include suggestions for rough construction and plumbing installation. Local building codes vary and could supersede those suggestions. If you are not confident in your ability to perform these tasks, contract out those tasks you need help with or use a professional installer. DO NOT use drywall screws to secure flanges to wall studs. Product damage will occur and will void the warranty.
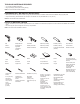
TOOLS AND MATERIALS REQUIRED • 2 x 4 lumber for additional wall studs • Rags or padding to protect product during bracing NOTE: It is recommended to install insulation. HERRAMIENTAS Y MATERIALES NECESARIOS • Madera para montantes de pared si instala el juego para pared adicionales; consulte las instrucciones de instalación del juego para pared • Conjunto de drenaje y desbordamiento que encajan en una bañera con una profundidad de 41,9 cm (16-1/2”) NOTA: Se recomienda instalar el aislamiento.
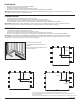
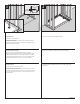
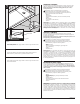
ROUGHING-IN • • • • Rough plumbing must be installed before panel installation. Minimum stud pocket sizes are shown below. Drain cutout 5” diameter max. Right side plumbing rough-in shown. For masonry construction, floor and walls must be framed to accommodate plumbing and installation. IMPORTANT: IF INSTALLING MATCHING WALL SET, refer to Wall Set Installation Manual for specific lumber sizes and placement. Additional studs will be required and need to be installed at this point.
1 1 2 5" (12,7cm) 1-3/4" (4,45cm) Install Drain Pipe Dry fit base and verify that it is straight and square. Trace outline of drain and base. Ensure that the waste pipe is properly located to align with the drain assembly (not included). The subfloor opening should be 5” in diameter. The drain pipe should extend 1-3/4” above the subfloor. Instale la tubería del drenaje Seque la base ajustada y verifique que esté recta y en escuadra. Trace el contorno de las ubicaciones del drenaje y de la base.
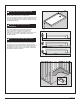
! REQUIRED FOR PROPER INSTALLATION IF THE SUBFLOOR IS NOT FLAT AND LEVEL Entire bottom support must be in contact with a flat level surface as shown. If installation surface is not level, a mortar bed must be applied where the base will be positioned. REFER TO STEP 5 FOR INSTRUCTIONS. ! REQUERIDO PARA LA INSTALACIÓN ADECUADA SI EL CONTRAPISO NO ESTÁ PLANO Y NIVELADO Todo el soporte inferior debe estar en contacto con una superficie plana y nivelada.
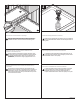
1 3 4 1 1 2 3/16" (0,51cm) Drill 3/16” holes at all stud locations on top flanges. ! Attach drain following manufacturer’s instructions. Drill 3/16” clearance holes into flanges only. Do not drill 3/16” holes directly into studs. Drill chuck can damage base. Use an extended bit holder to reduce risk of drill chuck hitting base. ! Haga orificios de 3/16” (4,7 mm) en todas las ubicaciones de los montantes en las bridas superiores. ! Fije el desagüe siguiendo las instrucciones del fabricante.
1 5 1 IF THE SUBFLOOR IS NOT FLAT AND LEVEL, a mortar bed must be applied where the base will be positioned. Apply a generous amount of mortar that has been mixed to a thick consistency. Use the mortar to fill in low areas. Place the base in the wet mortar, adjust until it is level, and let mortar cure for 24 hours. Proceed to step 6. 6 IF THE SUBFLOOR IS FLAT AND LEVEL, apply adhesive on floor and spread using the notched side of the trowel, starting within pencil line.
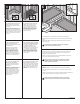
7 CARE AND CLEANING For regular cleaning use ONLY mild detergents or warm, soapy water. Use ONLY non-abrasive cloth or sponge. Always rinse surfaces after cleaning. Before cleaning this product with cleaning products, test a small, inconspicuous area. ! Manufacturer does not recommend the use of cleaning products that contain any of the following chemicals. Use of products containing these chemicals can cause the products to crack or discolor and will void the warranty.
LIMITED WARRANTY All parts and finishes of the Delta® Shower Base unit are warranted to the original consumer purchaser to be free from defects in material and workmanship for the time periods listed below. Delta recommends using a professional plumber for all installation and repair.