DIRECT-TO-STUD BATHTUB WALL SET CONJUNTO DE PARED DE TINA DIRECTA AL MONTANTE Model / Modelo / Modéle 40204, 40044, B66311-6032-WH ENSEMBLE MURAL POUR BAIGNOIRE FIXÉE AUX MONTANTS Write purchased model number here. Retain these instructions for future use. Escriba aquí el número del modelo comprado. Conserve estas instrucciones para usarlas en el futuro. Inscrivez le numéro de modèle ici. Conservez ces instructions pour consultation. 40204 B66311-6032-WH 40044 www.deltafaucet.
! REQUIREMENTS FOR SUCCESSFUL INSTALLATION KNOWLEDGE BASE: Framing Plumbing These instructions include suggestions for rough construction and plumbing installation. Local building codes vary and could supersede those suggestions. If you are not confident in your ability to perform these tasks, contract out those tasks you need help with or use a professional installer. DO NOT use drywall screws to secure flanges to wall studs. Product damage will occur and will void the warranty.
TOOLS AND MATERIALS REQUIRED • 2” x 4” lumber for additional wall studs • Lumber for bracing • Rags or padding to protect product during bracing NOTE: It is recommended to install insulation. HERRAMIENTAS Y MATERIALES NECESARIOS • Madera de 5,1 cm x 10,2 cm (2” x 4”) para montantes de pared adicionales • Madera para sostener • Trapos o almohadillas para proteger el producto durante la instalación de la madera para sostener NOTA: Se recomienda instalar el aislamiento.
ROUGHING-IN Rough plumbing and bathtub must be installed before panel installation. For masonry construction, floor and walls must be framed to accommodate plumbing and installation. Studs should be located as shown below. CONEXIÓN DE CAÑERÍAS 40204 15 3/8" (39.1 cm) Deben instalarse las cañerías y la bañera antes de instalar el panel. Para los trabajos de mampostería, el piso y las paredes deben acanalarse para dar lugar a las cañerías y la instalación.
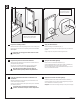
1 Tub Door Installation Only 40204 13/16" (2.06 cm) 57" (144.8 cm) 40044, B663116032-WH 2 3/16” (5.56 cm) 1 2 1/2" (6.35 cm) 1 Install Tub Door Nailers Prepare Back Panel Install an additional stud (1) on each side for tub door installation. Measure 2 1/2” (6.35 cm) from deck of tub to locate 57” (144.8 cm) stud. Position back panel as shown, leaving an even gap on both sides of back panel. IMPORTANT: Studs must be plumb and square to the floor. Inside corners must be square.
2 A. B. Back side of panel. Parte p osterior d el panel x Face arrière du panneau. x y y Drill holes from the back. 1 Haga los orificios desde atrás. Percez des trous par l’arrière. A. Prepare for Plumbing Fixtures B. Remove backing from self-adhesive pad (1). Using proper size hole saw, cut out plumbing fixture holes from back side of panel. Center pad over mixing valve hole (2) and press firmly onto back side of panel. Using a utility knife, trim pad to reveal mixing valve hole.
3 B. A. 1 2 A. 1 Prepare Side Panels B. Drill 3/16” holes at all stud locations on top flanges (1). Check that vertical side panel flanges (1) are straight and square to base. Drill 3/16” holes along side flanges (2) at five locations equal distance apart. ! A. Using a pencil, mark panel height on all wall studs. Remove panels. Drill 3/16” clearance holes into flanges only. Do not drill 3/16” holes directly into studs. Drill chuck can damage panel.
4 B. A. 1 1 2 A S A. Preparing for Back Panel B. Secure Back Panel Press back panel in place. A Apply adhesive to studs up to the pencil line (1). S Apply sealant along back of base. Secure top flanges (1) to studs with 1-1/4” panhead or roundhead screws. Do not overtighten screws, this can cause panel to crack. IMPORTANT: Gaps between flanges and studs must be less than 1/8”. Insert shims (2) to fill gaps. A. Preparación para los paneles traseros B.
5 B. A. A 1 3 2 S A. Preparing for Side Panels B. Secure Side Panels Slide the side panel into gap between wall and back panel, pressing firmly into corner and against studs. S Apply sealant along side of base and back panel. A Apply adhesive to studs. Push in and down until panel tops are even and curved area on side panel fits against back panel. Secure top (1) and side flanges (2) to studs with 1-1/4” panhead or roundhead screws. Do not overtighten screws, this can cause panel to crack.
6 7 2 S 1 Brace Wall Panels Apply Sealant Install temporary braces (1) to hold side panels tight against studs while adhesive dries. Protect surface of wall (2) where it will contact braces. S Apply sealant to all seams. Install plumbing fixtures and fittings per manufacturer’s instructions. IMPORTANT: Follow manufacturer’s instructions for adhesive dry time before removing brace. ! Check for leaks at all connections before use.
CARE AND CLEANING For regular cleaning use ONLY mild detergents or warm, soapy water. Use ONLY non-abrasive cloth or sponge. Always rinse surfaces after cleaning. Before cleaning this product with cleaning products, test a small, inconspicuous area. ! Manufacturer does not recommend the use of cleaning products that contain any of the following chemicals. Use of products containing these chemicals can cause the products to crack or discolor and will void the warranty.
LIMITED WARRANTY All All parts and finishes of the Delta® Tub Shower unit are warranted to the original consumer purchaser to be free from defects in material and workmanship for the time periods listed below. Delta recommends using a professional plumber for all installation and repair.