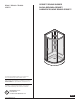
Model / Modelo / Modéle 422031 CERISE™ ROUND SHOWER DUCHA REDONDA CERISE™ CABINE DE DOUCHE RONDE CERISE™ For product and installation questions, do not return to the store. For additional help contact customer service. Para consultas sobre el producto y la instalación, no regrese a la tienda. Para obtener ayuda adicional, comuníquese con el servicio al cliente. Si vous avez des questions relatives au produit et à l’installation, ne retournez PAS au magasin.
! REQUIREMENTS FOR SUCCESSFUL INSTALLATION KNOWLEDGE BASE: Framing, Plumbing GLASS WARNING CAUTION: Risk of injury or product damage. During installation tempered glass should not come in direct contact with metal parts or it may shatter. Gaskets must always be used between glass and metal. Do not touch the edges of tempered glass with tools. Do not attempt to cut tempered glass or it will shatter. NOTICE: Tempered safety glass is stronger than normal glass but is not unbreakable.
WALL SET / CONJUNTO DE PARED / ENSEMBLE MURAL 10-24 x 3/4” 10-24 x 19 mm Screw/Tornillo/Vis (4) Washer/ Arandela/ Rondelle (8) 10-24 Hex nut/ Tuerca hexagonal/ Écrou à six pans (4) RP77616 Left Wall Panel Panel izquierdo de la pared Panneau mural gauche RP77585 Wall Set Hardware Herraje para el juego de piezas de pared Pièces de fixation du contour RP77617 Right Wall Panel Panel derecho de la pared Panneau mural droit NOTE: Enclosure and Base sold separately from Wall Set NOTA: La cabina y la base se
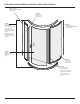
ENCLOSURE PARTS/ PIEZAS DEL RECINTO/ PIÈCES DE L’ENCEINTE RP77569 Wall Gasket (BB) Empaque para la pared (BB) Joint mural (BB) RP77640 Small Panel Panel pequeño Petit panneau RP77645 Top Track (A) Bottom Track (D) for left-hand door opening RP77569 Wall Gasket (BB) Empaque para la pared (BB) Joint mural (BB) Carril superior (A) Carril inferior (D) para abrir la puerta en el lado izquierdo Glissière supérieure (A) Glissière inférieure (D) pour ouverture de la porte à gauche RP77640 Door Glass Puerta de v
Enclosure Parts continued / PIEZAS DEL RECINTO continuado / Pièces de l’enceinte suite RP77597 Enclosure Hardware Herraje para la cabina Quincaillerie de l’enceinte Z W O Wall mount Soporte de pared Support mural (6) N Glass nut Tuerca para vidrio Écrou de vitre (6) J Left water guard Protector contra agua izquierdo Protection anti-fuite gauche (2) P Wall mount cover Cubierta para soporte de pared Cache de support mural (6) K Right water guard Protector contra agua derecho Protection anti-fuite
TOOLS AND MATERIALS REQUIRED • Lumber for additional wall studs if installing wall set; refer to wall set installation instructions NOTE: It is recommended to install insulation. HERRAMIENTAS Y MATERIALES NECESARIOS • Madera para montantes de pared si instala el juego para pared adicionales; consulte las instrucciones de instalación del juego para pared NOTA: Se recomienda instalar el aislamiento.
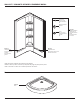
ROUGHING-IN 37 3/4" (95.89 cm) Rough plumbing and base must be installed before panel installation. For masonry construction, floor and walls must be framed to accommodate plumbing and installation. Studs should be located as shown below. 32 3/4" (83.19 cm) 29 3/4" (75.57 cm) 18 3/4" (47.63 cm) CONEXIÓN DE CAÑERÍAS Deben instalarse las cañerías y la bañera antes de instalar el panel. Para los trabajos de mampostería, el piso y las paredes deben acanalarse para dar lugar a las cañerías y la instalación.
BASE INSTALLATION / INSTALACIÓN DE LA BASE / INSTALLATION DE BASE 1 2 3/8” .95 cm Check that base is level and square. Cut drain access (maximum 5” diameter) and install 2” (5.08 cm) drain pipe. Trace outline of drain and base on floor. Corte el acceso al drenaje, un máximo de 5” (12,7 cm) de diámetro. Instale un tubo de desagüe de 2” (5,08 cm). Fíjese sin la base está nivelada y encuadrada. Trace el contorno del drenaje y el de la base en el piso y la pared.
BASE INSTALLATION / INSTALACIÓN DE LA BASE / INSTALLATION DE BASE ! 3 REQUIRED FOR PROPER INSTALLATION Entire bottom support must be in contact with a flat level surface as shown. If installation surface is not level, a mortar bed must be applied where the base will be positioned. IF THE SUBFLOOR IS NOT FLAT AND LEVEL REFER TO STEP 5 FOR INSTRUCTIONS. ! REQUERIDO PARA LA INSTALACIÓN ADECUADA Todo el soporte inferior debe estar en contacto con una superficie plana y nivelada.
BASE INSTALLATION / INSTALACIÓN DE LA BASE / INSTALLATION DE BASE 4 1 Drain Cover Cubierta del desagüe Crépine 5 1 Rubber Seal Sello de goma Garniture de caoutchouc Drain Body Cuerpo de drenaje Corps de renvoi Rubber Gasket Empaque de goma Joint en caoutchouc Paper Gasket Empaque de papel Joint en papier Nut Tuerca Écrou IF THE SUBFLOOR IS NOT FLAT AND LEVEL, a mortar bed must be applied where the base will be positioned. Disassemble drain.
BASE INSTALLATION / INSTALACIÓN DE LA BASE / INSTALLATION DE BASE 6 7 Rubber Seal flush with Pipe Sello de goma al ras con la tubería Garniture de caoutchouc au ras de l’extrémité du tuyau Place drop cloth in base and stand inside base to press it to floor when securing to wall studs. Lubricate rubber seal, pipe, and drain with diluted dish soap. Insert rubber seal and tap down until flush with drain pipe. Secure flanges to wall studs with 1 1/4” (3.175 cm) screws (panhead or roundhead, not provided).
WALL SET INSTALLATION INSTALACIÓN DEL JUEGO DE PIEZAS PARA LA PARED INSTALLATION DU CONTOUR ROUGH-IN FOR WALL SET INSTALLATION ONLY 1 X 1 1/4" (3.18 cm) X 68" (172.72 cm) Y Y 7 1/2" (19.05 cm) Install an additional stud on each side for enclosure door installation. Measure 7 1/2” (19.05 cm) from floor to locate 68” stud for enclosure door. Reveal 1 1/4” (3.18 cm) of 68” stud. Back side of panel Parte posterior del panel Endos du panneau IMPORTANT: Studs must be plumb and square to the floor.
WALL SET INSTALLATION/ INSTALACIÓN DEL JUEGO DE PIEZAS PARA LA PARED/ INSTALLATION DU CONTOUR 2 3 S S Remove any burrs on nailing flange before sealing. Dry fit the assembled panels onto base with flanges on top. APPLY SEALANT to corner of panels as shown. Check for proper alignment. Using adjustable wrench and screwdriver, secure panels with 10-24 x 3/4” screw, 10-24 hex nut and washers. S Quite cualquier rebaba en la brida de clavar antes de sellar.
WALL SET INSTALLATION/ INSTALACIÓN DEL JUEGO DE PIEZAS PARA LA PARED/ INSTALLATION DU CONTOUR 4 ! 5 Mark stud locations on top flange with pencil. Drill 3/16” clearance holes into flanges only. Do not drill 3/16” holes directly into studs. Drill chuck can damage panel. Use an extended bit holder to reduce risk of drill chuck hitting panels. Push wall to studs and use a pencil to mark panel height on all wall studs. Remove panels. Check that vertical side panel flanges are straight and square to base.
WALL SET INSTALLATION/ INSTALACIÓN DEL JUEGO DE PIEZAS PARA LA PARED/ INSTALLATION DU CONTOUR 6 7 A APPLY ADHESIVE to support boards up to pencil line. Secure top and side flanges to studs with 1-1/4” screws (panhead or roundhead, not provided). S APPLY SEALANT along base ledges. NOTE: Gaps between flanges and studs must be less than 1/8”. Insert shims to fill gaps. Install panels by pressing firmly into corners and against studs.
WALL SET INSTALLATION/ INSTALACIÓN DEL JUEGO DE PIEZAS PARA LA PARED/ INSTALLATION DU CONTOUR 8 9 S ! Braces should be placed on wall studs to prevent wall panel deflection. ! When installing drywall or greenboard, do not screw into flanges or product damage can occur. Install temporary brace to hold back panel tight against studs while adhesive sets. S APPLY SEALANT to all finished seams. Smooth bead of sealant with finger or tool to ensure a watertight seal.
ENCLOSURE INSTALLATION/ INSTALACIÓN DEL CERRAMIENTO/ INSTALLATION DE L’ENCEINTE 1 2 D RIGHT HAND Door Opening Bottom Track Carril inferior para la apertura de la puerta DE MANO DERECHA Puerta Glissière inférieure pour ouverture À DROITE de la porte A LEFT-HAND Door Opening Bottom Track Carril inferior para la apertura de la puerta de MANO IZQUIERDA Glissière inférieure pour ouverture À GAUCHE de la porte Determine door orientation - Door opens to the left or to the right.
ENCLOSURE INSTALLATION/ INSTALACIÓN DEL CERRAMIENTO/ INSTALLATION DE L’ENCEINTE 3 4 BB Q O Z N Q BB Install three sets of wall mounting hardware on each glass panel. Using the hex key included with the hardware. Install wall gasket (BB) onto glass panels. Make sure the bottom of the wall gaskets are tight up against the panel gaskets. the flap on the gasket should be on the inside of the shower.
ENCLOSURE INSTALLATION/ INSTALACIÓN DEL CERRAMIENTO/ INSTALLATION DE L’ENCEINTE 5 6 M Y P Dry fit panels. Verify both ends of the upper tracks are tight against walls. Insert glass panels into slots in lower track. Drill pilot holes using a 3/16” drill bit. Install upper track onto both panels. Secure all six wall mounts to wall set using #14 x 2” screws (Y). Verify ends of upper track are tight against wall. Snap wall mount covers (P) onto wall mount brackets.
ENCLOSURE INSTALLATION/ INSTALACIÓN DEL CERRAMIENTO/ INSTALLATION DE L’ENCEINTE 8 7 J K W Secure upper track by nstalling five #6 x ½” self-drilling screws (W) into upper track using a drill with magnetic bit holder and Phillips bit. LEFT PANEL: Insert plastic water guard (J) into upper and lower tracks, snapping into position. RIGHT PANEL: Insert plastic water guard (K) into upper and lower tracks, snapping into position.
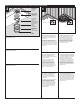
ENCLOSURE INSTALLATION/ INSTALACIÓN DEL CERRAMIENTO/ INSTALLATION DE L’ENCEINTE 9 10 INSIDE VIEW VISTA INTERIOR VUE DE L’INTÉRIEUR EXISTING CAULK BEAD EXISTING CAULK BEAD B C Insert door gasket (B) on the small glass panel. Insert door gasket (C) on large glass panel. ! S ! S ! S Silicone or acrylic latex sealant is not recommended. Use an advanced kitchen and bath polymer sealant for best results. Follow sealant directions for cure time. APPLY SEALANT as shown in Step 9.
ENCLOSURE INSTALLATION/ INSTALACIÓN DEL CERRAMIENTO/ INSTALLATION DE L’ENCEINTE 11 12 L AA R S L Install two door stops into LOWER track with M3.5 x 13mm screws (AA). Install top rollers on to top of door by threading screw into back of roller. Install bottom rollers on to bottom of door by threading screw into back of roller. Install two door stops into UPPER track with M3.5 x 13mm screws (AA).
ENCLOSURE INSTALLATION/ INSTALACIÓN DEL CERRAMIENTO/ INSTALLATION DE L’ENCEINTE 14 13 1 1 Hang door on upper track. Push bottom rollers into track. CAUTION: Two people may be required. Presione los rodamientos inferiores en el carril. Cuelgue la puerta en el carril superior. ADVERTENCIA: se pueden requerir dos personas. Suspendez la porte sur la glissière supérieure. Poussez les galets inférieurs dans la glissière. ATTENTION : Ce produit devrait être installé par deux personnes. 23 79657 Rev.
ENCLOSURE INSTALLATION/ INSTALACIÓN DEL CERRAMIENTO/ INSTALLATION DE L’ENCEINTE 16 15 F E U X T Install door handle as shown. If there is any looseness in rollers or they are not staying in track during opening and closing, adjust both top and bottom rollers by turning pin clockwise with a small philips screwdriver. Use provided caps to cover door handle screws.
ENCLOSURE INSTALLATION/ INSTALACIÓN DEL CERRAMIENTO/ INSTALLATION DE L’ENCEINTE 17 C Door Puerta Porte Interior view of enclosure Vista interior de la cabina Vue de l’intérieur de l’enceinte Insert one overlap gasket (C) on side of door opposite handle. NOTE: Open door before installing overlap gasket on panel. The two panels should meet and “overlap” when door is fully closed, sealing the seam. Inserte una junta de solapamiento (C) en el lado de la manija de la puerta opuesta.
CARE AND CLEANING For regular cleaning use ONLY mild detergents or warm, soapy water. Use ONLY non-abrasive cloth or sponge. Always rinse surfaces after cleaning. Before cleaning this product with cleaning products, test a small, inconspicuous area. ! Manufacturer does not recommend the use of cleaning products that contain any of the following chemicals. Use of products containing these chemicals can cause the products to crack or discolor and will void the warranty.
LIMITED WARRANTY All parts and finishes of the Delta® Tub Shower unit are warranted to the original consumer purchaser to be free from defects in material and workmanship for the time periods listed below. Delta recommends using a professional plumber for all installation and repair.
79657 Rev.