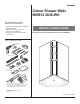
Pg. 7 Español Corner Shower Walls B69912-3838-WH For easy installation of your shower unit you will need to: • R EAD ALL the instructions completely before beginning. • READ ALL warnings, care, and maintenance information. • Purchase the correct water supply components. INSTALLATION GUIDE Consult your local plumbing codes prior to installation.
LIMITED WARRANTY Shower Walls Limited Warranty All parts and finishes of the Delta® shower unit are warranted to the original consumer purchaser to be free from defects in material and workmanship for the time periods listed below. Delta recommends using a professional plumber for all installation and repair.
CARE AND CLEANING We recommend that you clean your bathing product with mild detergents. Use a terry cloth towel, soft cloth, or sponge. Avoid using abrasive scrubbing pads, steel wool, or sponges. After cleaning, rinse thoroughly with water. Before cleaning this product with cleaning products, test a small, inconspicuous area. NOTICE: When using drain cleaner or clog remover, rinse thoroughly with water. NOTICE: Certain chemicals and cleaners mat\y deteriorate the product surface, causing cracks and, poten
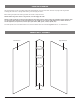
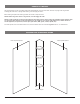
1 2 Finished sealant bead Verify shower location is level, plumb, and square. Check dimensions of existing base/floor to ensure proper fit of shower walls. Sealant applied before panel Install moisture resistant drywall. Leave a 1/8" to 1/4" gap between the drywall and shower base. NOTICE: Failure to leave a gap between the drywall and base could lead to drywall water damage. NOTE: Place cardboard in shower base to protect surface while installing shower walls. 3 4 Dry fit shower walls.
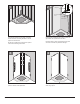
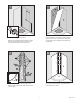
6 Measure location for plumbing fixtures. Trowel adhesive onto the drywall. Only apply adhesive for one panel at a time. Install first panel. Press firmly on wall panel to ensure complete contact. Repeat for second panel. Measure and mark plumbing fixture locations on back of shower wall. Using proper size hole saw, cut out plumbing fixture holes from back side of panel. 7 8 2 2 1 3 3 Vertical beads Apply beads of adhesive to the corner panel, then trowel out.
9 Apply sealant to all finished edges. Wait 24 hours before using. Sealant Cleanup NOTICE: Certain chemicals and cleaners may deteriorate product surfaces, causing cracks and, potentially, property damage. After application/ installation, clean up the product surface and remove any excess sealant with denatured alcohol only. Do not use solvents (turpentine, lacquer thinner, mineral spirits, paint thinner, MEK, xylene, acetone, naphtha, etc.). 93967 Rev.
Paredes de regaderas de esquina B69912-3838-WH Para instalar fácilmente la unidad de ducha Delta necesitará lo siguiente: • LEER TODAS las instrucciones completamente antes de empezar. • LEER TODOS los avisos, cuidados, e información de mantenimiento. • Comprar las conexiones correctas para el suministro de agua. GUÍA DE INSTALACIÓN Consulte los códigos/normas locales de plomería antes de realizar la instalación.
GARANTÍA LIMITADA Garantía limitada de paredes para ducha Toutes les pièces et finitions des douches Delta® acryliques avec technologie Innovex® sont garanties au client acheteur d’origine comme étant exemptes de défauts de matériel et de fabrication pendant les périodes indiquées ci-dessous. Delta recommande l’emploi d’un plombier professionnel pour toute installation ou réparation.
CUIDADO Y LIMPIEZA We recommend that you clean your bathing product with mild detergents. Use a terry cloth towel, soft cloth, or sponge. Avoid using abrasive scrubbing pads, steel wool, or sponges. After cleaning, rinse thoroughly with water. Before cleaning this product with cleaning products, test a small, inconspicuous area. NOTICE: When using drain cleaner or clog remover, rinse thoroughly with water. NOTICE: Certain chemicals and cleaners mat\y deteriorate the product surface, causing cracks and, pote
1 2 Finished sealant bead Sealant applied before panel Instale los paneles de yeso. Deje un espacio de 1/8" a 1/4" entre los paneles de yeso y la base de la regadera. Verifique que la ubicación para la ducha esté a plomo, a nivel y a escuadra. Verifique las dimensiones de la base/suelo existentes para asegurar el calce adecuado de las paredes de la ducha. AVISO: el no dejar el espacio entre los paneles de yeso y la base puede conducir a daños de agua en el panel de yeso.
5 6 Mida la ubicación para los ensambles de plomería. Coloque el adhesivo sobre la pared de yeso. Aplique adhesivo solamente en un panel a la vez. Instale el primer panel. Presione firmemente el panel de pared para asegurar un contacto completo. Repita con el segundo panel. Mida y marque la ubicación los ensambles de plomería en la parte posterior de la pared para ducha. Utilice el tamaño adecuado del orificio de la sierra, corte los orificios del ensamble de plomería desde la parte lateral del panel.
9 Aplique sellador en todos los bordes terminados. Espere 24 horas antes de usar. Limpieza del sellador AVISO: Ciertos productos químicos y productos de limpieza pueden deteriorar las superficies del producto, causando grietas y potencialmente daños materiales. Después de la aplicación/ instalación, limpie la superficie del producto y elimine el exceso de sellador sólo con alcohol desnaturalizado.
Model / Modelo CORNER SHOWER BASE BASE PARA DUCHA DE ESQUINA Write purchased model number here. Retain these instructions for future use. Escriba aquí el número del modelo comprado. Conserve estas instrucciones para usarlas en el futuro. B79912-3838-WH B711912-3838-WH ? For product and installation questions, do not return to the store. For additional help contact customer service. Para consultas sobre el producto y la instalación, no regrese a la tienda.
REQUIREMENTS FOR SUCCESSFUL INSTALLATION REQUISITOS PARA UNA INSTALACIÓN CORRECTA KNOWLEDGE BASE: Framing Plumbing These instructions include suggestions for rough construction and plumbing installation. Local building codes vary and could supersede those suggestions. If you are not confident in your ability to perform these tasks, contract out those tasks you need help with or use a professional installer. DO NOT use drywall screws to secure flanges to wall studs.
ROUGHING-IN TUBERÍA INTERNA 38 1/4" min (97.16 cm) • Rough plumbing must be installed before base installation. • Minimum stud pocket sizes are shown below. • Drain cutout 5” diameter max. Right side plumbing rough-in shown. • For masonry construction, floor and walls must be framed to accommodate plumbing and installation. A IMPORTANT: IF INSTALLING MATCHING ENCLOSURE, refer to Enclosure Installation Manual for specific lumber sizes and placement.
4 3 AVISO NOTICE NO corte el RIEL SUPERIOR del mismo largo que el RIEL INFERIOR. DO NOT cut the TOP TRACK the same length as the BOTTOM TRACK. 1 NOTICE For optimal water retention, water dam installation and/or proper caulking of this enclosure is necessary. Follow all steps as per sealant manufacturer’s instructions. AVISO Para una retención óptima del agua, la instalación de la lengüeta para la retención del agua y/o el calafateo de este recinto es necesario.
5 6 A 5” (12.7 cm) A. Flat and Level Floor Aplane y nivele el piso B. Uneven Floor Piso desnivelado 1 1/2” (1.3 cm) 2 A. If subfloor is flat and level, and mortar was not used, apply adhesive A on floor using 1/4" square-notched trowel, staying within pencil line (1). Proceed to step 7. Ensure that the waste pipe is properly located to align with the drain assembly (not included). Subfloor maximum diameter opening should be 5". The drain pipe should be 1/2” above the subfloor. B.
7 8 Shim 1 It is recommended not to stand in base while securing to wall. Set base in corner and press it into adhesive. Finish installing drain per manufacturer's instructions. 2 Secure flanges to all studs with 1 1/2” panhead or roundhead screws through previously drilled holes. 3 NOTE: Gaps between flanges and studs must be less than 1/8”. Insert shims to fill gaps if needed. Termine la instalación del desagüe de acuerdo con las instrucciones del fabricante.
CARE AND CLEANING 9 We recommend that you clean your acrylic bathing product with mild detergents. Use a terry cloth towel, soft cloth or sponge. Avoid using abrasive scrubbing pads, steel wool or sponges. After cleaning, rinse thoroughly with water. NOTICE When using drain cleaner or clog remover, rinse thoroughly with water. NOTICE Certain chemicals and cleaners may deteriorate the product surface, causing cracks and potentially, property damage.
Limited Warranty on Bathing Products What You Must Do To Obtain Warranty Service or Replacement Parts. A warranty claim may be made and replacement parts may be obtained by calling 1 800 355 2721 or by writing to: In the United States and Mexico: In Canada: Delta Faucet Company Masco Canada Limited, Plumbing Group Product Service Technical Service Centre 55 E. 111th Street 350 South Edgeware Road Indianapolis, IN 46280 St. Thomas, Ontario, Canada N5P 4L1 customerservice@deltafaucet.
102665 N B T RP100506 MODEL/MODELO/MODÈLE B911912-3838-PC Wall Jamb and Profile Jamba de pared y perfil Jambage mural et profil O Q Q R RP100508 Gaskets Empaquetadora Joints S Glass Door M Glass Panel Puerta de vidrio Porte en verre Panele de vidrio Panneaux de verre Base sold separately. La base se vende por separado Base vendu séparément.
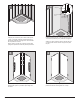
STUD LAYOUT FOR TILE/ DISPOSICIÓN DE PERNOS PARA AZULEJO/ MISE EN PAGE DE TUILES BEFORE YOU START / ANTES DE COMMENZAR / AVENT DE COMMENCER ! CAUTION: GLASS WARNING, TO AVOID RISK OF PERSONAL INJURY, PROPERTY OR PRODUCT DAMAGE: 37 1/2” (953 mm) During installation tempered glass should not come in direct contact with metal parts or it may shatter. Gaskets must always be used between glass and metal, Do not touch the edges of tempered glass with tools.
WALL JAMB INSTALLATION/ INSTALACIÓN DE JAMBA DE PARED/ INSTALLATION DE JAMBON MURAL 2 1 1 A B Template Edge Borde de la plantilla Bord du gabarit 3 2 ! CAUTION Wear safety glasses when drilling or cutting to avoid injury to the eyes. ! PRECAUCIÓN ! ATTENTION Verify that the shower base is level, the walls are plumb, and the corner is square. TIP: Place cardboard in the shower base to protect the surface while installing the shower enclosure. Fold the install template [A] as shown.
ENCLOSURE INSTALLATION / INSTALACIÓN DEL CERRAMIENTO / INSTALLATION DE L’ENCEINTE ! CAUTION Door installation requires at least two people to avoid risk of injury or product damage. ! PRECAUCIÓN ! ATTENTION 1 2 3 La instalación de la puerta requiere por lo menos dos personas para evitar riesgo de lesiones o daños al producto. N Pour éviter tout risque de blessures ou d'endommagement du produit, installez la porte avec l'aide d'au moins une autre personne. ! 1 5/16" (32.
ENCLOSURE INSTALLATION / INSTALACIÓN DEL CERRAMIENTO / INSTALLATION DE L’ENCEINTE 7 8 E E U G T F ! CAUTION Door installation requires at least two people to avoid risk of injury or product damage. PRECAUCIÓN ! La instalación de la puerta requiere por lo menos dos personas para evitar riesgo de lesiones o daños al producto. Repeat step 5-step 6 for another track [U]. Slide profile down to line up holes with track [U] as needed. Install the other profile [T] and tighten (4) screws [E].
ENCLOSURE INSTALLATION / INSTALACIÓN DEL CERRAMIENTO / INSTALLATION DE L’ENCEINTE ! CAUTION Door installation requires at least two people to avoid risk of injury or product damage. ! PRECAUCIÓN ! ATTENTION 10 11 12 1 La instalación de la puerta requiere por lo menos dos personas para evitar riesgo de lesiones o daños al producto. Pour éviter tout risque de blessures ou d'endommagement du produit, installez la porte avec l'aide d'au moins une autre personne.
ENCLOSURE INSTALLATION / INSTALACIÓN DEL CERRAMIENTO / INSTALLATION DE L’ENCEINTE NOTIC 15 The panel gasket should contact top surface of bottom track. 16 AVISO Profile Perfil Profil La junta del panel debe contactar la superficie superior de la pista inferior. AVIS R Panel Panel Panneau Q Le joint du panneau doit contacter la surface supérieure du rail inférieur.
CARE AND CLEANING For regular cleaning use ONLY mild detergents or warm, soapy water. Use ONLY non-abrasive cloth or sponge. Always rinse surfaces after cleaning. Before cleaning this product with cleaning products, test a small, inconspicuous area. Manufacturer does not recommend the use of cleaning products that contain any of the following chemicals. Use of products containing these chemicals can cause the products to crack or discolor and will void the warranty.