(Model D2400H) PART NO. D28609 Rev. 0 Copyright © 2003 Delta Machinery To learn more about DELTA MACHINERY visit our website at: www.deltamachinery.com.
SAFETY GUIDELINES - DEFINITIONS This manual contains information that is important for you to know and understand. This information relates to protecting YOUR SAFETY and PREVENTING EQUIPMENT PROBLEMS. To help you recognize this information, we use the symbols below. Please read the manual and pay attention to these symbols. Indicates an imminently hazardous situation which, if not avoided, will result in death or serious injury.
IMPORTANT SAFETY INSTRUCTIONS Read Operation Manual. Do not operate equipment until you have read Operation Manual for Safety, Assembly, Operation, and Maintenance Instructions. READ AND SAVE THESE INSTRUCTIONS HAZARD RISK OF EXPLOSION OR FIRE HOW TO PREVENT IT WHAT CAN HAPPEN • Spilled gasoline and it’s vapors can become ignited from cigarette sparks, electrical arcing, exhaust gases, and hot engine components such as the muffler. • Shut off engine and allow it to cool before adding fuel to the tank.
HAZARD RISK OF INJURY OR PROPERTY DAMAGE WHEN TRANSPORTING OR STORING WHAT CAN HAPPEN HOW TO PREVENT IT • Fuel or oil can leak or spill and could result in fire or breathing hazard, serious injury or death can result. Fuel or oil leaks will damage carpet, paint or other surfaces in vehicles or trailers. • If pressure washer is equipped with a fuel shut-off valve, turn the valve to the off position before transporting to avoid fuel leaks.
HAZARD RISK OF UNSAFE OPERATION WHAT CAN HAPPEN HOW TO PREVENT IT • Unsafe operation of your pressure washer could lead to serious injury or death to you or others. • Do not use chlorine bleach or any other corrosive compound. • Become familiar with the operation and controls of the pressure washer. • Keep operating area clear of all persons, pets, and obstacles. • Do not operate the product when fatigued or under the influence of alcohol or drugs. Stay alert at all times.
HAZARD RISK OF INJURY FROM SPRAY WHAT CAN HAPPEN HOW TO PREVENT IT • Always wear ANSI approved Z87 safety glasses.Wear protective clothing to protect against accidental spraying. • Never point spray wand at, or spray people or animals. • Always secure trigger lock when spray wand is not in service to prevent accidental operation. • Never permanently secure trigger in pull back (open) position. • High velocity fluid spray can cause objects to break, propelling particles at high speed.
CARTON CONTENTS Note: Photographs and line drawings used in this manual are for reference only and do not represent a specific model.
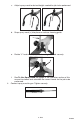
ASSEMBLY INSTRUCTIONS 1. Place handle assembly onto frame and connect handle to frame. 2. Attach high pressure hose to gun. Tighten securely. 3. To Assemble "Water Vroom" surface cleaning guide. NOTE: If not using the "Water Vroom" surface cleaning guide proceed to step 4. a. Loosen knob (a) and rotate "J" hook (b) down and out of the way. a b b. Slide spray wand (c) through opening in surface cleaning guide. IMPORTANT: Make sure nozzle is removed before assembling surface cleaning guide.
c. Adjust spray wand to desired height needed for job to be performed. d. Snap spray wand (c) into place on surface cleaning guide. c e. Rotate "J" hook over spray wand and tighten knob securely. b a f. 4. See To Use Spray Wand paragraph in the Operation section of this manual to choose and assemble the correct nozzle for the job to be performed. Connect spray wand to gun. Tighten securely.
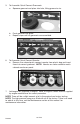
5. To Assemble Quick Connect Grommets: a. Squeeze grommet and place into hole, fitting groove to rim. b. c. 6. Push grommet into place. Repeat steps until all grommets are assembled. To Assemble Quick Connect Nozzles: a. Remove five colored quick connect nozzles from plastic bag and insert them into correct grommet. NOTE: Nozzles are color coded to match colored nozzles on panel. 7. Add engine oil (supplied) to engine.
OPERATING INSTRUCTIONS READ THIS OWNER’S MANUAL AND SAFETY RULES BEFORE OPERATING YOUR UNIT. Compare the illustrations with your unit to familiarize yourself with the location of various controls and adjustments. Save this manual for future reference. Quick Connect Nozzles Engine Quick Connect Spray Wand Spray Gun High Pressure Hose High Pressure Pump Surface Cleaning Guide BASIC ELEMENTS OF A PRESSURE WASHER High Pressure Pump: Increases the pressure of the water supply.
BASIC ELEMENTS OF ENGINE Refer to the engine manual for location and operation of engine controls. Choke Control: Opens and closes carburetor choke valve Starter Grip: Pulling starter grip operates recoil starter to crank engine. Engine Switch: Enables and disables ignition system. PRESSURE WASHER TERMINOLOGY PSI: Pounds per Square Inch. The unit of measure for water pressure. Also used for air pressure, hydraulic pressure, etc. GPM: Gallons Per Minute. The unit of measure for the flow rate of water.
TO USE SPRAY WAND Your pressure washer is equipped with five spray nozzles. Each nozzle is color coded and delivers a specific spray pattern for a particular cleaning purpose. The size of the nozzle determines the size of the fan spray and the pressure out of the nozzle. The 0º, 15º, 25º, and 40º nozzles are high pressure nozzles. The chemical nozzle is a low pressure nozzle. The nozzles are housed in receptacles on the panel of the pressure washer handle.
HOW TO APPLY CHEMICALS AND CLEANING SOLVENTS Applying chemicals or cleaning solvents is a low pressure operation. NOTE: Use only soaps and chemicals designed for pressure washer use. Do not use bleach. To Apply chemicals: 1. Press chemical hose onto barbed fitting located near high pressure hose connection of pump as shown. Barb fitting 2. Place other end of chemical hose with filter on it into container holding chemical/cleaning solution.
STARTING Prior to starting, refer to your engine manual for proper starting procedures for your engine type. 1. In a well ventilated outdoor area add fresh, high quality, unleaded gasoline with a pump octane rating of 86 or higher. Do not overfill. Wipe up spilled fuel before starting the engine. Refer to Engine Owners Manual for correct procedure. 2. Check engine oil level. See Engine Owners Manual for correct procedure. NOTE: There will be a slight amount of oil in the engine from factory testing. 3.
MAINTENANCE When performing maintenance, you may be exposed to hot surfaces, water pressure, or moving parts that can cause serious injury or death! Before performing any maintenance or repair, disconnect spark plug wire, let engine cool and release all water pressure. The engine contains flammable fuel. DO NOT smoke or work near open flames while performing maintenance. To ensure efficient operation and longer life of your pressure washer, a routine maintenance schedule should be prepared and followed.
HOW TO CLEAN THE WATER INLET FILTER This screen filter should be checked periodically and cleaned if necessary. 1. 2. Remove filter by grasping end and removing it from water inlet of pump as shown. Filter Screen Clean filter by flushing it with water on both sides. 3. Re-insert filter into water inlet of pump. NOTE: Cone side faces out. NOTE: Do not operate pressure washer without filter properly installed.
STORAGE ENGINE Consult the Engine Owners Manual for the manufacturer's recommendations for storage. PUMP 1. Drain all water from high pressure hose, coil it, and store it in cradle of the pressure washer handle. 2. Drain all water from spray gun and spray wand by holding spray gun in a vertical position with nozzle end pointing down and squeezing trigger. Store in gun/hose holder. 3.
TROUBLE SHOOTING GUIDE PROBLEM Engine will not start (see Engine Manual for further engine troubleshooting) No or low pressure (initial use) CAUSE CORRECTION No fuel. Add Fuel. Pressure builds up after two pulls on the recoil starter or after initial use. Squeeze gun trigger to relieve pressure. Choke lever in the “No Choke” position. Move choke to the “Choke” position. Spark plug wire not attached. Attach spark plug wire.
PROBLEM Will not draw chemicals No or low pressure (after period of normal use) CAUSE CORRECTION Spray wand not in low pressure. See How to Use Spray Wand paragraph in the Operation Section. Chemical filter clogged. Clean filter. Chemical screen not in chemical Ensure end of chemical hose is fully submerged into chemical. Chemical too thick. Dilute chemical. Chemical should be the same consistency as water. Pressure hose is too long Lengthen water supply hose instead of high pressure hose.
NOTES 21- ENG D28609
WARRANTY DELTA MACHINERY warrants to the original purchaser that all products covered under this warranty are free from defects in material and workmanship. Products covered under this warranty include air compressors, air tools, service parts, pressure washers, and generators, which have the following warranty periods: 3 YEARS - Limited warranty on 2-stage oil-free air compressor pumps that operate at 1725 RPM. 2 YEARS - Limited warranty on oil-lubricated air compressor pumps.