
Installation Instructions
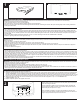


1. Drill 5/8-inch hole into wallboard on non-stud side
only . Insert the #10-24 x 3-inch machine screw
supplied with the anchor through the shelf bracket and
into the butterfly anchor.
2. While holding the butterfly anchor and the shelf
bracket, slide the anchor through the drilled hole until
the wings open. Tighten the #10-24 x 3-inch machine
screw until the shelf bracket is flush with the wall.
3. Fasten and tighten shelf bracket to anchor and studs.
Then place shelf on top and align pegs with the holes.
Press firmly to snap shelf into place.
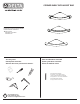
Butterfly Anchor
5/8”
BUTTERFLY ANCHOR
#10-24 x 3-inch machine screw
Shelf bracket
Ancrage Papillon
Anclaje de Mariposa
ANCHOR INSTRUCTIONS FOR
NON-STUD MOUNT
INSTRUCTIONS D'ANCRAGE POUR
SANS POTEAU
INSTRUCCIONES DE ANCLAJE PARA
MONTAJE SIN MONTANTE
1. Percez un trou de 5/8 po dans le panneau mural
uniquement à l'écart des montants de cloison. Insérez la
vis à métaux n°10-24 x 3 po fournie avec l'ancrage à
travers le support de tablette puis dans l'ancrage papillon.
1. Perfore un agujero de 5/8" en el panel de pared,
solamente en el lado sin montante. Inserte el tornillo para
metales #10-24 de 3 pulgadas proporcionado con el anclaje
por el soporte del estante y en el anclaje de mariposa.
2. Tout en maintenant l'ancrage papillon et le support de
tablette, faites glisser l'ancrage à travers le trou percé
jusqu'à ce que les ailes s'ouvrent. Serrez la vis à métaux
n°10-24 x 3 po jusqu'à ce que le support de tablette soit
à fleur du mur.
2. Mientras sostiene el anclaje de mariposa y el soporte del
estante, deslice el anclaje por el agujero perforado hasta que
las aletas se abran. Apriete el tornillo para metales #10-24 de
3 pulgadas hasta que el soporte del estante quede a ras con
la pared.
3. Fixez et resserrez le support pour tablette aux points
d'ancrage et aux montants. Puis placez la tablette sur le
dessus et alignez les crochets avec les trous. Appuyez
fermement sur la tablette pour bien l'enclencher.
3. Asegura y aprieta el soporte del estante al anclaje y los
barrotes. Luego, coloca el estante en la parte superior y alinea
las clavijas con los orificios. Presiona firmemente para encajar
el estante en su lugar.
Tornillo para metales #10-24 de 3 pulgadas
ANCLAJE DE MARIPOSA
DIÁMETRO DE 5/8"
Soporte del estante
Vis à métaux n°10-24 x 3 po
ANCRAGE PAPILLON
DIAMÈTRE 5/8 PO
Support de tablette
3
.
CAUTION AND SAFETY WARNINGS:
• DO NOT install this product without first reading and understanding this instruction sheet. If you are unable to understand these Warnings and Instructions,contact a professional or technical personnel for assistance before
attempting to install this product - otherwise, injury may occur.
• After ANY adjustments, repair or service and BEFORE use, make sure that all attaching hardware is tightened securely.
• Assist Bars add security for bath and commode areas if attached as instructed. Location, size, and angle of bars should be determined by a qualified professional to provide optimum safety and function.
• Use EXTREME caution on wet tub or floor surfaces.
• Users with limited physical capabilities should be supervised or assisted in bath and commode areas, even when using Assist Bars.
• This Assist Bar can provide support and increased stability for an individual weighing up to 500 pounds. Assist Bars are NOT designed to support the total weight of an individual. Use the bar for assistance ONLY.
• Be sure Assist Bars are correctly and securely installed. NEVER use Assist Bars if any looseness is noted.
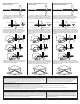
GRAB BAR MAY NOT PROVIDE DESIGNED AMOUNT OF SUPPORT UNLESS THESE INSTALLATION INSTRUCTIONS ARE STRICTLY
FOLLOWED. For proper installation, at least one end of Grab Bar MUST be positioned over a wall stud. For solid support, at least two (2) of
the three (3) screws on the end of the Grab Bar MUST go through the wallboard or tile and be tightly secured into the wall stud. Given
standard stud sizes, only two (2) of the three (3) screws may screw into the wall stud. Grab Bar may be installed vertically, horizontally or at
an angle, so long as at least two (2) of the three (3) mounting screws on one end of the Grab Bar are secured into a wall stud (see Figure 1).
Locate the wall stud(s) behind the wall before beginning installation (a stud finder can be obtained from a hardware store).
THE FOLLOWING STEPS REQUIRE DRILLING INTO THE WALL. When drilling into the wall,
exercise care to avoid any electrical wiring or plumbing that may be located behind the wall. Damaged
electrical wiring can cause electrical shock and/or fire. Since older homes do not always fall in line with
current housing codes and requirements, know where internal wall wiring is located so that no wires
will interfere with your installation. PROPER INSTALLATION IS EXTREMELY IMPORTANT.
IF IN DOUBT, INSTALLATION SHOULD BE DONE BY A QUALIFIED PROFESSIONAL.
WARNING
LA BARRE D'APPUI POUR RÉSIDENCE POURRAIT NE PAS FOURNIR LE SOUTIEN POUR LEQUEL ELLE A ÉTÉ CONÇUE SI CES
INSTRUCTIONS D'INSTALLATION NE SONT PAS STRICTEMENT SUIVIES. Pour une installation correcte, au moins une des extrémités
de la barre d'assistance DOIT être positionnée sur un poteau d'ossature murale. Pour un appui solide, au moins deux (2) des trois (3) vis à
l'extrémité de la barre d'appui DOIVENT passer au travers du panneau mural ou des carreaux et être solidement fixé au montant de cloison.
Étant donné la taille normale des montants, seulement deux (2) des trois (3) vis peuvent être vissées sur le montant mural. La barre d'appui
peut être installée verticalement, horizontalement ou obliquement, tant qu'au moins deux (2) des trois (3) vis de montage d'une extrémité
de la barre d'appui sont fixées dans un poteau d'ossature murale (Fig. 1). Localisez les montants de cloison avant de commencer
l'installation (vous pouvez acheter un localisateur de montant dans une quincaillerie).
LES ÉTAPES SUIVANTES NÉCESSITENT DE PERCER DES TROU DANS LE MUR. Lorsque
vous percez le mur, faites attention d'éviter tout conduit électrique ou plomberie qui pourraient se
trouver derrière le mur. Des fils électriques endommagés peuvent provoquer un choc électrique
et/ou un incendie Puisque les maisons anciennes ne respectent pas toujours les exigences et les
codes d'habitation actuels, sachez où passent les fils électriques à l'intérieur du mur de sorte qu'ils
n'interfèrent pas avec votre installation. UNE INSTALLATION CORRECTE EST EXTRÊMEMENT
IMPORTANTE. SI VOUS AVEZ DES DOUTES, L'INSTALLATION DEVRAIT ÊTRE FAITE PAR
UN PROFESSIONNEL QUALIFIÉ.
ATTENTION