
Installation Instructions and Owners Manual

10/20/11
6302 Rev. A
ADA Wall Grab Bar
and Hand Shower System
Installation Instructions
1 - Wall Grab Bar with adjustable
ADA Slide Mechanism
1 - 60” UltraFlex
®
Hose or 69”
Double Spiral Hose
1 - Set of Mounting Hardware
Six (6) #10 x 2-1/2” Wood Screws
Parts and Hardware included:
2
1
3
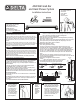
Install
Mount/Slide
Bracket.
Reference
Mount/Slide
Bracket
instruction
installation
(separate
sheet).
• Slot-headed screwdriver
• electric drill
• 5/32” drill bit
• Soft cloth
• Wrench or pliers
Tools Needed for Installation:
WARNING
Prior to snapping the
two cover flanges in
place, make certain
the Wall Grab Bar
is installed securely.
Then snap the two
cover flanges into
place, pressing tightly
so the three catches
on each wall flange
lock into position.
4
For installation with an existing
shower head, remove the shower
head by turning counter-clockwise
with adjustable wrench or pliers.
Be careful not to unscrew the
shower arm - hold the shower arm
secure while unscrewing the shower
head. Note: If the existing shower
arm has an integral ball connector,
replace it with a standard, 1/2”
threaded shower arm.
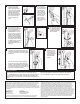
Side View
Vertical Mount
Wood
Screw
Wallboard
Grab
Bar
Wood Wall Stud
Wallboard
Top
Wood
Screw
Bottom
Wood Screw
Located Below
Top Wood Screw
In Wall Stud
Grab
Bar
Top View
Horizontal Mount
GRAB BAR MAY NOT PROVIDE DESIGNED AMOUNT OF SUPPORT UNLESS THESE
INSTALLATION INSTRUCTIONS ARE STRICTLY FOLLOWED.
For proper installation, both ends of Grab Bar MUST be installed into a wood stud.
For solid support, at least two (2) of the three (3) screws on each end of the Grab Bar
MUST go through the wallboard or tile and be tightly secured into the wood stud.
Given standard stud sizes, only two (2) of the three (3) screws may screw into the
wood stud.
Grab Bar may be installed vertically, horizontally or at an angle, so long as at least
two (2) of the three (3) mounting screws on each end of the Grab Bar are secured into
a wood stud. Locate the wood studs behind the wall before beginning installation
(a stud finder can be obtained from a hardware store).
WARNING
THE FOLLOWING STEPS REQUIRE DRILLING INTO THE WALL.
When drilling into the wall, exercise care to avoid any electrical wiring or plumbing
that may be located behind the wall. Damaged electrical wiring can cause electrical
shock and/or fire. Since older homes do not always fall in line with current housing
codes and requirements, know where internal wall wiring is located so that no wires
will interfere with your installation.
PROPER INSTALLATION IS EXTREMELY IMPORTANT. IF IN DOUBT, INSTALLATION
SHOULD BE DONE BY A QUALIFIED PROFESSIONAL.
USING GRAB BAR:
1.
Read, understand and follow the information in the SAFETY WARNINGS
section of this instruction sheet.
Alsons Corporation shall have no
liability for any damage or injury caused by improper installation or use
of this Grab Bar.
2. Grasp the Grab Bar when exiting or entering the bathtub or shower.
3. Use EXTREME caution on wet tub or floor surfaces.
4. DO NOT put entire weight on Grab Bar. Grab Bar is rated for persons
weighing up to 300 pounds when properly installed.
5. DO NOT stand, sit or step on Grab Bar. DO NOT use Grab Bar as a step or
platform to reach area above the tub. Use the bar for assistance ONLY.
CARE AND MAINTENANCE:
1. Use of mild soap and water or a non-abrasive cleaner is recommended
for cleaning.
2. Periodically inspect the Grab Bar for damage or looseness. DO NOT use
if any damage or looseness exists. Contact your authorized dealer for
assistance.
3.
SAVE THESE INSTRUCTIONS FOR FUTURE REFERENCE.
BEFORE INSTALLING GRAB BAR:
1. Remove the Grab Bar and parts from the package. If concealed mount Grab
Bar is used, move cover plates away from mounting holes.
2. Determine where you want to install Grab Bar.
3. Place Grab Bar on wall at desired position. If mounting horizontally or vertically,
check that the Grab Bar is level.
4. With a pencil, mark the centers of the mounting hole positions on one end. These
are the points where you will later drill pilot holes for putting in the screws.
5. Repeat Step 4 for the other end of the Grab Bar.
TO INSTALL INTO WOOD WALL STUDS:
6. Put on safety glasses before starting.
7. Use the 3/8” power drill and 5/32” drill bit to drill all holes into the wall
and wood wall studs at the marked positions.
NOTE: If installing Grab Bar over
ceramic tiles, the 1/4” carbide tip drill bit will be needed for drilling through
the tile, in order to prevent damage to the tiles. Drill pilot holes through the tiles
by using a 1/4” carbide tip drill bit. Once a hole has been drilled through the
ceramic tiles, use the 5/32” drill bit to drill a pilot hole in the wood wall stud
itself.
8. Place Grab Bar on wall, aligning mounting holes with the holes in the wall.
9. Insert the wood screws provided into one end of the Grab Bar. Screw into wall and
wall stud (HAND TIGHTEN ONLY) .
10. Repeat Step 4 for opposite end of the Grab Bar.
11.
Securely
tighten all mounting wood screws with a screwdriver.
12. If concealed mount Grab Bar is used, move cover plates
over mounting holes and firmly press against the wall.
Cover
Plate
Mounting
Holes
Cover Plate
Concealed Mount Grab Bar
Mounting
Holes
Exposed Mount Grab Bar
Wood Wall Stud
Wood Wall
Stud