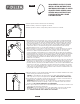
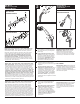
50560 SERIES–SUPPLY ELBOW INSTALLATION INSTRUCTIONS 43934 INSTRUCCIONES PARA EL CODO ABASTECEDOR–SERIES 50560 SÉRIES 50560–INSTRUCTIONS D’INSTALLATION DU COUDE D’ALIMENTATION 1. Remove present shower head and shower arm with flange. 1. Quite la cabeza y el brazo de la regadera con la brida. 1. Retirez la pomme de douche, le tuyau de la pomme de douche et la collerette. 2.
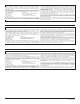
LIFETIME FAUCET AND FINISH LIMITED WARRANTY OF LOSS OR DAMAGES ARE EXCLUDED. Proof of purchase (original sales receipt) from the original consumer purchaser must be made available to Delta for all warranty claims. THIS IS THE EXCLUSIVE WARRANTY BY DELTA FAUCET COMPANY, WHICH DOES NOT MAKE ANY OTHER WARRANTY OF ANY KIND, INCLUDING THE IMPLIED WARRANTY OF MERCHANTABILITY.
54613 & 56613 SERIES SHOWER MOUNT HAND SHOWER INSTALLATION INSTRUCTIONS 86512 SERIES 54613 Y 56613 INSTRUCCIONES PARA LA INSTALACIÓN DE LA REGADERA MANUAL EN LA REGADERA Write purchased model number here. Escriba aquí el número del modelo comprado. Inscrivez le numéro de modèle ici.
1 Slide Bar Barra deslizable Coulisse Select wall position for wall bar or wall mount bracket based on family’s needs. NOTE: Locate so there will be slack in the hose when hand shower is in extreme up or down position. Follow the mounting instructions for your specific model. Elija la posición en la pared para la barra de pared basada en las necesidades de su familia. NOTA: Ubíquela de manera que tenga la manguera algo floja cuando use la regadera manual, en la posición extrema hacia arriba o hacia abajo.
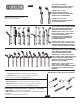
Slide Bar Barra deslizable Coulisse 51552, 51567, 57051 & 57530 Series/Series/Seria 59210 Series/Series/Seria 4 9 5 5 8 6 3 10 2 7 7 6 2 1 1 5 6 7 5 12 6 11 4 4 8 9 7 3 4 3 2 3 6 5 SLIDE BAR INSTALLATION Model 51552, 51567, 57051 & 57530: Slide the slide mechanism (1) and elbow (10) onto the wall bar (2). The slide mechanism must be on the bar before mounting it to the brackets. Temporarily insert brackets (3) into slots in wall bar.
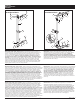
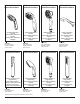
Wall Mount Montaje en la pared Supports Muraux 55011, 55013, 55020, 55021, 55085, 57510 & 57923 3 Series/Series/Seria 2 A. Shower Mount Regadera en la pared Porte-douche 1 54613 & 56613 Series/Series/Seria 2 5 4 1 2 7 1 B.
55011 & 57011 Series/Series/Seria Transitional Hand Piece 2 Setting Pieza de Mano Transicional 2 Ajustes Douche à main Transitional 2 réglages RP7405s Hand Held Shower Regadera de Mano Douche à main 57014 Series/Series/Seria 55021 & 57021 Series/Series/Seria Transitional Hand Piece 3 Setting Pieza de Mano Transicional 3 Ajustes Douche à main Transitional 3 réglages Traditional Hand Piece 3 Setting Pieza de Mano Tradicional 3 Ajustes Douche à main Traditional 3 réglages RP48770s Hand Held Shower Regader
57510 Series/Series/Seria 57923 & 59210 Series/Series/Seria 51567 & 55567 Series/Series/Seria Arzo® Hand Piece Single Setting Pieza de Mano Arzo® Un Ajuste Douche à main Arzo® Un réglage Addison® Hand Piece Single Setting Pieza de Mano Addison® Un Ajuste Douche à main Addison® Un réglage Ara™ Hand Piece Single Setting Pieza de Mano AraTM Un Ajuste Douche à main AraMC Un réglage RP61294s Mounting Bracket Consola de montaje Support RP48296s Hand Held Shower Regadera de Mano Douche à main 59567-PKs Han
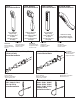
57021 Series/Series/Seria RP64154s Bar Barra Barre RP64704s Retrofit Bar for 54713 (25 1/4" center to center mounting). Retrofit bar not required for 55710. Barra Reconvertida para 54713 (montaje de centro a centro de 25 1/4”). No se requiere la barra reconvertida para 55710. Barre pour installation après coup pour 54713 (points de fixation espacés de 25 1/4 pouces centre à centre). Barre pour installation après coup non requise pour 55710.
Backflow Protection System Your Delta ® faucet handshower incorporates a backflow protection system that has been tested to be in compliance with ASME A112.18.3 and ASME A112.18.1 / CSA B125.1 . It incorporates two certified check valves in series, which operate independently and are integral, non-serviceable parts of the wand assembly.
3-PORT,THREE AND SIX FUNCTION DIVERTER TRIM 51833 ACCESORIO PARA EL DESVIADOR DE TRES Y SEIS FUNCIONES, DE 3 TOMAS Models/Modelos/Modèles T11800,T11851,T11853,T11855,T11859, T11861,T11864,T11867,T11885,T11886, T11892,T11894,T11897-LHP,T11900,T11951, T11953,T11955,T11959,T11961,T11964,T11967, T11985,T11986,T11992,T11994,T11997-LHP, T11852, T11952 Series/Series/Seria ÉLÉMENTS DE FINITION DE L’INVERSEUR À 3 ORIFICES, À TROIS ET SIX FONCTIONS Write purchased model number here.
1 2 A. A. 2 4 3 2 1 1 3 B. B. 3 2 5 2 1 1 3 4 A. When the diverter is ready for trim remove plasterguard (1), bonnet A. Place and hold backplate (1) (T11855/T11955 Only) and escutcheon B. Install cartridge assembly (1) into body (2) assuring that the locating B. Place handle (1) onto stem (2) and tighten set screw (3). A. Cuando el desviador está listo el accesorio quite el protector de yeso A. Coloque y sostenga la placa posterior (1) (T11855/ T11955 solamente) B.
▲Specify Finish Especifíque el Acabado Précisez le Fini RP71717 2-Function, Non-Shared Diverter Cartridge Cartucho desviador no-compartido de 2 funciones Cartouche d’inverseur non partagé, 2 fonctions Body - 3 Port Cuerpo - 3 Tomas Corps - 3 Orifices RP51918 3-Function Cartridge Cartucho del desviador, 3 funciones Cartouche d’inverseur, 3 fonctions RP71718 3-Function, Non-Shared Diverter Cartridge Cartucho desviador no-compartido de 3 funciones Cartouche d’inverseur non partagé, 3 fonctions RP20032 Plug
▲Specify Finish Using New Trim With Rough R11600 Especifíque el Acabado Précisez le Fini Para el uso de un accesorio nuevo con tuberías internas R11600 RP53446▲ Arzo® 6-Function Escutcheon Chapetón (6 funciones) - Arzo® Rosace (6 fonctions)- Arzo® RP51917 Trim Sleeve Manga del Accesorio Manchon de Finition RP53447▲ Arzo® 3-Function Escutcheon Chapetón (3 funciones) - Arzo® Rosace (3 fonctions)- Arzo® RP53445▲ Arzo® Handle w/Set Screw Manija con Tornillo de Ajuste - Arzo® Manette avec Vis de Calage - A
Water Flow For 3 Function Diverter / Flujo de agua para Desviadores de 3 posiciones / Écoulement de l’eau pour les inverseurs à 3 positions 1st Position 1 a posición 1ère position Outlet 1 Salida 1 Sortie 1 Outlet 2 Salida 2 Sortie 2 2nd Position 2 a posición 2e position Outlet 3 Salida 3 Sortie 3 Outlet 1 Salida 1 Sortie 1 Outlet 2 Salida 2 Sortie 2 3rd Position 3 a posición 3e position Outlet 3 Salida 3 Sortie 3 In / Entrada / Entrée Outlet 1 Salida 1 Sortie 1 Outlet 3 Salida 3 Sortie 3 Outlet
CLEANING AND CARE Care should be given to the cleaning of this product. Although its finish is extremely durable, it can be damaged by harsh abrasives or polish. To clean, simply wipe gently with a damp cloth and blot dry with a soft towel.
MultiChoice® Valve Trim Installation Instructions 68882 Owners Manual 17 Series ASME A112.18.1 / CSA B125.1 Write purchased model number here. 17 Series E FL O N T You May Need Table of Contents: Warranties ................................................................................. Page 2 Installation Instructions ............................................................. Pages 3 - 7 Clean and care...........................................................................
Lifetime Faucet and Finish Limited Warranty In the United States and Mexico: Delta Faucet Company Product Service 55 E. 111th Street Indianapolis, IN 46280 1-800-345-DELTA (3358) customerservice@deltafaucet.
Installation 1 Cartridge Installation B. A. 4 1 5 3 2 2 1 3 Turn off water supplies. Remove cover (1), bonnet nut (2) and test cap (3) from the body. If this is not a thin wall mounting, the entire plasterguard (4) may be removed. If screen (5) is in place, remove before installing cartridge. Insert adapter assembly (1) into valve body. Make sure the adapter assembly is correctly positioned and is pressed all the way down inside body.
Installation 2 Showerhead and Tub Spout Installation A. 1 3 2 FOR SHOWERHEAD INSTALLATION: Connect top outlet (1) to shower arm (2) with proper fittings. To prevent damage to finish on shower arm, insert wall end of shower arm into shower flange (3) before screwing arm into riser connection. Thread showerhead (4) onto shower arm. Apply plumber tape to pipe threads on both ends. Do not overtighten showerhead. 4 58045 58045 B. 4 2 1 3 58065 4 3 B.
Installation 2 Showerhead and Tub Spout Installation FOR TUB SPOUT INSTALLATION: Refer to the installation instructions supplied with your spout. Do not connect deck mount spouts to in-wall valves. Do not use hand showers connected in lieu of a tub spout to a tub/shower valve. Do not use PEX tubing for tub spout drop. Slip-On Installation The copper tube (1) must be 1/2” nominal copper.
Installation 3 Trim Installation A. B. 2 2 1 1 3 4 5 Escutcheon Installation for Models T17053, T17253, T17453, T17067, T17267 & T17467. 3 Slide O-ring (1) over cartridge and the bonnet nut (2). The O-ring, which acts as a spacer to steady the sleeve, should rest behind the bonnet nut. Slide the sleeve (3) over the cartridge, body and O-ring. Ensure sleeve is properly positioned over the front of cartridge. 6 7 5 9 C.
Installation 4 Installation and Adjustment of the Rotational Limit Stop A. B. 1 Place the temperature control knob (1) on volume handle and rotate to the mixed position (if required). DO NOT SECURE WITH SCREW. Turn on water supplies; let the water run until both hot and cold water is as hot/cold as possible. Place thermometer in a plastic tumbler, and hold the tumbler in the water stream. Record the temperature reading.
Clean and Care Care should be given to the cleaning of this product. Although its finish is extremely durable, it can be damaged by harsh abrasives or polish. To clean, simply wipe gently with a damp cloth and blot dry with a soft towel. Warning: Scrubbing Bubbles® Bathroom Cleaner and Lysol® Basin Tub and Tile Cleaner must not be used on the clear knob handles and levers. Use of these cleaners can result in cracked or severely damaged handles.
Instrucciones para la Instalación del Accesorio para Válvulas MultiChoice® Manual para los Propietarios ASME A112.18.1 / CSA B125.1 17 Series Escriba aquí el número del modelo comprado. E FL O N T Usted puede necesitar Contenido: Garantías ................................................................................. Page 2 Instrucciones de Instalación .................................................... Pages 3 - 7 Limpieza y Cuidado de su Liave ..............................................
Garantía Limitada De Por Vida de la Llave y su Acabado En los Estados Unidos y México: Delta Faucet Company Product Service 55 E. 111th Street Indianapolis, IN 46280 1 800 345 DELTA (3358) customerservice@deltafaucet.
Instalación Instalación del Cartucho 1 B. A. 4 1 5 3 2 2 1 3 Introduzca el adaptador (1) en la válvula. Asegúrese que el adaptador estén correctamente colocados dentro de los orificios en la base de la válvula. Fije el adaptador con el tornillo (2) suministrado con el adaptador. Quite el retenedor (3) del adaptador. Cierre los suministros de agua. Quite la cubierta (1), la tuerca tapa (2) y la tapa de prueba (3).
Instalación 2 Instalación de la Cabeza de la Regadera y el Surtidor de la Bañera A. 1 3 2 PARA LAS INSTALACIONES DE LAS CABEZAS DE REGADERA: Conecte la toma de salida de agua superior (1) al brazo de la regadera (2) con los accesorios apropiados. Para prevenir daño al acabado del brazo de la regadera, introduzca el extremo que va hacia la pared del brazo de la regadera dentro del reborde (3) antes de atornillar el brazo en la conexión de la tubería vertical.
Instalación 2 Instalación de la Cabeza de la Regadera y el Surtidor de la Bañera PARA LA INSTALACIóN DEL SURTIDOR DE LA BAcERA: Refiérase a las instrucciones para la instalación suministradas con su surtidor. No conecte los surtidores para las instalaciones en las superficies horizontales en las válvulas dentro de las paredes. No use las regaderas de mano en vez de un surtidor de bañera conectado a una válvula de bañera/regadera.
Instalación 3 Instalación Final A. B. 2 2 1 1 3 4 5 La instalación de la roseta para los modelos T17053, T17253, T17453, T17067, T17267 y T17467. 3 Deslice el aro O (1) sobre el cartucho y la tuerca tapa (2). El aro O, el cual funciona como un separador para estabilizar la manga, debe quedar apoyado en la tuerca tapa. Deslice la manga (3) sobre el cartucho, el cuerpo de la pieza y el aro O. 6 7 9 C.
Instalación 4 Instalación y Ajuste del Tope que Limita la Rotación A. B. 1 1 Instalación y Ajuste del Tope que Limita la Rotación Coloque la perilla para el control de la temperatura (1) en la manija para controlar el volumen y gire a la posición mixta (si se requiere). NO FIJE CON TORNILLO. Abra los suministros de agua; deje que el agua corra hasta que ambas, el agua caliente y la fría, estén lo más caliente/fría posible.
Limpieza y Cuidado de su Llave Tenga cuidado al ir a limpiar este producto. Aunque su acabado es sumamente durable, puede ser afectado por agentes de limpieza o para pulir abrasivos. Para limpiar su llave, simplemente frótela con un trapo húmedo y luego séquela con una toalla suave. ¡ADVERTENCIA! No se puede usar SCRUBBING BUBBLES® BATHROOM CLEANER o LYSOL® BASIN TUB AND TILE CLEANER en las manijas transparentes. El uso de estos productos pueden resultar en manijas rajados o severamente dañados.
Instructions d’installation Finition de la soupape MultiChoice® Guide d’utilisation ASME A112.18.1 / CSA B125.1 17 Séries Inscrivez le numéro de modèle ici. E FL O N T Articles dont vous pouvez avoir besoin: Table des matières Garanties .................................................................................. Page 2 Instructions d’installation .......................................................... Pages 3 - 7 Instructions de nettoyage ....................................................
Garantie à vie limitée des robinets et de leurs finis Aux États-Unis et au Mexique : Delta Faucet Company Product Service 55 E. 111th Street Indianapolis, IN 46280 St. 1-800-345-DELTA (3358) customerservice@deltafaucet.
Installation 1 Installation de la cartouche. B. A. 4 1 5 3 2 2 1 3 Introduisez l’adaptateur (1) dans le corps de la soupape. Assurez-vous que les joints toriques sont positionnés correctement dans les trous à la base du corps. Fixez l’adaptateur avec la vis (2) se trouvant dans celui-ci. Retirez la pièce de retenue (3) de l’adaptateur. Interrompez l’arrivée d’eau. Enlevez le couvercle (1), l’écrou à portée sphérique (2) et le capuchon d’essai (3) du corps.
Installation 2 Installation de la pomme de douche et du bec de baignoire A. 1 3 2 4 INSTALLATION DE LA POMME DE DOUCHE : Raccordez la sortie supérieure (1) au tuyau d’alimentation de la pomme de douche (2) à l’aide des raccords appropriés. Pour éviter d’abîmer le fini du tuyau de la pomme de douche, introduisez le côté « mur » de celui-ci dans la collerette (3) avant de le visser dans le raccord du tuyau vertical. Appliquez du ruban de plomberie sur les filets.
Installation 2 Installation de la pomme de douche et du bec de baignoire INSTALLATION DU BEC DE BAIGNOIRE : Consultez les instructions d’installation fournies avec le bec. Ne raccordez pas à une soupape murale à un bec conçu pour être monté sur une plage. Ne raccordez pas une douche à main à la sortie d’un robinet de baignoire-douche prévue pour un bec de baignoire. N’utilisez pas de tube PEX pour raccorder le bec.\ Installation d’un bec coulissant Le tube de cuivre (1) doit avoir un diamètre nominal de1
Installation 3 Installation des pièces de finition A. B. 2 1 2 1 3 4 5 Installation de la rosace pour les modèles T17053, T17253, T17453, T17067, T17267 et T17467. 3 Faites glisser le joint torique (1) sur la cartouche et l’écrou à portée sphérique (2). Le joint sert de pièce d’espacement et il stabilise le manchon; il doit se trouver derrière l’écrou à portée sphérique. Faites glisser le manchon (3) sur la cartouche, le corps et le joint torique. 6 7 5 9 C.
Installation 4 Installation et réglage de la butée anti-échaudage A. B. 1 1 Placez le bouton de réglage de température (1) sur la manette de réglage de débit et tournez-le jusqu’à la position de mélange (au besoin). NE LE FIXEZ PAS AVEC LA VIS. Rétablissez l’alimentation en eau. Laissez couler l’eau jusqu’à ce que l’eau froide soit aussi froide que possible et que l’eau chaude soit aussi chaude que possible.
Instructions de nettoyage Il faut le nettoyer avec soin. Même si son fini est extrêmement durable, il peut être abîmé par des produits fortement abrasifs ou des produits de polissage. Il faut simplement le frotter doucement avec un chiffon humide et le sécher à l'aide d'un chiffon doux. AVERTISSEMENT: N’employez pas le nettoyant pour salle de bain Scrubbing ® Bubbles ni le Nettoyant de Lavabos, ® de Baignoires et de Carreaux Lysol sur les manettes et les poignées sphériques transparentes.
58045, 58064, & 58065 Models / Modelos / Modèles 58045 58064 RP76839▲ Showerhead Cabeza de Rogadora Pomme de Douche RP64022▲ Showerhead Cabeza de Rogadora Pomme de Douche RP64025▲ Handshower Regadera Manual Douche à main RP64021 Hose & Gaskets Manguera y Empaques Tuyau souple et joints RP76840▲ Handshower Regadera Manual Douche à main RP64021 Hose & Gaskets Manguera y Empaques Tuyau souple et joints 58065 RP64024▲ Showerhead Cabeza de Rogadora Pomme de Douche RP64025▲ Handshower Regadera Manual Do
T17030, T17130, T17230, T17230-H2O, T17430 & T17430-H2O Models / Modelos / Modèles RP70173▲ Showerhead Cabeza de Rogadora Pomme de Douche RP6023▲ Shower Arm Brazo de la Rogadora Tuyau de Pomme de Douche RP43381▲ Showerhead Cabeza de Rogadora Pomme de Douche RP6025▲ Shower Flange Pestaña de la Rogadora Collerette RP196▲ Trim Screws/Atornillos de Franja/Vis de Finition RP12630▲ For Longer Screws Para Tornillos Más Grandes Pour Vis Plus Longues * RP46463 Cartridge Assembly Cartucho Cartouche RP23336 O-Ri
T17038, T17238, T17238-H2O, T17438 & T17438-H2O Models / Modelos / Modèles RP51305▲ Showerhead Cabeza de Rogadora Pomme de Douche RP70173▲ Showerhead Cabeza de Rogadora Pomme de Douche RP6023▲ Shower Arm Brazo de la Rogadora Tuyau de Pomme de Douche RP6025▲ Shower Flange Pestaña de la Rogadora Collerette RP196▲ Trim Screws/Atornillos de Franja/Vis de Finition RP12630▲ For Longer Screws Para Tornillos Más Grandes Pour Vis Plus Longues * RP46463 Cartridge Assembly Cartucho Cartouche RP23336 O-Ring Anill
T17051, T17251, T17251-H2O, T17451 & T17451-H2O Models / Modelos / Modèles RP62283▲ Showerhead Cabeza de Rogadora Pomme de Douche RP70171▲ Showerhead Cabeza de Rogadora Pomme de Douche RP6023▲ Shower Arm Brazo de la Rogadora Tuyau de Pomme de Douche RP52144▲ Shower Flange Pestaña de la Rogadora Collerette RP196▲ Trim Screws/Atornillos de Franja/Vis de Finition RP12630▲ For Longer Screws Para Tornillos Más Grandes Pour Vis Plus Longues * RP46463 Cartridge Assembly Cartucho Cartouche RP37731▲ Trim Slee
T17053, T17253, T17253-H2O, T17453 & T17453-H2O Models / Modelos / Modèles RP62955▲ Showerhead Cabeza de Rogadora Pomme de Douche RP70171▲ Showerhead Cabeza de Rogadora Pomme de Douche RP46870▲ Shower Arm Brazo de la Rogadora Tuyau de Pomme de Douche Shower Arm▲ Brazo de la Rogadora Tuyau de Pomme de Douche RP196▲ Trim Screws/Atornillos de Franja/Vis de Finition RP12630▲ For Longer Screws Para Tornillos Más Grandes Pour Vis Plus Longues RP51034▲ Shower Flange Pestaña dela Rogadora Collerette RP51035▲
T17061, T17261 & T17461 Models / Modelos / Modèles RP6023▲ Shower Arm Brazo de la Rogadora Tuyau de Pomme de Douche RP70175▲ Showerhead Cabeza de Rogadora Pomme de Douche RP6025▲ Shower Flange Pestaña de la Rogadora Collerette RP196▲ Trim Screws/Atornillos de Franja/Vis de Finition RP12630▲ For Longer Screws Para Tornillos Más Grandes Pour Vis Plus Longues * RP46463 Cartridge Assembly Cartucho Cartouche RP50880▲ Trim Sleeve Manga de Fran ja Manchon de Finition RP32105 Screw/Tornillo/Vis NOTE: Do NOT
T17064, T17264, T17264-I, T17464 & T17464-I Models / Modelos / Modèles RP6023▲ Shower Arm Brazo de la Rogadora Tuyau de Pomme de Douche RP64859▲ Showerhead Cabeza de Rogadora Pomme de Douche RP76839▲ Showerhead Cabeza de Rogadora Pomme de Douche RP6025▲ Shower Flange Pestaña dela Rogadora Collerette RP196▲ Trim Screws/Atornillos de Franja/Vis de Finition RP12630▲ For Longer Screws Para Tornillos Más Grandes Pour Vis Plus Longues * RP46463 Cartridge Assembly RP76840▲ Handshower Regadera Manual Douche à
T17067, T17267, T17467 Models / Modelos /Modèles RP40593▲ Shower Arm Brazo de la Rogadora Tuyau de Pomme de Douche Shower Flange▲ Pestaña dela Rogadora Collerette RP51035▲ Bracket & Screws Abrazadera y Tornillos Support et Vis RP196▲ Trim Screws/Atornillos de Franja/Vis de Finition For Longer Screws▲ Para Tornillos Más Grandes Pour Vis Plus Longues Showerhead▲ Cabeza de Rogadora Pomme de Douche * RP46463 Cartridge Assembly Cartucho Cartouche RP50880▲ Trim Sleeve Manga de Fran ja Manchon de Finition RP
T17078, T17278, T17278-H2O, T17478 & T17478-H2O Models / Modelos / Modèles RP51305▲ Showerhead Cabeza de Rogadora Pomme de Douche RP6023▲ Shower Arm Brazo de la Rogadora Tuyau de Pomme de Douche RP70172▲ Showerhead Cabeza de Rogadora Pomme de Douche RP6025▲ Shower Flange Pestaña de la Rogadora Collerette RP196▲ Trim Screws/Atornillos de Franja/Vis de Finition RP12630▲ For Longer Screws Para Tornillos Más Grandes Pour Vis Plus Longues * RP46463 Cartridge Assembly Cartucho Cartouche RP50880▲ Trim Sleev
T17082, T17085, T17282, T17285, T17285-H2O,T17482, T17485 & T17485-H2O Models / Modelos / Modèles RP48590▲ Showerhead Cabeza de Rogadora Pomme de Douche RP70175▲ Showerhead Cabeza de Rogadora Pomme de Douche RP40593▲ Shower Arm Brazo de la Rogadora Tuyau de Pomme de Douche RP46870▲ Shower Arm Brazo de la Rogadora Tuyau de Pomme de Douche RP40592▲ Shower Flange Pestaña de la Rogadora Collerette RP196▲ Trim Screws/Atornillos de Franja/Vis de Finition RP52382▲ Showerhead Cabeza de Rogadora Pomme de Douch
T17086, T17286, T17286-H2O, T17486 & T17486-H2O Models / Modelos / Modèles RP70171▲ Showerhead Cabeza de Rogadora Pomme de Douche RP46870▲ Shower Arm Brazo de la Rogadora Tuyau de Pomme de Douche RP46872▲ Shower Flange Pestaña dela Rogadora Collerette RP196▲ Trim Screws/Atornillos de Franja/Vis de Finition RP12630▲ For Longer Screws Para Tornillos Más Grandes Pour Vis Plus Longues * RP46463 Cartridge Assembly Cartucho Cartouche RP50880▲ Trim Sleeve Manga de Fran ja Manchon de Finition RP32105 Screw/To
T17092, T17292 & T17492 Models / Modelos / Modèles RP61265▲ Showerhead Cabeza de Rogadora Pomme de Douche RP6023▲ Shower Arm Brazo de la Rogadora Tuyau de Pomme de Douche RP61266▲ Shower Flange Pestaña de la Rogadora Collerette RP61270▲ Escutcheon Roseta Rosace avec Orifice RP196▲ Trim Screws/Atornillos de Franja/Vis de Finition RP12630▲ For Longer Screws Para Tornillos Más Grandes Pour Vis Plus Longues * RP46463 Cartridge Assembly Cartucho Cartouche RP50880▲ Trim Sleeve Manga de Fran ja Manchon de Fin
T17094, T17194, T17294, T17294-H2O, T17494 & T17494 -H2O Models / Modelos / Modèles RP6023▲ Shower Arm Brazo de la Rogadora Tuyau de Pomme de Douche RP70173▲ Showerhead Cabeza de Rogadora Pomme de Douche RP6025▲ Shower Flange Pestaña de la Rogadora Collerette RP64024▲ Showerhead Cabeza de Rogadora Pomme de Douche RP196▲ Trim Screws/Atornillos de Franja/Vis de Finition RP12630▲ For Longer Screws Para Tornillos Más Grandes Pour Vis Plus Longues RP64021▲ Hose & Gaskets Manguera y Empaques Tuyau souple et j
T17097, T17297 & T17497 Models / Modelos / Modèles RP70172▲ Showerhead Cabeza de Rogadora Pomme de Douche RP72562▲ Shower Flange Pestaña de la Rogadora Collerette RP40593▲ Shower Arm Brazo de la Rogadora Tuyau de Pomme de Douche RP196▲ Trim Screws/Atornillos de Franja/Vis de Finition * RP46463 Cartridge Assembly Cartucho Cartouche RP72569▲ Escutcheon Roseta Rosace avec Orifice RP50880▲ Trim Sleeve Manga de Fran ja Manchon de Finition RP49089▲ Trim Ring Aro de accesorio Anneau décoratif RP23336 O-Ri
T17140, T17240 & T17440 Models / Modelos / Modèles RP42578▲ Showerhead Cabeza de Rogadora Pomme de Douche RP6023▲ Shower Arm Brazo de la Rogadora Tuyau de Pomme de Douche RP38452▲ Shower Flange Pestaña de la Rogadora Collerette RP196▲ Trim Screws/Atornillos de Franja/Vis de Finition RP12630▲ For Longer Screws Para Tornillos Más Grandes Pour Vis Plus Longues * RP46463 Cartridge Assembly Cartucho Cartouche RP50880▲ Trim Sleeve Manga de Fran ja Manchon de Finition RP40590▲ Trim Ring Aro de accesorio Ann
T17155, T17255, T17255-H2O, T17455 & T17455-H2O Models / Modelos / Modèles RP34355▲ Showerhead Cabeza de Rogadora Pomme de Douche RP34356▲ Shower Flange Pestaña dela Rogadora Collerette RP6023▲ Shower Arm Brazo de la Rogadora Tuyau de Pomme de Douche RP70172▲ Showerhead Cabeza de Rogadora Pomme de Douche RP196▲ Trim Screws/Atornillos de Franja/Vis de Finition RP12630▲ For Longer Screws Para Tornillos Más Grandes Pour Vis Plus Longues * RP46463 Cartridge Assembly RP34359▲ Trim Ring Aro de accesorio Ann
Notes / Notas / Notes 25 68882 Rev.
Delta Faucet Company Product Service 55 E. 111th Street Indianapolis, IN 46280 68882 Rev. G www.deltafaucet.
MULTICHOICE® ROUGH-IN BODY 50353 PIEZAS PARA LA INSTALACIÓN INTERNA MULTICHOICE® CORPS DE ROBINET MULTICHOICE® ASME A112.18.1 / CSA B125.1 Model/Modelo/Modèle R10000 Series/Series/Seria Write purchased model number here. Escriba aquí el número del modelo comprado. Inscrivez le numéro de modèle ici.
1 A. B. C. 3 3 DIVERTER 5 1 4 3 2 2 1 4 A. SHUT OFF WATER SUPPLIES. Consider the type and thickness of your finished wall before placing your stringer back plate. Install the body (1) so the surface of the finished wall is flush with the front of the plasterguard (2) ± 1/4". Note: For with stops models, plasterguard must be flush or subflush 1/4" to finished wall. Mount body using the two stringer mounting holes (3) on the bracket. Note: Remove cover (4) to access mounting holes.
A. 2 Copper Tubing Tubería de Cobre Cuivre B. 1 2 3 2 Iron Pipe Hierro Fer 1 2 1 2 1 4 Pex 2 1 A. Connect valve body to water supplies using the proper fittings for your valve body type (copper tubing, iron pipe or Pex). Note: For Pex, be sure to use the right fitting for crimping and the right tool for cold expansion. If either of the two outlet ports is to be unused, seal the port with a pipe plug. Note: (1) is the cold inlet port and (2) is the hot inlet port.
3 4 5 6 1 1 7 4 3 2 2 8" - 18" (203 mm-457 mm) 8 po - 18 po 8 1 6 3 4 2 7 3 6 Connect top outlet (1) to shower pipe with proper fittings. Connect bottom outlet (2) to tub spout pipe with proper fittings. Pipe (3) between valve body and tub spout must be a minimum of 1/2" (13 mm) copper pipe or 1/2" (13 mm) iron pipe in a straight drop no less than 8" (203 mm) but no more than 18" (457 mm) long with only one iron pipe or copper 90 degree elbow to the tub spout nipple.
Replacement Parts Piezas de Repuesto Pièces de rechange RP46078 Test Cap Tapa de Prueba Capuchon d’essai RP22734 Bonnet Capuchón Chapeau RP46077 Screen Filtro de malla Tamis RP46075 Plasterguard Protector de yeso Protecteur RP46076 Cover Cubierta Couvercle 3" RP63988 Deepwall Copper Tubes (4) Profundos Tubos de cobre de pared (4) Profondes tubes en cuivre mur (4) RP50366 Stop Tope Butée 2" RP46079* Reusable Test Plug (Sold as RP Only) Tapón de Prueba Reutilizable (Sólo se vende como Pieza de Repuesto
Limited Warranty on Delta® Faucets Parts and Finish All parts (other than electronic parts and batteries) and finishes of this Delta® faucet are warranted to the original consumer purchaser to be free from defects in material and workmanship for as long as the original consumer purchaser owns the home in which the faucet was first installed or, for commercial users, for 5 years from the date of purchase. In the United States and Mexico: Delta Faucet Company Product Service 55 E.
Notes / Notas / Notes 3-PORT, THREE AND SIX FUNCTION DIVERTER ROUGH-IN 70551 TUBERÍAS DENTRO DE LA PARED PARA EL DESVIADOR DE TRES Y SEIS FUNCIONES, DE 3 TOMAS.
SI LIC ON E You may need Usted puede necesitar Articles dont vous pouvez avoir besoin: 1 Water Flow For 3 Function Diverter / Flujo de agua para Desviadores de 3 posiciones / Écoulement de l’eau pour les inverseurs à 3 positions 1st Position 1 ª posición 1ère position 2 3/4" +/- 1/4" (70 mm) Front surface of stringer Finished Wall Pared Acabada Mur de finition TEF LON 3rd Position 3 ª posición 3e position Outlet 1 Salida 1 Sortie 1 Outlet 1 Salida 1 Sortie 1 1 2 6 6 Outlet 2 Salida 2 Sortie 2