
User Manual


72406 Rev. J
3
E.
H.
F.
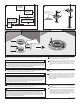
Alignandseattheoctagonshapedseal(1)ontotheoctagon
shaped nut (2). Be sure to align correctly.
G.
Alignthethreemountingbolts(1)withthemountingholes(2).Slidethe
mounting bolts into the mounting holes and
placetankoutlet(3)with
gasketintowaterinlet(4).
Installwasher(5)andnut(6)ontotankmount-
ingboltsfrombottomofbowl.Makesuretankissquarewiththewall,
thentightenmountingnutswithwrench(7)provided.Alternatebolts
whiletighteningnutsevenlyuntiltankfitssnuglyagainstthebowl.
CAUTION: Damage may occur if bolts are over tightened, and leaks
may occur if under tightened.
1
2
3
4
1
5
6
F.
Alineeycoloqueensitioelselloenformadeoctágono(1)enlatuercaenforma
deoctágono(2).Asegúresedealinearcorrectamente.
G.
Alineelostrestornillosdemontaje(1)conlosorificiosdemontaje(2).Deslice
los pernos de montaje en los orificios de montaje y coloque la salida del tanque
(3) con el empaque en la tubería de entrada de agua (4). Instale la arandela (5)
ylatuerca(6)sobrelostornillosdemontajedeltanque.Asegúresedequeel
tanqueestácuadradoconlapared,yluegoaprietelastuercasdemontajecon
lallavedeherramienta(7)incluida.Alternelostornillosmientrasaprietalastuer-
cas uniformemente hasta que el tanque se sienta firmemente colocado sobre el
tazón del inodoro. ADVERTENCIA: Daño puede ocurrir si los tornillos se
aprietan demasiado y fugas puede producirse si bajo apretados.
F.
Installez le gros joint de caoutchouc du réservoir (1) autour de la
sortie filetée (2).
G.
Assurez-vousquelestroisboulonsdemontage(1)setrouventfaceauxtrous
de montage (2). Introduisez les boulons de montage dans les trous et placez la
sortieduréservoir(3)etlejointdansl'entréed'eau(4).Placezlarondelle(5)et
l'écrou(6)surchacunedesvisdemontageduréservoir.Assurez-vousquele
réservoirestd’équerreaveclemuretserrezlesécrousdemontageaveclaclé
(7)fournie.Serrezlesécrousdesboulonsuniformémentenalternantjusqu’àce
que le réservoir soit appuyé solidement sur la cuvette. ATTENTION : Un
serrage excessif des boulons peut entraîner des dommages et des fuites
sont possibles en cas de serrage insuffisant.
1
2
7
2
6
4
5
3
6
5
6
5
G.
F.
1
2
Thissideup.
Esteladohacia
arriba.
Haut
2
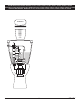
D.
Alignthemountingbolts(1)onthewasteflangewithmountingholes(2)and
carefullyplacetoiletovertheflange.Makesurethatthetoiletfitsproperlyonto
thewaxseal.
E.
Loosely
install plastic disc (1), washer (2), and nut (3) onto mounting bolt (4).
Repeatfortheotherside.Atthispoint,makesurethetoiletissquarewith
thewall.Witharockingmotion,pressthetoiletdowntoseatthewaxring
and flange. While alternating sides, tighten the bolts with wrench (5) until
toilet is firmly seated on the floor.
CAUTION: Damage may occur if bolts are
overtightened. Install mounting bolt covers (6) on both sides of toilet.
D.
Alineelostornillosdemontaje(1)enlabridadeldesagüeconlosagujerosdemontaje
delinodoro(2)ycuidadosamentecoloqueelinodorosobrelabrida.Asegúresequeel
ladodegomadelsellodeceraestácorrectamenteajustadoenlabridadeldesagüe.
E.
Instaleeldiscoplásticosinapretar(1),laarandela(2),ylatuerca(3)enelpernodemontaje
(4).Repitaparaelotrolado.Alllegaraestepaso,asegúresedequeelinodoroestácuadra-
doconlapared.Conunmovimientodevaivén,presioneelinodorohaciaabajoparaencajar-
lo en el anillo de cera y la brida. Mientras que alterna a los costados, apriete los pernos con
la llave (5) hasta que el inodoro esté firmemente asentado en el suelo. PRECAUCIÓN: Daño
puede ocurrir si los tornillos se aprietan demasiado. Instalación las tapas de los tornillos
de montaje (6) en ambos lados del inodoro.
D.
Posezdoucementlatoilettesurlacollerettedemanièreàintroduirelesbou-
lonsdemontage(1)danstrousdemontage(2).Assurez-vousquelecôtéde
caoutchoucdel’anneaudecireestbienajustédanslerenvoi.
E.
Placezledisquedeplastique(1),larondelle(2)etl'écrou(3)surleboulon(4)sans
serrezl’écrou.Répétezl’opérationdel'autrecôté.Assurez-vousquelatoiletteest
d’équerreaveclemur.Enlabalançant,écrasezlatoilettesurl’anneaudecireetlacol-
lerette.Avecuneclé(5),serrezlesécrousenalternantd’uncôtéàl’autrejusqu'àce
que la toilette soit solidement appuyée sur le plancher. ATTENTION : Évitez de trop
serrer les boulons pour ne pas abîmer la base de la toilette. Installez les cache-
boulons (6) de chaque côté de la toilette.
D.
1
1
2
2