
Installation Guide

Portman
140 Business Park Drive • Winston-Salem, NC 27107
www.libertyhardware.com
DSHB287-XXX
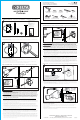
safety goggles
lunettes de sécurité
gafas de seguridad
Phillips screwdriver
tournevis Phillips
destornillador en cruz Phillips
pencil
crayon
lápiz
1/8 in. drill bit
foret de 1/8 po
broca de 1/8 in
electric drill
une perceuse électrique
taladro eléctrico
1/4 in. drill bit
foret de 1/4 po
broca de 1/4 in
hammer
marteau
martillo
level
niveau
nivel
masking / painters’ tape
ruban masque / ruban cache
c inta adhesiva de papel / para pintor
Items Required for Installation:
Articles nécessaires pour l’installation:
Artículos requeridos para la instalación:
Wear Safety goggles
Portez des lunettes de sécurité
Use gafas de seguridad
02/27/13©2013 Liberty Hardware manufacturing corporation, a MASCO COMPANY
5
Hold the post at the base and place post over the bracket with the bottom edge against the wall. The catch at the
bottom of the post should hook onto the spring at the bottom of the bracket. Then push the post upward and
snap over the top edge of the bracket.
Tenez le poteau à la base et placez-le sur la fixation avec le bord inférieur contre le mur. Le bas du poteau devrait
s'accrocher au ressort au bas de la fixation. Poussez ensuite le poteau vers le haut et enclencher sur le bord
supérieur de la fixation.
Sostenga el poste por la base y colóquelo sobre la abrazadera con el borde inferior contra la pared. La parte inferior
del poste deberá engancharse al resorte en la parte inferior de la abrazadera. Luego, empuje el poste hacia arriba y
encájelo sobre el borde superior de la abrazadera.
2
Position bracket on wall in desired location making sure that it is level. Mark (on the wall) location of fastener
through bracket using a pencil.
Placez la fixation à l’endroit désiré sur le mur en vous assurant qu’elle est à niveau. À l’aide d’un crayon, marquez sur le
mur l’emplacement de l’attache à travers la fixation.
Coloque la abrazadera sobre la pared en la ubicación deseada, cerciorándose de que esté nivelada. Marque
(sobre la pared) con un lápiz la ubicación del sujetador que pasa por la abrazadera.
Locate mounting hardware before discarding any packaging. Supplied tape is for TILE MOUNTING ONLY.
Localisez toutes les pièces de montage avant de jeter tout emballage. Le ruban fourni est destiné à un MONTAGE
SUR CARREAU SEULEMENT.
Ubique las piezas de montaje antes de desechar cualquier empaque. La cinta proporcionada es SOLAMENTE PARA
EL MONTAJE EN AZULEJO.
Installation Instructions / Instructions pour l’installation / Instrucciones de instalación:
5
For non-stud installation in drywall, (1) drill 1/4” hole in centerpoint. (2) Insert the anchor into the wall. If necessary use a
hammer to lightly tap the anchor into the wall. (3) Place bracket with the spring on the bottom and the top edge angled
toward the wall. (4) Insert the fastener through the washer into the center hole on the bracket. Using a screwdriver, turn
the screw clockwise, until you feel resistance and the anchor is snug against the wall. Do not over-tighten or press into
the wall. This activates the wings behind the drywall.
For non-stud installation in tile, (1) drill 1/4” pilot hole in centerpoint. (2) Insert the anchor into the wall. If necessary use a
hammer to lightly tap the anchor into the wall. *Remove paper on both sides of the piece of tape supplied. (3) Apply the
tape to the face surface of the bracket. Place bracket with the spring on the bottom and the top edge angled down
toward the wall. (4) Insert the fastener through the washer into the center hole on the bracket. Using a screwdriver, turn
the screw clockwise, until you feel resistance and the anchor is snug against the wall. Do not over-tighten or press into
the wall. This activates the wings behind the drywall.
Pour une installation sans montant sur cloison sèche, (1) percez un trou de ¼ po au point central. (2) Insérez la pièce
d’ancrage au mur. Si nécessaire, utilisez un marteau pour enfoncer délicatement la pièce d’ancrage dans le mur. (3)
Placez la fixation avec le ressort au bas et le bord supérieur incliné vers le mur. (4) Insérez l’attache à travers la rondelle
dans le trou central de la fixation. En utilisant un tournevis, tournez la vis dans le sens horaire, jusqu'à ce que vous
sentiez une résistance et que la pièce d’ancrage soit serrée contre le mur. Ne resserrez pas tr
op ou ne pressez pas dans
le mur. Ceci active les ailes à l’arrière de la cloison sèche.
Pour une installation sans montant sur carreau, (1) percez un avant-trou de 1/4 po au point central. (2) Insérez la pièce
d’ancrage au mur. Si nécessaire, utilisez un marteau pour enfoncer délicatement la pièce d’ancrage dans le mur.
*Retirez le papier des deux côtés du ruban fourni. (3) Appliquez le ruban sur le côté face de la fixation. Placez la
fixation avec le ressort au bas et le bord supérieur incliné vers le bas, en direction du mur. (4) Insérez l'attache à travers
la rondelle dans le trou central de la fixation. En utilisant un tournevis, tournez la vis dans le sens horaire, jusqu'à ce que
vous sentiez une résistance et que la pièce d’ancrage soit serrée contre le mur. Ne resserrez pas trop ou ne pressez pas
dans le mur. Ceci active les ailes à l’arrière de la cloison sèche.
Para instalar sin montante en paredes de tablero de yeso, (1) perfore un agujero de 1/4" en el punto central. (2) Inserte el
anclaje en la pared. Si es necesario, use un martillo para incrustar ligeramente el anclaje en la pared. (3) Coloque la
abrazadera con el resorte en la parte inferior, y el borde superior en ángulo hacia la pared. (4) Pase el sujetador por la
arandela e insértelo en el agujero central de la abrazadera. Gire el tornillo hacia la derecha con un destornillador, hasta
que sienta resistencia y el anclaje quede ceñido contra la pared. No apriete demasiado ni lo presione contra la pared.
Esto activa las aletas detrás de la pared de tablero de yeso.
Para instalar sin montante en azulejo, (1) perfore un agujero piloto de 1/4" en el punto central. (2) Inserte el anclaje en la
pared. Si es necesario, use un martillo para incrustar ligeramente el anclaje en la pared. *Retire el papel de ambos lados
de la cinta proporcionada. (3) Aplique la cinta a la superficie frontal de la ab
razadera. Coloque la abrazadera con el
resorte en la parte inferior, y el borde superior en ángulo hacia abajo en la pared. (4) Pase el sujetador por la arandela e
insértelo en el agujero central de la abrazadera. Gire el tornillo hacia la derecha con un destornillador, hasta que sienta
resistencia y el anclaje quede ceñido contra la pared. No apriete demasiado ni lo presione contra la pared. Esto activa
las aletas detrás de la pared de tablero de yeso.
For stud installation in drywall, (1) drill 1/8” hole in centerpoint. (2) Place bracket with the spring on the bottom and
the top edge angled toward the wall. (3) Insert #8 x 1-1/4“ wood screw (not supplied), through the washer, into the
center hole on the bracket and tighten screw until snug against wall. Do not over-tighten or press into the wall.
For stud installation in tile, (1) drill 1/8” pilot hole in centerpoint. *Remove paper on both sides of the piece of tape
supplied. (2) Apply the tape to the face surface of the bracket. Place bracket with the spring on the bottom and the
top edge angled down toward the wall. (3) Insert #8 x 1-1/4“ wood screw (not supplied), through the washer, into
the center hole on the bracket and tighten screw until snug against wall. Do not over-tighten or press into the wall.
Pour une installation avec montant sur cloison sèche, (1) percez un trou de 1/8 po au point central. (2) Placez la fixation
avec le ressort au bas et le bord supérieur incliné vers le mur. (3) Insérez une vis à bois N° 8 x 1-1/4 po (non fournie) à
travers la rondelle dans le trou central de la fixation et resserrez la vis jusqu'à ce qu'elle soit serrée contre le mur. Ne
resserrez pas trop ou ne pressez pas dans le mur.
Pour une installation avec montant sur carreau, (1) percez un avant-trou de 1/8 po au point central. *Retirez le papier des
deux côtés du ruban fourni. (2) Appliquez le ruban sur l
e côté face de la fixation. Placez la fixation avec le ressort au
bas et le bord supérieur incliné vers le bas, en direction du mur. (3) Insérez une vis à bois N° 8 x 1-1/4 po (non fournie)
à travers la rondelle dans le trou central de la fixation et resserrez la vis jusqu'à ce qu'elle soit serrée contre le mur. Ne
resserrez pas trop ou ne pressez pas dans le mur.
Para instalar con montante en paredes de tablero de yeso, (1) perfore un agujero de 1/8" en el punto central. (2) Coloque
la abrazadera con el resorte en la parte inferior, y el borde superior en ángulo hacia la pared. (3) Pase el tornillo para
madera #8 de 1-1/4" (no se incluye) por la arandela, insértelo en el agujero central de la abrazadera y apriételo hasta
que quede ceñido contra la pared. No apriete demasiado ni lo presione contra la pared.
Para instalar con montante en azulejo, (1) perfore un agujero piloto de 1/8" en el punto central. *Retire el papel de ambos
lados de la cinta proporcionada. (2) Aplique la cinta a la superficie frontal de la abrazadera. Coloque la abrazadera
con el resorte en la parte inferior, y el borde superior en ángulo hacia abajo en la pared. (3) Pase el tornillo para
madera #8 de 1-1/4" (no se incluye) por la arandela, insértelo en el agujero central de la abrazadera y apriételo hasta
que quede ceñido contra la pared. No apriete demasiado ni lo presione contra la pared.
1
*Supplied tape for TILE
MOUNTING
ONLY
*Ruban fourni pour
MONTAGE SUR CARREAU
SEULEMENT.
*La cinta proporcionada es
SOLAMENTE PARA EL
MONTAJE EN AZULEJO.
NON-STUD INSTALLATION / INSTALLATION SANS MONTANT / INSTALACIÓN SIN MONTANTE
Skip step “3b”, Go to Step 4. / Omettez l’étape « 3b ». Passez à l’étape 4. / Omita el paso "3b"; vaya al paso 4.
STUD INSTALLATION / INSTALLATION AVEC MONTANT / INSTALACIÓN CON MONTANTE
DRYWALL USE ONLY. / UTILISATION SUR CLOISON SÈCHE SEULEMENT. / PARA USO ÚNICAMENTE EN PARED DE TABLERO DE YESO.
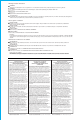
3a
1 2
43
*
*Supplied tape is for TILE MOUNTING ONLY.
*Ruban fourni pour MONTAGE SUR CARREAU SEULEMENT.
*La cinta proporcionada es SOLAMENTE PARA EL MONTAJE EN AZULEJO.
4
Ensure that the bracket is level. Use a hammer to lightly tap the supplied nail through the top hole on the bracket into
the drywall.
Assurez-vous que la fixation est à niveau. Utilisez un marteau pour enfoncer délicatement le clou fourni dans le trou
supérieur de la fixation sur la cloison sèche.
Cerciórese de que la abrazadera esté nivelada. Use un martillo para dar un ligero golpe en el clavo proporcionado para
que pase por el agujero superior de la abrazadera hasta incrustarse en el tablero de yeso.
3b
1
2
*
*Supplied tape is for TILE MOUNTING
ONLY.
*Ruban fourni pour MONTAGE SUR
CARREAU SEULEMENT.
*La cinta proporcionada es SOLAMENTE
PARA EL MONTAJE EN AZULEJO.
3
*Supplied nail for DRYWALL MOUNTING ONLY.
*Clou fourni pour MONTAGE SUR CLOISON SÈCHE
SEULEMENT.
*El clavo proporcionado es SOLAMENTE PARA EL
MONTAJE EN PARED DE TABLERO DE YESO.