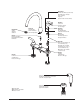
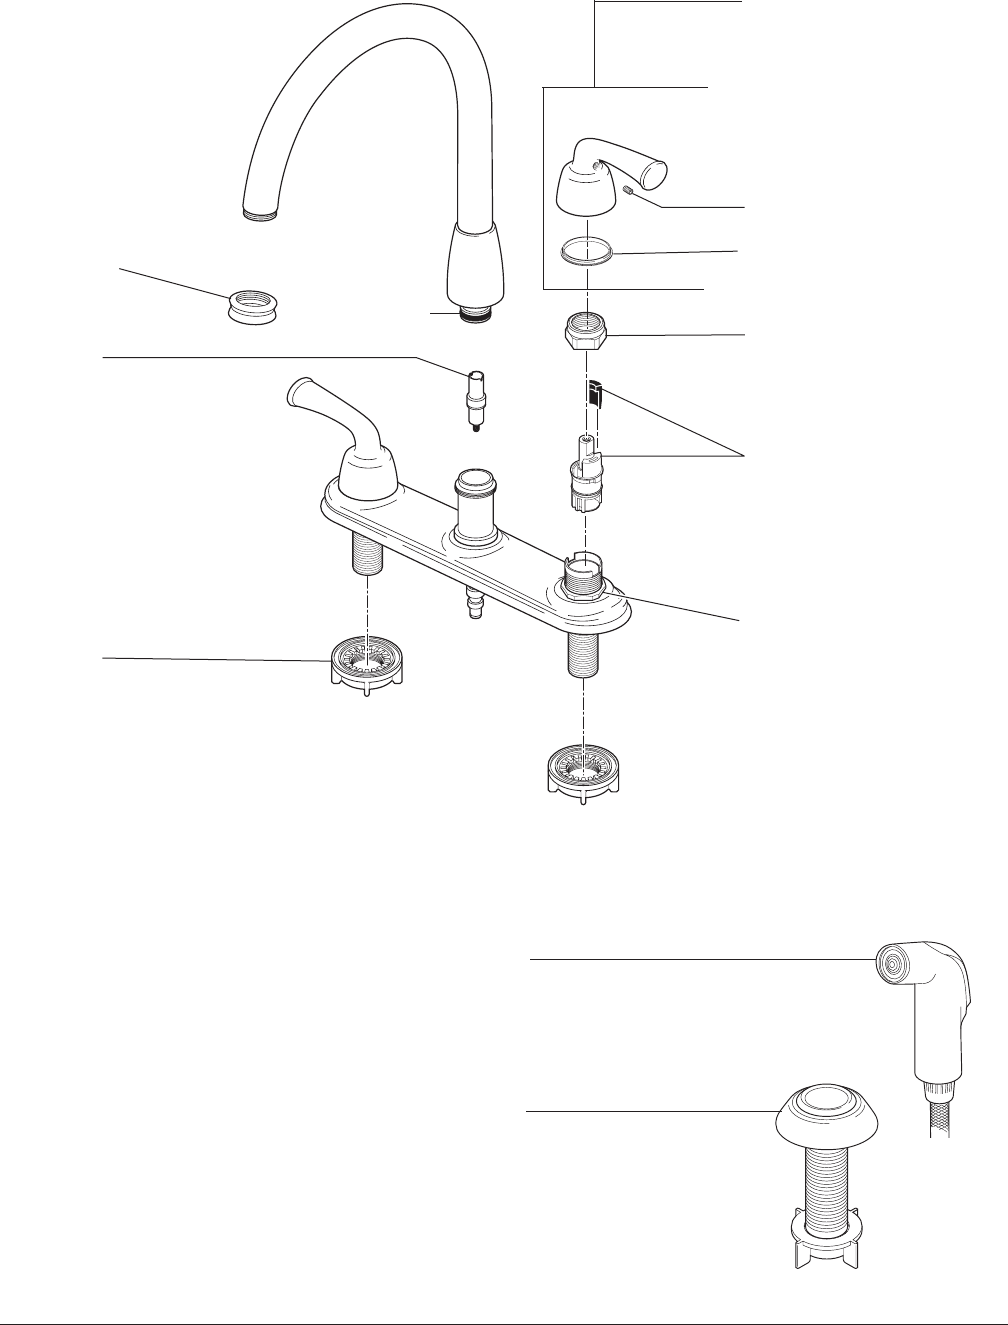
RP48935s Handle Assemblies (Hot & Cold) Ensamble de las manijas (fría y caliente) Poignées (d’eau chaude et d’eau froide) RP25620 Set Screw Tornillo de Ajuste Vis de Calage RP48936▲ Aerator Aireador Aérateur RP41896 Glide Ring Aro para Deslizar L’anneau de Glissement RP20049 Thick O-Ring Anillo "O" Grueso Joint Torique Épais RP6060 Bonnet Nuts Bonete/Capuchones Chapeaux Filetés RP6073 Diverter Assembly Ensamble del Desviador Dérivation RP47422 Stem Unit Assemblies (2) & 1/4 Turn Stops (2) Ensamble de
CLEANING AND CARE Care should be given to the cleaning of this product. Although its finish is extremely durable, it can be damaged by harsh abrasives or polish. To clean, simply wipe gently with a damp cloth and blot dry with a soft towel. Lifetime Faucet and Finish Limited Warranty All parts and finishes of the Delta® faucet are warranted to the original consumer purchaser to be free from defects in material & workmanship for as long as the original consumer purchaser owns their home.
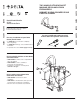
48934 MANIJAS DE PALANCA PARA FREGADEROS ROBINET À DEUX POIGNÉES POUR ÉVIER DE CUISINE C ® Write purchased model number here. Escriba aquí el número del modelo comprado. Inscrivez le numéro de modèle ici. ON LIC SI TEF LON 48934 48934 • To READ ALL the instructions completely before beginning. • To READ ALL warnings, care, and maintenance information. • To purchase the correct water supply hook-up.
2 1 3 1 2 2 2 1 SHUT OFF WATER SUPPLIES Remove old faucet. Mount spray support (1) in sink. Insert sprayer and quick connect spray hose (2) through support and sink as shown. Snap quick connect spray hose (2) onto hose nipple (3). Pull down moderately to ensure connection has been made. Place faucet (1) on sink. Hand tighten nuts (2). Option: If sink is uneven, use silicone under the gasket. CIERRE LOS SUMINISTROS DE AGUA Coloque la llave (1) al fregadero. Apriete a mano las tuercas (2).
3 4 1 1 2 1 1 3 2 Install handles (1). Be sure glide ring (2) is properly seated in bottom of handle before installing. Make connections to water lines. Use 1/2” IPS faucet connections (1) or use coupling nuts (not supplied) (2) with 3/8” O.D. ball-nose risers (3). Instale las manijas (1). Antes de instalar, asegúrese que el aro para deslizar (2) esté apropiadamente colocado en la parte inferior de la manija. Haga las conexiones a la líneas de agua.
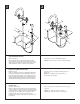
5 1 2 2 1 1 Maintenance If faucet leaks from spout outlet – Shut off water supplies – Replace Stem Unit Assembly (1).* If spray attachment does not function properly – Shut off water supplies – Remove diverter assembly and clean. 2 * Install stems (1) and 1/4 turn stops (2) correctly for proper handle rotation. Remove aerator (1) and turn faucet handles all the way on. Turn on hot and cold water supplies (2) and flush water lines for one minute. Reinstall aerator.