
Operating Guide


16 17
OPERATION
Bevel Angle Setting Type of Cut Steps
33.85° Left side, inside corner 1. Top edge of molding against fence
2. Miter table set right 31.62°
3. Save left end of cut
33.85° Right side, inside corner 1. Bottom edge of molding against fence
2. Miter table set left 31.62°
3. Save left end of cut
33.85° Left side, outside corner 1. Bottom edge of molding against fence
2. Miter table set left 31.62°
3. Save right end of cut
33.85° Right side, outside corner 1. Top edge of molding against fence
2. Miter table set right 31.62°
3. Save right end of cut
• The angles for crown moldings must be very precise. The bevel and miter angles are interdependent; changing one
angle changes the other angle as well.
• Since it is very easy for the work piece to shift, all settings should first be tested on scrap molding. Also most walls
do not have angles of exactly 90°; therefore, you will need to fine-tune your settings.
• When cutting crown molding the bevel angle should be set at 33.85°.
• The miter angle should be set at 31.62° either right or left, depending on the desired cut for the application. See the
chart below for correct angle settings and correct positioning of crown molding on the work table.
FIGURE 18
FIGURE 19
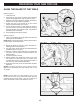
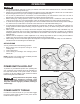
CUTTING WARPED MATERIAL
When attempting to cut warped material, the CONVEX
face should be against the fence as shown in Figure 18.
Never position a piece of warped material with the
CONCAVE face or edge against the fence, as shown in
Figure 19. It will pinch the blade near the completion of
the cut.
To avoid a kickback and to avoid serious
personal injury, never position the
concave edge of bowed or warped material against the
fence.