
Operating Guide


6
In order to operate your table saw safely, you must use a
push stick whenever the size or shape of the workpiece
would otherwise cause your hands to be within 6 inches
(152 mm) of the saw blade or other cutter. A push stick is
included with this saw.
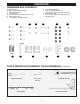
No special wood is needed to make additional push
sticks as long as they are sturdy and long enough and
the wood is free of knots, checks and cracks. A length of
16 inches (400 mm) is recommended with a notch that
ts against the edge of the workpiece to prevent slipping.
It’s a good idea to have several push sticks of the same
minimum length, 16 inches (400 mm), with different size
notches for different workpiece thicknesses.
The shape can vary to suit your own needs as long as
it performs its intended function of keeping your hands
away from the blade. Angling the notch so the push stick
can be held at a 20- to 30-degree angle from the saw’s
table will help you to hold down the workpiece while also
moving it through the saw. Refer to diagram in cutting
aids section of this manual.
MAKING A PUSH STICK
SAW BLADE GUARD, ANTI-KICKBACK PAWLS AND RIVING KNIFE
ASSEMBLY
KICKBACKS
Kickbacks can cause serious injury. A kickback occurs
when a part of the workpiece binds between the saw blade
and the rip fence, or other xed object, rises from the table
and is thrown toward the operator. The risk of kickback
can be minimized by attention to the following instructions.
HOW TO REDUCE THE RISK OF KICKBACKS AND
PROTECT YOURSELF FROM POSSIBLE INJURY:
y Be certain that the rip fence is parallel to the saw
blade.
y DO NOT rip by applying the feed force to the section
of the workpiece that will become the cut-off (free)
piece. Feed force when ripping should always be
applied between the saw blade and the fence; use
a push stick for all narrow work that is 6 inches (152
mm) wide or less.
y Keep saw blade guard, riving knife and anti-kickback
assembly in place and operating properly. The riving
knife must be in alignment with the saw blade and the
anti-kickback assembly must stop a kickback once
it has started. Check their action before ripping by
pushing the wood under the anti-kickback assembly.
The teeth must prevent the wood from being pulled
toward the front of the saw. If any part of assembly
is not operational, return to the nearest authorized
service center for repair.
y Plastic and composite materials (like hardboard) may
be cut on your saw. However, since these are usually
quite hard and slippery, the anti-kickback pawls may
not stop a kickback. Therefore, be especially attentive
to following proper set up and cutting procedures for
ripping.
y Use saw blade guard, anti-kickback pawls, and riving
knife assembly for every possible operation, including
all through-cut sawing.
y Push the workpiece past the saw blade prior to
releasing control.
y NEVER rip a workpiece that is twisted or warped,
or does not have a straight edge to guide along the
fence.
y NEVER saw a large workpiece that cannot be
controlled.
y NEVER use the fence as a guide or length stop when
crosscutting.
y NEVER saw a workpiece with loose knots, aws, nails
or other foreign objects.
y NEVER rip a workpiece shorter than 10 inches (254
mm).
y NEVER use a dull blade. A dull blade should be
replaced or re-sharpened.
Your table saw is equipped with a blade guard, anti-
kickback pawls and riving knife assembly that covers
the blade and reduces the possibility of accidental blade
contact. The riving knife is a at plate that ts into the
cut made by the saw blade and effectively prevents
kickback by lessening the tendency of the blade to bind
in the cut. Two anti-kickback pawls are located on the
sides of the riving knife that allow the wood to pass
through the blade in the cutting direction but reduce
the possibility of the material being thrown backwards
toward the operator. The riving knife can be used in two
positions. It must be raised to the through-cut position
before attaching anti-kickback pawls and blade guard.
Both positions are marked on the riving knife. The blade
guard and anti-kickback pawls can only be used when
making through cuts that sever the wood. When making
rabbets and other non-through cuts, the blade guard and
anti-kickback pawls must be removed and riving knife
lowered to the non-through cut position marked on the
riving knife.
Use all components of the guarding system (blade
guard assembly, riving knife and anti-kickback pawls)
for every operation for which they can be used including
all through-cutting. If you elect not to use any of these
components for a particular application, exercise
additional caution regarding control of the workpiece, the
use of push sticks, the position of your hands relative to
the blade, the use of safety glasses, the means to avoid
kickback and all other warnings contained in this manual
and on the saw itself. Replace the guarding systems as
soon as you return to through-cutting operations. Keep
the guard assembly in working order.
TRAPPED WORKPIECE without rst turning the saw off and disconnecting the saw from the power source.
y BEFORE LEAVING THE SAW, wait for the blade to come to a complete stop, then disconnect the saw from the power
source, clean the table and work area, and lock out switch to prevent unauthorized use.
y AN UNFAMILIAR NOISE OR EXCESSIVE VIBRATION may indicate a problem with your saw. If this happens, turn
it off and disconnect it from the power source until the problem has been located and corrected. Contact customer
service for assistance if the problem cannot be solved.
TABLE SAW SAFETY RULES