
Installation Guide


7
Front / Frente
90°
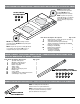
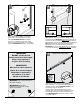
1a
Tiled wall / Pared alicatada
Option / Opción
C
C
C
C
1
Front / FrenteFront / Frente
2
1b
C
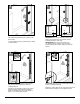
One-piece shower
Ducha de una pieza
Option / Opción
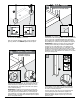
If using Option 1b, trim, grind or use a hacksaw and miter
box to round the corner of the wall jamb (C). Repeat steps
1b and 2 for remaining wall jamb.
Si usa la opción 1b, corte, lime o use una sierra para metal
y una caja de ingletes para redondear la esquina de la
jamba de pared (C). Si es necesario, lije los bordes para
eliminar las rebabas. Repita los pasos 1b y 2 con la otra
jamba de pared.
IMPORTANT: The wall jamb (C) must sit flat against the shower
wall and bottom threshold ledge. Make sure tile meets the fixture
at a 90° corner. Tile or installation imperfections may require
minor shaping of the wall jamb (C) with a metal file to improve
fit. If installing onto ceramic tile, masonry drill bits are required.
IMPORTANTE: La jamba de pared (C) debe descansar plana
contra la pared de la ducha y el saliente del umbral inferior.
Asegúrese de que el alicatado forme con la instalación fija
un ángulo de 90°. Las imperfecciones en el alicatado o en la
instalación pueden requerir modificar algo la forma de la jamba
de pared (C) con una lija metálica para mejorar el ajuste Si la
instalación se hace sobre baldosines de cerámica, se necesitan
brocas para mampostería.
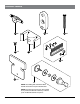
Before beginning, identify the short side of wall jamb (C).
The short side will ALWAYS face the wall.
Antes de comenzar, identifique el lado corto de la jamba de
pared (C). El lado corto SIEMPRE apuntará hacia la pared.
IMPORTANT: The wall jamb (C) must sit flat against the shower
wall and bottom threshold ledge. The area where the wall and
bottom threshold meet may be curved. If needed, use a coin to
mark and transfer the corner radius of the fixture to the bottom
corner of the side jamb (C).
IMPORTANTE: La jamba de pared (C) debe descansar plana
contra la pared de la ducha y el saliente del umbral inferior. El
área donde la pared y el umbral inferior se encuentran puede
estar curvada. Si es necesario, utilice una moneda para marcar y
transferir el radio de la esquina de la instalación fija a la esquina
inferior de la jamba lateral (C).
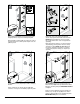
1
2
2
C