SS350LS 10" Contractors Saw (Model 36-978/36-979) 16" Variable Speed Scroll Saw with Quickset II® Blade Changing Feature Scie à découper $ELTA ,OGO à vitesse variable0-3 BLACK LOGO WITH BLACK de 41 cm (16 po) 7HITE BACKGROUND IS THE PRIMARY OF OUR TRADEMARK 7HEN avec dispositif deUSE SIZE OF LOGO FALLS BELOW OR THERE IS NO BLACK BACKGROUND changement de lame THEN USE THE BOTTOM LOGO ® rapide Quickset II4HIS VERSION OF THE TRADEMARK IS ONLY TO BE USED WHEN THE PRODUCT IS PRESENT Sierra calado
TABLE OF CONTENTS IMPORTANT SAFETY INSTRUCTIONS . . . . . . . . . . . . . . . . . . . . . . . . . . . . . . . . . . . . . . . . . . . . . . . . . . . . . . . . . . . 2 safety guidelines - definitions . . . . . . . . . . . . . . . . . . . . . . . . . . . . . . . . . . . . . . . . . . . . . . . . . . . . . . . . . . . . 3 GENERAL SAFETY RULES . . . . . . . . . . . . . . . . . . . . . . . . . . . . . . . . . . . . . . . . . . . . . . . . . . . . . . . . . . . . . . . . . . . . .
safety guidelines - definitions It is important for you to read and understand this manual. The information it contains relates to protecting YOUR SAFETY and PREVENTING PROBLEMS. The symbols below are used to help you recognize this information. Indicates an imminently hazardous situation which, if not avoided, will result in death or serious injury. Indicates a potentially hazardous situation which, if not avoided, could result in death or serious injury.
GENERAL SAFETY RULES Failure to follow these rules may result in serious personal injury. FOR YOUR OWN SAFETY, READ THE INSTRUCTION MANUAL BEFORE OPERATING THE MACHINE. Learning the machine’s application, limitations, and specific hazards will greatly minimize the possibility of accidents and injury. 2. WEAR EYE AND HEARING PROTECTION. ALWAYS USE SAFETY GLASSES. Everyday eyeglasses are NOT safety glasses. USE CERTIFIED SAFETY EQUIPMENT. Eye protection equipment should comply with ANSI Z87.1 standards.
ADDITIONAL SPECIFIC SAFETY RULES Failure to follow these rules may result in serious personal injury. 14. DO NOT CUT A WORKPIECE THAT DOES NOT HAVE A FLAT SURFACE against the table. 15. MAKE RELIEF CUTS before cutting long curves. Never attempt to cut a curve that is too tight. Breaking blades can cause injury. 16. NEVER BACK A BOUND BLADE OUT OF A KERF with the saw running. Turn the saw "OFF", disconnect the saw from the power source, wedge the kerf and remove the blade. Breaking blades can cause injury.
POWER CONNECTIONS A separate electrical circuit should be used for your machines. This circuit should not be less than #12 wire and should be protected with a 20 Amp time lag fuse. If an extension cord is used, use only 3-wire extension cords which have 3-prong grounding type plugs and matching receptacle which will accept the machine’s plug.
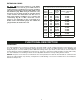
EXTENSION CORDS MINIMUM GAUGE EXTENSION CORD Use proper extension cords. Make sure your extension cord is in good condition and is a 3-wire extension cord which has a 3-prong grounding type plug and matching receptacle which will accept the machine’s plug. When using an extension cord, be sure to use one heavy enough to carry the current of the machine. An undersized cord will cause a drop in line voltage, resulting in loss of power and overheating. Fig.
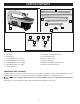
CARTON CONTENTS 2 3 4 5 6 1 7 11 10 9 8 13 12 Fig. 1 1. 2. 3. 4. 5. 6. 7. Scroll Saw Stand Leg (3) Lower Side Brace 30" Long (2) Upper Side Brace 22½" Long (2) Lower Back Brace 18½" Long (1) Upper Back Brace 12" Long (1) Stand Leg Foot (3) 8. 9. 10. 11. 12. 13 5/16-18x1½" Hex Head Screw (3) 5/16" Flat Washer (6) 5/16" Lockwasher (3) 5/16-18 Hex Nut (3) M8x16mm Carriage Head Screw (12) M8x1.
assembly For your own safety, do not connect the machine to the power source until the machine is completely assembled and you read and understand the entire instruction manual. ASSEMBLY TOOLS REQUIRED 1/2" and 13mm wrenches (not supplied) ASSEMBLY TIME ESTIMATE Assembly takes approximately 30 minutes to 1 hour. STAND NOTE: THE ASSEMBLY OF THIS STAND WILL USE M8X16MM CARRIAGE HEAD SCREWS AND M8 FLANGED HEX NUTS.
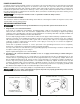
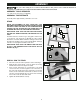
FASTENING SCROLL SAW TO SUPPORTING SURFACE Fig. 4 This scroll saw MUST be securely fastened to a stand or workbench using the three holes, two of which are shown at (A) Fig. 4. The third hole is at the rear of the machine. An alternate method of securing the scroll saw to a supporting surface is to fasten the scroll saw to a mounting board. Then securely clamp the mounting board to a stand or workbench using two or more C-clamps.
ADJUSTING BLADE TENSION Disconnect machine from power source. Fig. 7 Tension is applied to the blade when the blade tension lever (A) Fig. 7, has been adjusted and is in the vertical position as shown. When the blade tension lever (A) is moved to the horizontal position, as shown in Fig. 8, blade tension is released. A To adjust blade tension, position lever (A) in the vertical position, as shown in Fig. 7.
TILTING THE TABLE Disconnect machine from power source. Fig. 10 The table on your scroll saw can be tilted 45° to the left for bevel cutting operations by removing the dust cup as shown in Fig. 24 and loosening table lock knob (A) Fig. 10, tilt the table to the desired angle indicated on degree scale (B) Fig. 11 and tighten lock handle (A) Fig. 10. When bevel cutting, the holddown (B) Fig. 12, can be adjusted to lay flat on the stock by loosening screw (C) and tilting the holddown (B).
ADJUSTING HOLDDOWN source. Fig. 15 Disconnect machine from power B The holddown (A) Fig. 15, should be adjusted so it contacts the top surface of the work (D) being cut. Loosen lock knob (B) and move holddown rod (C) up or down, then tighten lock knob (B). The holddown (A) Fig. 15, may be adjusted front to rear, by loosening set screw (B) Fig. 16, and positioning the holddown in the desired location. Once the holddown is in the desired location, tighten set screw (B), Fig. 16.
TABLE INSERT Fig. 18 Disconnect machine from power source. The table insert (A) can be positioned in the saw table with the opening in the insert pointing to the front of the table, as shown in Fig. 18, or to the right as shown in Fig. 19. With the table in the level position, 90° to the blade, the insert (A) should be positioned, as shown in Fig. 18.
INSIDE CUTTING Inside cutting takes place when the blade is threaded through a hole in the workpiece. With your scroll saw, you can perform this operation quickly and easily as follows: Loosen lock handle (A) Fig. 21, and raise the holddown (B). Release blade tension by moving the blade tension lever (C) to the horizontal position as previously explained. Release upper blade holder lever (D) as previously explained.
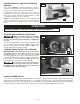
CHANGING BLADES Disconnect machine from power source. 1. Remove table insert (A) Fig. 22, and release blade tension by pulling tension lever (B) forward, as shown. Fig. 22 B A 2. Push upper blade chuck locking lever (C) Fig. 23, to the rear as shown. This will release the blade (D) from the upper chuck (E). Fig. 23 E C D 3. Remove the dust collection cup (A) by rotating knob (B) 90° as shown in Fig. 24. Slide dust cup out of the guides (C) by pulling it toward the front.
5. Insert new blade (I) Fig. 26, into the upper blade holder (J) making certain the blade teeth are pointing down toward the table. Push upper blade chuck locking lever (L) to the front. Insert new blade into the lower blade holder Fig. 25 in the same manner. 6. Apply blade tension by referring to the following section "ADJUSTING BLADE TENSION." Fig. 26 J I L FUSE REPLACEMENT Fig. 27 WARNING: Disconnect machine from power source. A fuse holder (A) Fig.
SERVICE REPLACEMENT PARTS Service Center, visit our website at www.deltamachinery. com or call our Customer Care Center at 1-800-223-7278. All repairs made by our service centers are fully guaranteed against defective material and workmanship. We cannot guarantee repairs made or attempted by others. Use only identical replacement parts. For a parts list or to order parts, visit our website at servicenet.deltamachinery. com.
The following are trademarks of PORTER-CABLE • DELTA (Las siguientes son marcas registradas de PORTER-CABLE • DELTA S.A.) (Les marques suivantes sont des marques de fabriquant de la PORTER-CABLE • DELTA): Auto-Set®, BAMMER®, B.O.S.S.