
Installation Sheet


Installation
5
2
Showerhead and Tub Spout Installation
FOR TUB SPOUT INSTALLATION:
Refer to the installation instructions supplied with your spout. Do not connect deck mount spouts to
in-wall valves. Do not use hand showers connected in lieu of a tub spout to a tub/shower valve. Do not
use PEX tubing for tub spout drop.
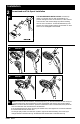
Slip-On Installation
The copper tube (1) must be 1/2” nominal
copper. Important: If it is necessary to cut the
copper tube, the end must be chamfered free of
burrs to prevent cutting or nicking O-ring inside
the spout. Slide spout over copper tube ush
with the nished tub or wall surface. Tighten set
screw (2), but do not overtighten.
Iron Pipe Installation
Install threaded pipe nipple (1) to extend past
nished wall. Apply plumber tape to threads on
pipe nipple and screw on tub spout.
Copper Sweat Installation
Remove O-ring (1) from adapter (2). Solder
adapter to tube taking care to keep solder away
from O-ring groove. CAUTION: NO SOLDER
PERMITTED ON OUTSIDE DIAMETER OF
ADAPTER ADJACENT TO O-RING GROOVE.
Cut off tube (3) and replace O-ring on groove of
brass adapter. Thread tub/spout onto adapter,
taking care not to damage O-ring, and hand
tighten until spout is rmly against nished wall
and all slack is taken up behind wall.
Iron Pipe Installation
Installation of easy-on universal tub spout
Install pipe nipple so that end of nipple projects out
from nished wall surface 1/2" to 1 1/4" (13 mm to
32 mm).
Apply plumber tape or pipe dope to pipe threads.
Hand tighten adapter (1) onto pipe nipple (2). Finish
tightening with standard pipe wrench until a positive
seal is implemented. Take care not to damage
O-Ring (3) groove. Back of adapter (1) must not
project more than 1" (25 mm) from nished wall
surface.
Hand tighten tub spout onto adapter (1) taking care
not to damage the O-Ring (3).
C-4
C-3
C-2
C-1
1
2
1
1
2
3
1/2" to 1 1/4"
(13 mm to 32 mm)
1 2
3
68882 Rev.H