
Installation Guide


84892 Rev. C
Installation
Cartridge Installation
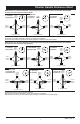
3
A.
B.
Turn off water supplies.
Remove cover (1),
bonnet nuts (2) and test caps (3) from the
rough-in body (4).
Place a bucket or small container over the front
of the valve body and slowly open the water
supplies to ush any debris from the supply
lines before installing the cartridge. Turn the
water supplies back off.
Rotate valve cartridge (1) so the words “HOT
COLD” (2) appear on the top. Insert cartridge
assembly into rough-in body. Make sure the key
(3) on the cartridge is fully engaged with the slot
in the brass body (4). Insert bonnet nut (5) on
the cartridge and thread onto the body. Hand
tighten securely. Slide o-ring (6) over cartridge
and bonnet.A light coating of plumbers grease
applied to o-rings may aid in assembly.
For the exceptions of back to back or reverse
installations (hot on right and cold on left) only:
Rotate valve cartridge (1) so “HOT COLD” (2)
appears on the bottom.
Apply silicone lube to the three o-rings shown
above to make the cartridge easier to install and
remove from the rough-in body.
Install the cartridge making sure that the keys
are fully engaged with the slot in the rough-in
body (see step B).
Slide o-ring (4) and bonnet nut (3) over the
cartridge and thread onto the rough-in body.
Hand tighten securely.
Back to back Installation
Normal Installation
(changes not required)
Reverse
Installation
Cold
Hot
1
2
3
4
2
3
1
2
3
4
5
3
4
2
4
3
1
1
6