
Operating Guide


107533 Rev. B
2
3
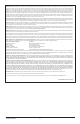
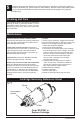
Diverter Cartridge Installation
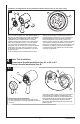
Trim Installation
4
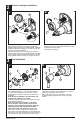
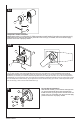
Diverter Bonnet Installation
Slide bonnet nut (1) over diverter sleeve (2) and
thread into rough-in body.
Hand tighten securely.
Escutcheon Installation
For nished walls up to 1 1/8". Install trim sleeve
(1) over valve cartridge (7) and bonnet. Secure
backplate (2) to rough-in body using 4 screws (3)
provided.
Note: Be sure backplate is oriented front side
forward and markings are visible.
Holding escutcheon (5) in place, thread trim nut (4)
onto diverter sleeve (6).
Note: For thick wall installation, visit delta
faucet website, check "parts & accessories
diagram" of the models you bought, order the
appropriate thick wall installation kit RP to
support nished wall thickness up to 2 1/8"
.
On rough or uneven surfaces it is necessary to
apply caulk around the backplate (2) to supplement
the seal. Do not caulk the drip notch in the bottom of
the backplate (2). Do not caulk the escutcheon (5).
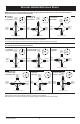
B.
For Diverter Cartridge Installation:
Apply silicone lube to the o-ring (2) to make the
diverter sleeve (3) easier to install diverter cartridge.
Rotate the diverter cartridge (1) so the pin is at the
bottom for proper installation.
Apply silicone lube to the o-rings (4) to make the
diverter sleeve (3) easier to install diverter cartridge.
Align diverter sleeve so that the notches are in the
same position as the notches on rough-in body (5).
A.
3
1
5
2
1
Volume Handle Installation
Install valve handle (1) over cartridge (4), screw in
set screw (2) using a allen wrench.
Place set screw cover (3), if included, over set
screw and apply pressure until cover is properly
seated.
2
5
4
B.
1
2
3
4
A.
4
5
6
2
1
3
3
7
8