
Operating Guide


107533 Rev. B
6
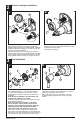
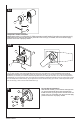
Diverter Handle Installation
Slide diverter handle (1) onto diverter cartridge stem
(2), ensure that handle aligns with cartridge stem.
Install set screw (3) using an allen wrench. Place set
screw cover (4), if included, over set screw and apply
pressure until cover is properly seated.
1
5
3
2
4
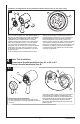
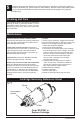
Temperature handle Installation
Attach spacer screw (1) to valve stem (2). Slide temperature control handle (3) into place over spacer screw (1).
Install set screw (4) using an allen wrench,
place set screw cover (5), if included, over set screw and apply
pressure until cover is properly seated.
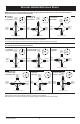
A2.
B.
2
1
3
4
A3.
1
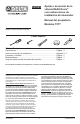
Temperature handle Installation
Turn on water supplies; LET THE WATER RUN AT BOTH FULL HOT AND FULL COLD TO ENSURE THE WATER IS
RUNNING AS HOT/COLD AS POSSIBLE. Place the temperature handle (1) onto the spline, then rotate the temperature
handle until you achieve your maximum desired temperature from the outlet (not more than 120° or the lower temperature
mandated by your local plumbing code). Then take off the temperature handle and assemble it onto the spline again to make
sure the temperature handle limit stop (2) hits against the volume handle limit stop (3) as shown. Install temperature handle
with set screw (4), cover set screw with handle button (5).
2
3
5
4