
Installation Guide

85865 Rev. C
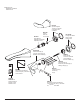
SPOUT FLANGE AND SPOUT INSTALLATION HANDLE FLANGE INSTALLATION
HANDLE FLANGE INSTALLATION
HANDLE FLANGE INSTALLATION
INSTALACIÓN DEL ADAPTADOR DEL SURTIDOR
SPOUT FLANGE AND SPOUT INSTALLATION
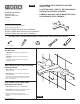
Pull off plasterguards (1) and discard them.
Install spout ange (1) and gasket (2). Option: If mounting
surface is uneven, apply suitable sealant to the back surface of
each escutcheon, according to the manufacturer’s instructions.
Finished wall thickness can vary from 1/8" to 1 1/8". Install spout
tube adapter (3). Tighten until adapter bottoms out on nut.
Install spout (1) and secure with set screw (2).
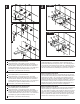
Install handle ange (1) and gasket (2). Secure with ange nut (3).
Finished wall thickness can vary from 1/8 "to 1 1/8". If mounting sleeve
(4) is extending from nished wall more than 3/8", install ange nut (3)
as shown in gure 1. If mounting sleeve (4) is sub ush or extending less
than 3/8" from nished wall, install ange nut (3) as shown in gure 2.
Instale el reborde de la manija (1) y el empaque (2). Fije con la tuerca
con la arandela incorporada (3). El espesor de la pared acabada puede
variar desde 1/8" hasta 1 1/8". Si la mang a de instalación manga (4)
sobrepasa más de 3/8" de la pared acabada, instale la tuerca con la
arandela incorporada (3) como se muestra en el diagrama 1. Si la mang
a de instalación manga (4) está por debajo del nivel de la pared o se
extiende menos de 3/8" de la pared acabada, instale la tuerca con la
arandela incorporada (3) como se muestra en el diagrama 2.
Installez l’embase de la manette (1) et le joint (2). Fixez la manette avec
l’écrou à embase (3). L’épaisseur du mur ni peut varier de 1/8" à 1
1/8" . Si la saillie du manchon (4) par rapport à la surface du mur ni est
supérieure à 3/8 po, installez l’écrou à embase (3) comme le montre la
gure 1. Si le manchon (4) est en retrait par rapport à la surface du mur
ni ou s’il présente une saillie de moins de 3/8 po par rapport à celle-ci,
installez l’écrou à embase (3) comme le montre la gure 2.
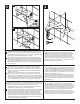
Pull off plasterguards (1) and discard them.
Install spout ange (1) and gasket (2). Option: If mounting
surface is uneven, apply suitable sealant to the back surface of
each escutcheon, according to the manufacturer’s instructions.
Finished wall thickness can vary from 1/8" to 1 1/8". Install spout
tube adapter (3). Tighten until adapter bottoms out on nut.
Install spout (1) and secure with set screw (2).
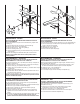
1 2
1
1
3
2
2
1
A
.
A
.
A
.
B
.
B
.
B
.
C
.
C
.
C
.
A.
B.
Figure 1
C.
Figure 2
4
4
4
2
1
3
2
2
1
1
3
3
4
2
1
3
2