Delvcam DELV‐SDI‐7 7"Advanced Func on 3G‐SDI Camera‐Top LCD Monitor
IMPORTANT SAFETY INSTRUCTIONS Read manual before using this product. Keep manual for future reference. Do not place the display screen on the ground. Avoid heavy impact or dropping. Do NOT use chemical soluƟons to clean this product. Wipe with a clean soŌ cloth to maintain the brightness of the surface. Do not block any vent holes. Follow the instrucƟons when making adjustments.
SPECIFICATIONS Display Screen: 7 inch LCD, LED backlight Resolution: 1024x600, supports up to 1920x1080 Brightness: 250cd/m² Aspect Ratio: Contrast Viewing Angle: Input Signal: Output Signal: 16:9 800:1 160°/ 150°(H/V) 3G-SDI, HDMI, YPbPr, Video, Audio 3G-SDI, HDMI, Video Supported Formats YPbPr: 480i/59.94Hz; 480p/59.94Hz; 576i/50Hz; 576p/50Hz; 720p/50Hz; 720p/59.94Hz; 720p/60Hz; 1080i/50Hz; 1080p/50Hz; 1080p/59.94Hz; 1080i/59.94Hz; 1080i/60Hz HDMI: 480i/59.94Hz; 480p/59.
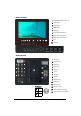
MONITOR FRONT 1 Power LED Indicator (red is on) 2 Video Signal 3 YPbPr Signal 4 HDMI Signal 5 SDI Signal 6 4 User Definable Buttons 7 Menu Select/Brightness 8 Menu Options/Saturation 1 2 3 4 5 7 6 8 9 10 9 Tint 10 Contrast MONITOR REAR 1 SDI Output 2 Video Output 1 5 2 6 3 Video Input 4 Audio Input 12 5 SDI Input 11 3 7 4 8 6 Y Input 13 7 Pb Input 8 Pr input 14 9 HDMI Output 9 10 10 HDMI Input 11 Battery Plate Pin Number 1 Delvcam DELV‐SDI‐7 12 DC Power Input GND 2 3 --- 4
OPERATION 1. Turn power ON. 2. Press MENU Select (BRI/M/SEL), then rotate MENU dial to scroll through menu selecƟons. 3. Press MENU OpƟons (SAT/ADJ), then rotate to make selecƟon.
SETTINGS SYSTEM Language English, Chinese PIP Small, Medium, Large—can adjust source, position, and swap PBP, POP—can adjust Delvcam DELV‐SDI‐7 SDI ON/OFF Input Format OSD 5s, 10s, 15s Logo ON/OFF Freeze Input ON/OFF Image Flip ON/OFF Peaking Mono/Color Asst Func Manual/AUto Man Default OK/Cancel ISP Factory Use Only Page 6
SETTINGS USER DEFINABLE BUTTONS R1 Delvcam DELV‐SDI‐7 R2 R3 R4 F1—F4 User Definable Options Aspect Ratio Camera Center Marker Check Field Color Bar Exposure False Color Freeze Input Histogram H/V Delay Peaking PIP Pixel to Pixel Screen Marker Underscan Zoom R1-R4 User Definable Options Brightness Contrast Saturation Sharpness Tint Page 7
TROUBLE SHOOTING 1. No Image - Ensure that the cables are properly connected. - Use the standard power adapter that is included as improper voltage input may cause damage or injury. 2. Incorrect or Abnormal Colors - Ensure that the cables are properly connected. - Check the signal source video output. - Check SaturaƟon for appropriate seƫng. - Ensure Check Field is set to color or mono as required. - Reset image raƟo. 3.