05/12 Rev.10 AC20037 U.S. Patent No.
Thank you for purchasing Demco’s SIDEQUEST. We feel you have made a wise choice and hope you are completely satisfied with your SIDEQUEST. If you have any questions regarding the applications of certain solutions or chemicals, contact your chemical supplier and follow chemical manufacturer recommendations as well as all licensing and use restrictions or regulations. WARNING: To Avoid Personal Injury or Property Damage, Observe Following Instructions: Chemicals are dangerous.
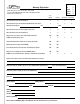
Ag RV Rental Brakes Marine Warranty Registration 4010 320th Street • Box 189 • Boyden, Iowa 51234 Toll Free 800-54DEMCO (800-543-3626) • FAX 800-845-6420 www.demco-products.
Postage Demco 4010 320th Street, Box 189 Boyden, Iowa 51234 Page 4
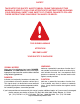
SAFETY TAKE NOTE! THIS SAFETY ALERT SYMBOL FOUND THROUGHOUT THIS MANUAL IS USED TO CALL YOUR ATTENTION TO INSTRUCTIONS INVOLVING YOUR PERSONAL SAFETY AND SAFETY OF OTHERS. FAILURE TO FOLLOW THESE INSTRUCTIONS CAN RESULT IN INJURY OR DEATH. THIS SYMBOL MEANS ATTENTION BECOME ALERT YOUR SAFETY IS INVOLVED! warning: SIGNAL WORDS Note: use of the following signal words DANGER, WARNING, and CAUTION with safety messages.
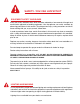
SAFETY...you can live with it Equipment safety guidelines Every year many accidents occur which could be avoided by a few seconds of thought and more careful approach to handling equipment. You, the operator, can avoid accidents by observing precautions in this section. To avoid personal injury, study precautions and insist those working with you, or you yourself, follow them. In order to provide a better view, certain illustrations in this manual may show an assembly with a safety shield removed.
SAFETY SIGN LOCATIONS Part# 10328 Red (on back side of tank) WARNING To prevent serious injury or death • Refer to chemical supplier and manufacturer recommendations and all licensing restrictions or regulations. • Always wear recommended protective clothing when working with chemicals or sprayer. • Dispose of all unused chemicals or solutions in proper and ecologically sound manner. Improper use can injure people, animals, plants and soil.
Safety sign care • Keep safety signs clean and legible at all times. • Replace safety signs that are missing or have become illegible. • Replacement parts that displayed a safety sign should also display current sign. • Safety signs are available from your distributor, dealer parts department, or manufacturer. How to install safety signs: • Be sure installation area is clean and dry. • Decide on exact position before you remove backing paper. • Remove smallest portion of split backing paper.
• Keep wheel and lug nuts tightened to specified torque. • Assure that agricultural implement tires are inflated evenly. • Give sprayer a visual inspection for any loose bolts, worn parts, or cracked welds, and make necessary repairs. Follow maintenance safety instructions included in this manual. • Be sure there are no tools lying on or in equipment. • Do not use the sprayer until you are sure that area is clear, especially around children and animals.
• Pick the most level possible route when transporting across fields. Avoid edges of ditches, gullies, and steep hillsides. • Be extra careful when working on inclines. • Periodically clear equipment of brush, twigs, or other materials to prevent buildup of dry combustible materials. • Maneuver tractor or towing unit at safe speeds. • Avoid overhead wires or other obstacles. Contact with overhead lines could cause serious injury or death.
Highway and transport operations • SAFETY CHAINS: If equipment is going to be transported on a public highway, always follow state and local regulations regarding safety chains and auxiliary lighting. Be sure to check with local law enforcement agencies for your own particular regulations. If required safety chains should be obtained and installed.
• Watch for obstructions overhead and side to side while transporting. • Always operate equipment in a position to provide maximum visibility at all times. Make allowances for increased length and weight of sprayer when making turns, or stopping. Performing maintenance • Good maintenance is your responsibility. Poor maintenance is an invitation to trouble. • Make sure there is plenty of ventilation. Never operate engine of towing vehicle in a closed building. Exhaust fumes may cause asphyxiation.
BOLT TORQUE TORQUE DATA FOR STANDARD NUTS, BOLTS, AND CAPSCREWS. Tighten all bolts to torques specified in chart unless otherwise noted. Check tightness of bolts periodically, using bolt chart as guide. Replace hardware with same grade bolt. NOTE: Unless otherwise specified, high-strength Grade 5 hex bolts are used throughout assembly of equipment. Bolt Torque for Standard bolts * Torque Specifications GRADE 2 GRADE 5 GRADE 8 “A” lb-ft (N.m) lb-ft (N.m) lb-ft (N.
Assembly Instructions For 10-Bolt Hub Preparation: Remove any loader brackets from the tractor. The tractor duals must be set to 120” wheel spacing. Mount base plate (specific to your tractor model) to the side of the tractor. See separate instruction found in base plate parts box. 1. With proper hydraulic jack, lift tractor until weight is off dual wheel but still touching ground. Be sure to secure wheel properly.
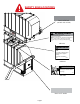
SIDEQUEST PARTS BREAKDOWN Ref. No. 1. 2. 3. 4. 5. 6. 7. 8. 9. 10. 11. 12. 13. 14. 15. 16. 17. 18. 19. 20. 21. Part No. Qty. 00083 8 00084 14 00085 20 00254 20 00482 8 00640 8 00967 16 01253 6 01254 14 02178 16 02397 4 02592 16 06102 12 07435 10214-35 16 10215-35 2 10245 8 10918-35 2 10923-35 3 Description 1/2”-UNC Hex Hd. Nut 1/2” Lockwasher 1/2” Flatwasher 3/4” Lockwasher 1/2”-UNC x 1-3/4” Gr.5 Hex Hd. Bolt 1/2”-UNC Jam Nut 1/2”-UNC x 1-1/4” Gr.5 Hex Hd. Bolt 1/2”-UNC x 2” Gr.
350 GALLON SIDEQUEST CENTER EXIT PARTS BREAKDOWN 13 19 17 15 16 23 31 35 28 3 34 10 15 2 9 33 1 2 5 26 TANK BREAKDOWN Ref. No. --. --. --. --. P1. P2. P3. P4. P5. Part No. Qty.
500 GALLON SIDEQUEST CENTER EXIT PARTS BREAKDOWN 20 21 2 8 2 22 9 3 22 19 13 18 22 15 28 23 15 3 2 9 16 25 31 1 35 2 5 26 15 11 7 6 34 10 24 33 26 12 NOTE: Refer to p.15 for replacement part numbers.
OPTIONAL SIDEQUEST JACK STANDS BREAKDOWN Ref. No. Notes: Adjustable jack may be used in two locations. On the outside of the Stand Mount Bracket as well as in the rear of the Tank holder. 1. 2. 3. 4. 5. 6. 7. 8. 9. 10. 11. 12. 13. 14. Part No. Qty.
Optional SideQuest Fold-away External Step PARTS BREAKDOWN Re ar of Tra c tor 4 5 8 7 Fro nt of 11 7 6 7 6 8 Tra c tor 7 3 9 7 2 8 REF. PART DESCRIPTION NO. NO. QTY. 1. 11446-35 2 External Step 2. 11447-35 2 Left Step Support 3. 11448-35 2 Left Step Mount 4. 11449-35 2 Right Step Mount 5. 11450-35 2 Right Step Support 6. 00059 20 3/8” Flatwasher 7. 00523 16 3/8” x 1-1/4” Hex Head Bolt (Gr. 5) 8. 02592 16 3/8” Nylon Insert Locknut 9. 07919-95 8 Bushing 10. 11451 4 Support Cable 11.
SPRAYER CHECKLIST: Downtime caused by field breakdowns is costly and time consuming. Many breakdowns can be eliminated by periodic equipment maintenance. By spending time reviewing this checklist before seasonal spraying application time and following proper after season care, you can save time and money later. Warning: To Prevent Serious Injury Or Death • Keep hands, feet, and loose clothing away from rotating parts.