Quickstart Guide Guía de inicio rápido Guide d’utilisation rapide Guida rapida Schnellstart-Anleitung Appendix English ( 3 – 8 ) Español ( 9 – 14 ) Français ( 15 – 20 ) Italiano ( 21 – 36 ) Deutsch ( 27 – 32 ) English ( 33 – 34 )
Quickstart Guide (English) Introduction Thank you for purchasing the Prime 2. At Denon DJ, we know how serious music is to you. That’s why we design our equipment with only one thing in mind—to make your performance the best it can be. Box Contents Prime 2 Standalone DJ System Display Protective Cover Display Cleaning Cloth IEC Power Cable USB 3.0 Cable Hard Drive Mounting Screws Engine Prime Software Download Card Quickstart Guide Safety & Warranty Manual Important: Visit denondj.
Setup Important: Occasionally, we may update Prime 2’s firmware to add exciting new features and improvements. Visit denondj.com to check for available firmware updates, especially after you update your software (firmware updates may address new software features). 1. Visit denondj.com and log into your account. (Create an account if this is your first Denon DJ product.) 2. In your account, download and install the latest version of Engine. 3. Connect input sources (microphones, CD players, etc.
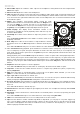
Features Top Panel 48 46 40 48 48 47 49 43 44 26 27 28 19 12 13 35 36 37 38 23 24 11 32 30 34 39 31 6 7 10 29 40 8 2 5 10 9 20 21 22 8 10 33 4 3 45 42 25 41 50 1 10 44 52 53 54 55 56 45 42 25 26 27 41 10 10 15 43 51 9 28 33 20 11 12 21 13 22 17 18 23 29 19 16 14 32 35 36 37 38 24 30 39 34 31 1. Touchscreen: This full-color, multi-touch display shows information relevant to Prime 2's current operation.
16. Phones Mix: Adjusts the software’s audio output to the headphones, mixing between the cue output and the master mix output. 17. Phones Level: Adjusts the volume of the headphones. 18. Split Cue: When this switch is in the On position, the headphone audio will be “split” such that all channels sent to cue channel are summed to mono and sent to the left headphone channel and the master mix is summed to mono and sent to the right channel.
33. Censor / Reverse: Press this button to activate/deactivate the Censor feature: the playback of the track will be reversed, but when you release the button, normal playback will resume from where it would have been if you had never engaged the Censor feature (i.e., as if the track had been playing forward the whole time). Press and hold Shift and then press this button to reverse the playback of the track normally. 34.
Front Panel 1 2 2 3 1. Headphones (1/4”, 1/8”) (6.35 mm, 3.5 mm): Connect your 1/4” or 1/8” (6.35 mm or 3.5 mm) headphones to this output for cueing and mix monitoring. The headphone volume is controlled using the Phones Level knob. 2. Crossfader Assign: Routes the audio playing on the corresponding channel to either side of the crossfader (A or B), or bypasses the crossfader and sends the audio directly to the program mix (center, Thru). 3.
Guía de inicio rapido (Español) Introducción Gracias por comprar el Prime 2. En Denon DJ, sabemos que usted se toma la música en serio. Por eso es que diseñamos nuestros equipos con una sola cosa en mente—hacer que pueda tocar su mejor interpretación. Contenido de la caja Sistema de DJ autónomo Prime 2 Cubierta de protección de la pantalla Paño de limpieza de la pantalla Cable de alimentación IEC Cable USB 3.
Instalación Importante: Ocasionalmente, es posible que actualicemos el firmware del Prime 2 para añadir excitantes mejoras y características. Visite denondj.com para encontrar las actualizaciones de firmware disponibles, especialmente luego de actualizar su software (las actualizaciones de firmware pueden contemplar las nuevas características del software). 1. Visite denondj.com e inicie sesión con su cuenta. (Cree una cuenta si este es su primer producto Denon DJ). 2.
Características Panel superior 48 46 40 48 48 47 49 43 44 26 27 28 19 12 1. 2. 3. 4. 5. 6. 7. 13 35 36 37 38 23 24 11 32 30 34 39 31 6 7 10 29 40 8 2 5 10 9 20 21 22 8 10 33 4 3 45 42 25 41 50 1 10 44 52 53 54 55 56 45 42 25 26 27 41 10 10 15 43 51 9 33 20 11 12 21 13 22 17 18 23 29 19 16 14 24 32 35 36 37 38 30 39 34 11. 12. 13. 14. 15. 16. 4 3 8 2 5 10 9 9. 10.
18. Cue dividido: Cuando este interruptor está en posición On (activado), se “divide” el audio de los auriculares de modo que todos los canales enviados al canal de cue se suma a mono y se envía al canal del auricular izquierdo y la mezcla maestra se suma a mono y se envía al canal derecho. Cuando el interruptor está en posición Off (Desactivado), el canal de cue y la mezcla maestra se “combinan”. 19.
34. Pads para actuaciones en vivo: Estos pads tienen distintas funciones en cada bandeja en función del modo de pad activo. 35. Hot Cue: Pulse este botón para entrar al modo de Hot Cue. Para más información, consulte la Guía del Usuario. 36. Loop: Pulse este botón una vez para entrar al modo Manual Loop. Para más información, consulte la Guía del Usuario. 37. Roll: Pulse este botón para entrar al modo Roll. Para más información, consulte la Guía del Usuario. 38.
Panel frontal 1 1. 2. 3. 2 2 3 Auriculares (1/4, 1/8 pulg.) (6,35, 3,5 mm): Conecte sus auriculares de 1/4 o 1/8 pulg. (6,35 o 3,5 mm) a esta salida para búsqueda de punto inicial (cue) y monitorización de la mezcla. El volumen de los auriculares se controla con la perilla Phones Level (nivel de auriculares).
Guide d’utilisation rapide (Français) Présentation Merci d’avoir fait l’acquisition du Prime 2. Chez Denon DJ, nous savons à quel point la musique est importante pour vous. C’est pourquoi nous concevons nos produits avec une seule chose en tête — faire de votre performance la meilleure qui soit. Contenu de la boîte Système autonome pour DJ Prime 2 Couvercle de protection pour l’écran Chiffon de nettoyage pour l’écran Câble d'alimentation CEI Câble USB 3.
Installation Important : À l’occasion, il se peut que nous procédions à des mises à jour du progiciel du Prime 2 afin d’ajouter des fonctionnalités et d’améliorer sa performance. Veuillez visiter denondj.com afin de vérifier s’il y a des mises à jour du progiciel disponibles, surtout si vous mettez à jour votre logiciel (les mises à jour du progiciel peuvent permettent l’utilisation des nouvelles fonctionnalités logicielles). 1. Visitez denondj.com et ouvrez une session.
Caractéristiques Panneau supérieur 48 46 40 48 48 47 49 43 44 26 27 28 19 12 32 23 24 1. 2. 3. 4. 5. 6. 7. 11 13 35 36 37 38 30 34 39 31 6 7 10 29 40 8 2 5 10 9 20 21 22 8 10 33 4 3 45 42 25 41 50 1 10 44 52 53 45 42 9. 10. 11. 12. 13. 14. 15. 16.
17. Phones Level : Ce bouton permet de régler le volume de la sortie casque. 18. Split Cue : Lorsque ce sélecteur est à On, l'audio du casque sera partagé afin que tous les canaux envoyés au canal cue soient combinés en mono et ajoutés au canal casque gauche et que le mix principal soit combiné en mono et ajouté au canal droit. Lorsque le sélecteur est à Off, l’audio du canal cue et du mix principal sont combinés. 19.
33. Censor/Reverse : Cette touche permet d'activer ou de désactiver la fonction censeur : la lecture de la piste sera inversée, mais lorsque la touche est relâchée, la lecture normale de la piste est relancée à partir de l’emplacement où elle serait si vous n’aviez pas activé la fonction Censor (c.-à-d., comme si la lecture n’avait jamais été interrompue). Maintenir la touche Shift enfoncée et appuyer sur cette touche permet de reprendre la lecture normale de la piste. 34.
Panneau avant 1 1. 2. 3. 3 2 2 Sortie casque (6,35 mm et 3,5 mm) : Cette sortie permet de brancher un casque d’écoute 6,35 mm ou 3,5 mm pour la pré-écoute et le calage. Le niveau de cette sortie est commandé par le bouton Phones Level. Affectation du crossfader : Ce commutateur permet d’acheminer l’audio du canal correspondant à l’un ou l’autre côté du crossfader (A ou B), ou de contourner le crossfader et d’acheminer l’audio directement au mix du programme (centre, Thru).
Guida rapida (Italiano) Introduzione Grazie per aver acquistato il Prime 2. Noi di Denon DJ sappiamo che per te la musica è una cosa seria. Ecco perché progettiamo i nostri dispositivi con un unico obiettivo in mente: rendere le tue prestazioni le migliori possibili. Contenuti della confezione Impianto DJ standalone Prime 2 Cover di protezione del display Panno per la pulizia del display Cavo di alimentazione IEC Cavo USB 3.
Configurazione Importante: di tanto in tanto potremmo aggiornare il firmware del Prime 2 per aggiungere nuove emozionanti funzioni e per apportare miglioramenti. Recarsi alla pagina denondj.com per verificare l'eventuale presenza di aggiornamenti del firmware disponibili, soprattutto dopo l'eventuale aggiornamento del software (gli aggiornamenti del firmware possono essere rivolti a nuove funzioni del software). 1. Recarsi alla pagina denondj.com ed effettuare il login al proprio account.
Caratteristiche Pannello superiore 48 46 40 48 48 47 49 43 44 26 27 28 19 12 32 23 24 1. 2. 3. 4. 5. 6. 7. 11 13 35 36 37 38 30 34 39 31 6 7 10 29 40 8 2 5 10 9 20 21 22 8 10 33 4 3 45 42 25 41 50 1 10 44 52 53 54 55 56 45 42 25 26 27 41 10 10 15 43 51 9 33 20 11 12 21 13 22 17 18 23 29 19 16 14 24 32 35 36 37 38 30 39 34 10. 11. 12. 13. 14. 15. 16. 4 3 8 2 5 10 9 9.
17. Livello cuffie: regola il volume delle cuffie. 18. Split Cue: quando questo interruttore è su On, l’audio delle cuffie sarà “suddiviso” in modo che tutti i canali inviati a cue vengano sommati a mono e inviati al canale cuffie di sinistra, e che il mix master venga sommato a mono e inviato al canale destro. Quando l’interruttore è su Off, il canale Cue e il mix master verranno “miscelati” insieme. 25 40 19.
35. Hot Cue: premere questo tasto per entrare in modalità Hot Cue. Per maggiori informazioni, si veda la Guida per l'uso. 36. Loop: premere questo tasto una volta per entrare in modalità Manual Loop. Per maggiori informazioni, si veda la Guida per l'uso. 37. Roll: premere questo tasto per entrare in modalità Roll. Per maggiori informazioni, si veda la Guida per l'uso. 38. Slicer: premere questo tasto per entrare in modalità Slicer. Per maggiori informazioni, si veda la Guida per l'uso. 39.
Pannello anteriore 1 1. 2. 3. 3 2 2 Cuffie (1/4”, 1/8”) (6,35 mm, 3,5 mm): collegare le cuffie da 1/ 4” o 1/8” (6,35 mm 3,5 mm) a questa uscita per il monitoraggio del mix e il cueing. Il volume delle cuffie è controllato tramite la manopola Phones Level (livello cuffie). Crossfader Assign (assegna crossfader): convoglia l’audio riprodotto sul canale corrispondente a ciascun lato del crossfader (L o R), oppure bypassa il crossfader e invia l’audio direttamente al mix programma (centro, Thru).
Schnellstart-Anleitung (Deutsch) Einführung Vielen Dank für den Kauf des Prime 2. Wir von Denon DJ wissen, wie wichtig Ihnen die Musik ist. Darum entwerfen wir unsere Geräte stets nur mit einem einzigen Ziel vor Augen: Ihre Performance so gut wie möglich zu unterstützen. Lieferumfang Prime 2 Standalone-DJ-System Display-Schutzabdeckung Display-Reinigungstuch IEC-Netzkabel USB 3.
Setup Wichtig: Möglicherweise werden wir die Firmware für Prime 2 gelegentlich aktualisieren, um nützliche neue Funktionen und Verbesserungen hinzuzufügen. Besuchen Sie insbesondere nach einer Aktualisierung Ihrer Software denondj.com, um zu sehen, ob Firmwareupdates verfügbar sind, (Firmwareupdates können neue Softwarefunktionen betreffen). 1. Besuchen Sie denondj.com und melden Sie sich bei Ihrem Konto an. (Falls es sich um Ihr erstes Denon DJ– Produkt handelt, erstellen Sie bitte ein Konto.) 2.
Funktionen Oberseite 48 46 40 48 48 47 49 43 44 26 27 28 19 12 32 23 24 1. 2. 3. 4. 5. 6. 7. 11 13 35 36 37 38 30 34 39 31 6 7 10 29 40 8 2 5 10 9 20 21 22 8 10 33 4 3 45 42 25 41 50 1 10 44 52 53 45 42 9. 10. 11. 12. 13. 14. 15. 16. 25 26 27 41 9 28 33 20 11 12 21 13 22 17 18 23 29 19 16 14 24 32 35 36 37 38 30 39 34 31 Touchscreen: Dieses Vollfarb-Multi-Touch-Display zeigt Informationen, die den derzeitigen Betrieb von Prime 2 betreffen.
17. Phones Level (Kopfhörer-Pegel): Passt die Laufstärke des Kopfhörers an. 18. Split Cue (Cue-Splitting): Wenn sich dieser Schalter in der “Ein”-Position befindet, wird das Audio des Kopfhörers “gesplittet”, so dass alle an den Cue-Kanal gesendeten Kanäle zu mono zusammengefasst und an den linken Kopfhörerkanal gesendet und der Master-Mix zu mono zusammengefasst und an den rechten Kanal gesendet wird. Wenn sich der Schalter in der “Aus”-Position befindet, werden der Cue-Kanal und der Mastermix „vermischt“.
34. Performance-Pads: Je nach aktuellem Pad-Modus besitzen diese Pads auf jedem Deck unterschiedliche Funktionen. 35. Hot Cue: Drücken Sie diese Taste, um den Hot Cue-Modus aufzurufen. Siehe das Benutzerhandbuch für weitere Informationen. 36. Loop: Drücken Sie diese Taste einmal, um in den Manual Loop-Modus zu gelangen. Siehe das Benutzerhandbuch für weitere Informationen. 37. Roll: Drücken Sie diese Taste, um in den Roll-Modus zu gelangen. Siehe das Benutzerhandbuch für weitere Informationen. 38.
Vorderseite 1 1. 2. 3. 2 2 3 Kopfhörer (6,35 mm, 3,5 mm): Schließen Sie zum Cuing und Mix-Monitoring Ihre 6,35 mm- oder 3,5 mm-Kopfhörer an. Die Kopfhörerlautstärke wird über den Kopfhörerpegel–Regler angepasst. Crossfader Assign (Crossfader-Zuweisung): Routet das auf dem entsprechenden Kanal wiedergegebene Audio an die entsprechende Seite des Crossfaders (L oder R), oder umgeht den Crossfader und sendet das Audio direkt zum Programmmix (Mitte, Thru).
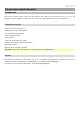
Appendix (English) Technical Specifications Frequency Response 20 Hz – 20 kHz (±1 dB) Dynamic Range > 112 dB (A-weighted) Signal-to-Noise Ratio > 92 dB (A-weighted) Headroom Aux/Line > 15 dB Mic Input > 20 dB Outputs > 20 dB < -85 dB (1 kHz, unity) Channel Separation T.H.D. Analog Input Analog Output Connections Aux/Line < 0.01% (1 kHz, unity) Microphone < 0.
Trademarks & Licenses Denon is a trademark of D&M Holdings Inc., registered in the U.S. and other countries. Denon DJ products are produced by inMusic Brands, Inc., Cumberland, RI 02864, USA. Kensington and the K & Lock logo are registered trademarks of ACCO Brands. Windows is a registered trademark of Microsoft Corporation in the United States and other countries. All other product names, company names, trademarks, or trade names are those of their respective owners.
Manual Version 1.