User Guide English ( 3 – 30 ) Guía del usuario Español ( 31 – 59 ) Guide d’utilisation Français ( 60 – 87 ) Guida per l’uso Italiano ( 88 – 115 ) Benutzerhandbuch Appendix Deutsch ( 116 – 144 ) English ( 145 – 147 )
User Guide (English) Introduction Box Contents Support DN-500BD MKII Rack Ears & Screws Power Cable User Guide Remote Control Safety & Warranty Manual For the latest information about this product (system requirements, compatibility information, etc.) and product registration, visit denonpro.com. Safety Instructions Please also see the included Safety & Warranty Manual for more information.
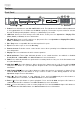
Features Front Panel 4 8 9 10 11 5 6 7 1 2 3 12 13 14 1. Power: Press this button to turn DN-500BD MKII on/off. The light above the button will be red when it is off or green when it is on. Make sure the AC In is properly connected to a power outlet. Do not turn the unit off during media playback—doing so could damage your media. 2. USB Port: Connect a mass-storage-class USB device to this port. See Operation > Playing Files (Video, Audio, or Picture) for more information. 3.
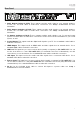
Rear Panel 1 1 2 3 4 5 6 7 8 9 7.1 1. Audio Outputs (balanced, XLR): These outputs send the audio signal to your external speakers, receiver, etc. Use XLR cables to make these connections. See Setup > Connections for more information. 2. Audio Outputs (unbalanced, RCA): These outputs send the audio signal to your external speakers, receiver, etc. Use RCA cables to make these connections. See Setup > Connections for more information. 3. 7.
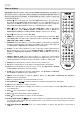
Remote Control Important: Point the remote control at the remote sensor when operating it. If the remote sensor is exposed to direct sunlight, strong artificial light (like from an interverter-type fluorescent lamp), or infrared light, the unit or remote control may not function properly. 1. Power ( ): Press this button to turn DN-500BD MKII on/off. The light above the button on DN-500BD MKII will be red when it is off or green when it is on. Make sure the AC In is properly connected to a power outlet.
22. Audio: Press this button during video playback to show current audio setting in the upper-left corner of the screen. Each press after that will select the next available setting. The available settings depend on the supported audio configurations of your video. For example, a video file may let you select Stereo, Mono, Left, or Right, while a Blu-ray Disc may let you select DTS-HD MA (Master Audio) or Dolby Digital in various languages. 23.
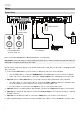
Setup Connections 7.1 USB hard drive To 7.1 sound system Power Powered Monitors, receiver, amp, etc. TV or display Modem Items not listed in Introduction > Box Contents are sold separately. Important: Connect all cables securely and properly (with stereo cables: left with left, right with right). Do not bundle or wrap them with the power cable. Not all of these steps may apply to your specific audio/video setup, but you will need to do Steps 1 and 5 at the very least. 1.
Initial Wizard 1. Press DN-500BD MKII’s Power button to power it on. Make sure your TV is on, too. 2. The Initial Wizard screen will appear. On each page of the Initial Wizard: • Use the up/down cursor buttons () on the remote control to move through the available options. • Press OK to confirm your selection and move to the next page. • Press Skip Back ( ) to return to the previous page. 3. On Page 1, press OK on the remote control to move to the next screen. 4.
Operation If the unit is off, press the Power Button to power it on. Getting Started (Home Screen) To select what kind of media you want to play: 1. On the remote control, press Home to open the Home screen. 2. Press the left/right cursor buttons () on the remote control to move through the options. • Blu-ray Disc: Select this to play a video disc in the standard Blu-ray or DVD format.
To rewind or fast-forward, press Search Back/Forward ( / ) on the remote control. Each time you press the same button, the speed will increase. You can do this up to 5 times before it returns to normal playback speed. To resume playback, press Play ( ) on DN-500BD MKII or the remote control. To skip to the next chapter, press Skip Forward ( ) on DN-500BD MKII or the remote control. If Chapter Repeat is on (described later), this will skip to the beginning of the current chapter.
To jump to a specific title, chapter, or time of the disc: 1. Press GoTo on the remote control. The Information panel will appear at the top of the screen. (To cancel the operation before selecting a title, chapter, or time, press GoTo again or wait until the blue square cursor in the Information panel disappears, and then press Info.) 2. Use the left/right cursor buttons () to select any of the available fields: • Title: Press OK to “unlock” this field.
Playing Audio Discs DN-500BD MKII can play and view the following audio disc formats: Supported CD formats CD, CD-R, CD-RW, DTS Music Disc (DTS Audio CD, 5.1 Music Disc), HDCD, Super Video CD (SVCD), Video CD (VCD) Supported DVD formats DVD, DVD+R, DVD-R, DVD+RW, DVD-RW See the Basic Functions section to learn some basic operations. See Additional Functions to learn more advanced ones. Basic Functions To play audio from a CD: 1.
Additional Functions To select a Repeat mode, press Repeat on the remote control, or press Shift and Skip Back ( DN-500BD MKII. It will cycle through 3 modes: • Off: Normal operation. • Repeat Track: The current track will repeat continuously. In this Repeat mode, pressing will Skip Back/Forward ( / ) will skip to the beginning of the current chapter only. • Repeat All: The current title will repeat continuously. ) on All To select a playback mode, press Random on the remote control.
To create a Program (a list of tracks that will play in a specific order): 1. Press Prog on the remote control. The Program page will appear on the screen. In the Program page, the type of media and total number of tracks (Track Total) will appear above the 15 available slots of the Program. 2. Do any of the following in the Program page: • At any time, press Play ( ) on DN-500BD MKII or the remote control to start playing the Program.
Basic Functions USB Drive: To browse your files and play a file: 1. Gently insert a USB drive to the USB port on the front panel or rear panel. The display will show USB In when DN-500BD MKII recognizes the USB drive. 2. Press Home on the remote control to view the Home screen. 3. Use the left/right cursor buttons () to select Media Center, and then press OK. The Media Center will appear on the screen. 4.
While playing an audio file, the screen will show the following information: File Name, Type (file format), Total Time, Title, Artist, Album, and Genre. The last four items are usually included as ID3 tags but are not always present in all audio files. If the file is missing an ID3 tag, the field will be blank. While viewing a picture, you can do the following: • Press the up cursor button () to flip (mirror) the picture vertically.
To skip to the next file, press Skip Forward ( ) on DN-500BD MKII or the remote control. To skip to the previous file, press Skip Back ( ) twice on DN-500BD MKII or the remote control (though if you are within the first few seconds of the current file, you can press it just once.) While viewing pictures, press this button only once instead of twice. To return to the beginning of the file, press Skip Back ( ) once on DN-500BD MKII or the remote control.
To play a playlist: 1. Go to the highest folder in the Media Center. 2. Select the Playlist folder and then press OK. 3. Select the folder for the desired file type: Photo, Music, or Video. 4. Select the file from which you want to start playback, and then press Play ( ) on DN-500BD MKII or the remote control, or press OK on the remote control. The playlist will start playing. To remove files from a playlist: 1. Go to the highest folder in the Media Center. 2. Select the Playlist folder and then press OK.
Adjusting the Sound Important: If the Vol –/+ and Mute buttons do not work, set the Output Volume to Variable instead of Fixed (see Adjusting the Settings > Setting > Audio Setup to learn how to do this). To adjust the volume, use the Vol –/+ buttons on the remote control. Alternatively, use the volume adjustment controls on your TV, your TV’s remote control, your audio receiver or amplifier, etc. Important: These buttons control the output level of the audio outputs and 7.1 outputs only.
Other Features Lock The Lock feature disables almost all of the buttons on DN-500BD MKII’s front panel. This helps prevent accidental changes to playback. To enable/disable the Lock feature, press and hold Shift and then press Stop on DN-500BD MKII’s front panel. When Lock is enabled, the Lock light (to the right of the display) will turn on. While Lock is enabled, you can still do the following: • Disable the Lock feature on the front panel.
Adjusting the Settings Setting The Setting menu lets you change settings that affect DN-500BD MKII’s overall operation. There are several different types of settings you can configure: playback (see Playback Setup below), video (see Video Setup below), sound (see Audio Setup below), network connections (see Network Setup below), or DN-500BD MKII itself (see Device Setup below).
Playback Setup • Power On Mode o • • • DVD/CD Auto Play: When set to On, a disc will start playing automatically after you insert it. When set to Off, you will have to start disc playback manually after inserting it. Setting o PIP Mark: When set to On, the screen will show a mark to indicate that there is secondary video you can view using the Picture-in-Picture feature. When set to Off, these marks are disabled (though you can still use the Picture-in-Picture feature).
Video Setup • Output Setting o Video Adjust: Select More… and press OK to view the sliders for Brightness, Contrast, Hue, and Saturation. Use the left/right cursor buttons () to adjust each one. Press b to return to the previous screen. o 3D Output: When set to Auto, DN-500BD MKII will determine automatically display 3D video output if a video uses it. When set to Off, no videos will use 3D video output.
• Close Caption o CC Attribute: When set to Auto, the closed captioning feature will use the default font, size, colors, opacity, etc. When set to Custom, you can select these attributes to your preference (described below). o Font Color: The color of the text: Default, White, Black, Red, Green, Blue, Yellow, Magenta, or Cyan. o Font Size: The size of the text: Default, Standard, Small, or Large.
• Sound Control o Crossover: Select the crossover frequency for your sound system: Off, 40Hz, 60Hz, 80Hz, 90Hz, 100Hz, 110Hz, 120Hz, 150Hz, 175Hz, 200Hz, or 250Hz. Any audio content whose frequency is lower than this setting will be sent to your subwoofer, if any. o Dynamic Range: When set to On, DN-500BD MKII will apply some compression to smooth out the high and low volume levels of the audio. When set to Off, DN-500BD MKII will not use any compression.
• Setting Interface: Select how DN-500BD MKII will access the internet: Ethernet (the LAN port must be connected to your Ethernet connection) or Wireless (DN-500BD MKII will connect to your wireless router). When you change this setting, you will be asked if you want to continue, which terminates your current connection.
Device Setup • • Firmware o Version: DN-500BD MKII’s current firmware version. o Upgrade: When you are upgrading DN-500BD MKII’s firmware, select how DN-500BD MKII will access the firmware file: Disc, USB Storage, or Network. Follow the instructions included with the firmware update file.
BDMV Options • Title: The number on the left is the currently playing title, which you can change. The number on the right is the total number of titles. • Chapter: The number on the left is the currently playing chapter, which you can change. The number on the right is the total number of chapters. • Time: Use this to show the time as the elapsed time for the title (TT), remaining time for the title (– TT), elapsed time for the chapter (CH), or remaining time for the chapter (–CH).
Audio CD Options • Track: The number on the left is the currently playing track, which you can change. The number on the right is the total number of tracks on the disc or in the program. • Time: Use this to show the time as the elapsed time for the track (Track), remaining time for the track (–Track), elapsed time for the disc (Disc), or remaining time for the disc (–Disc). • Mode: Use this to select a playback mode: Normal, Random, or Shuffle.
Appendix (English) Technical Specifications All specifications are subject to change without notice. Digital System System Digital media player (Blu-ray Disc, DVD, CD, SD, USB device [mass storage class]) AVCHD playback format Supported Disc Formats Supported File Formats Supported File Systems Blu-ray Disc BD25, BD50, BD-ROM, BD-R, BD-RE DVD DVD, DVD+R, DVD-R, DVD+RW, DVD-RW CD CD, CD-R, CD-RW, DTS Music Disc (DTS Audio CD, 5.1 Music Disc), HDCD, Super Video CD (SVCD), Video CD (VCD) Video .
Audio Analog Outputs Output Level (balanced XLR): +4 dBu = +1.786 dBV Output Level (unbalanced RCA): +6 dBV Digital Output Output Level (coaxial): 0.5V, 75 Ω Signal Format: AES/EBU Surround Audio DTS-Master Audio, DTS-HD High Resolution Audio, DTS Digital Surround, Dolby TrueHD, Dolby Digital (AC-3), Dolby Digital Plus (7.1ch) Frequency Response 20 Hz – 20 kHz (+0.5 dB) Signal-to-Noise Ratio > 100 dB (A-weighted) Total Harmonic Distortion < 0.
Trademarks and Licenses Denon is a trademark of D&M Holdings Inc., registered in the U.S. and other countries. Blu-ray™, Blu-ray Disc™, and the logo are trademarks of the Blu-ray Disc Association. Dolby and the double-D symbol are registered trademarks of Dolby Laboratories. ® DivX and the DivX Mark are trademarks or registered trademarks of DivX, LLC and its affiliates in the United States and other countries and is used under license.
denonpro.com Manual Version 1.
DENON PROFESSIONAL Important Safety Instructions & Warranty Information lnstrucciones importantes de seguridad e informaci6n de la garantia Instructions importantes de securite et informations de garantie lstruzioni importanti di sicurezza e le informazioni della garanzia Wichtige Sicherheitsanweisungen und Garantieinformationen English (3-7) Espanol (8-11) Franc;ais (12-15) Italiano (16-19) Deutsch (20-23)
Denon is a trademark of D&M Holdings Inc., registered in the U.S. and other countries. Denon Professional products are produced by inMusic Brands, Inc., Cumberland, RI 02864 U.S.A. NEMAe is the registered trademark and service mark of the National Electrical Manufacturers Association. All other product names, company names, trademarks, or trade names are those of their respective owners.
DENON Product Warranty l'•OFEII/OAIAL (for products purchased in the U.S.A.) 1. What is covered and for how long? All Products: inMusic Brands, Inc.
DENON Product Warranty ,.oFE66/0NAL (for products purchased outside of the U.S.A.) 1. inMusic Brands, Inc. ("inMusic") warrants to the original purchaser that Denon Professional ("Denon Pro") products are free from defects in material and workmanship under normal use and service for the period commencing upon the date of purchase from an authorized Denon Pro dealer and continuing for the following period of time after that date for (1) Year. 2.
Return Information • • • • • • • A return merchant authorization number must be obtained from your local Denon Pro representative. For your representative go to denonpro.com. A copy of the original sales receipt must also be included for the equipment to be repaired under warranty. The faulty equipment must be packed in its original packaging. One additional outer layer of packaging must be included to ensure product safety.
12. Power Sources (if applicable): This product should be connected to a power supply only of the type described in these operating instructions, or as marked on the unit. 13. Internal/External Voltage Selectors (if applicable): Internal or external voltage selector switches, if any, should only be reset and re-equipped with a proper plug for alternative voltage by a qualified service technician. Do not attempt to alter this yourself. 14.
~ This device complies with Part 15 of the FCC rules. Operation is subject to the following two conditions: (1) this (2) this device must accept any interference received, including interference that may cause undesired operation. ~ device may not cause harmful interference, and FCC Radiation Exposure Statement: This equipment complies with FCC radiation exposure limits set forth for an uncontrolled environment.
World Headquarters inMusic Brands, Inc. 200 Scenic View Drive Cumberland, RI 02864 USA Tel: 401-658-5766 Fax: 401-658-3640 U.K. Office inMusic Europe, ltd. Unit 3, Nexus Park Lysons Avenue Ash Vale HAMPSHIRE GU12 SOE UNITED KINGDOM Tel: 01252 896 040 Fax: 01252 896 021 Germany Office inMusic GmbH Harkortstr. 12 - 32 40880 Ratingen GERMANY Tel: 02102 7402 20150 Fax: 02102 7402 20011 denonpro.