
Owner's Manual


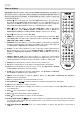
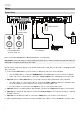

Table Of Contents

6
Remote Control
Important: Point the remote control at the remote sensor when operating it. If
the remote sensor is exposed to direct sunlight, strong artificial light (like from an
interverter-type fluorescent lamp), or infrared light, the unit or remote control may
not function properly.
1. Power (
): Press this button to turn DN-500BD MKII on/off. The light above
the button on DN-500BD MKII will be red when it is off or green when it is on.
Make sure the AC In is properly connected to a power outlet. Do not turn the
unit off during media playback—doing so could damage your media.
2. Mute (
): Press this button to mute DN-500BD MKII’s audio. If this button
does not work, set the Output Volume to Variable instead of Fixed (see
Adjusting the Settings > Setting > Audio Setup to learn how to do this).
3. Eject (
): Press this to eject the disc tray.
4. HDMI: Press this button to select the next available picture resolution: Auto
(DN-500BD MKII will detect the optimal resolution automatically), 480i/576i,
480p/576p, 720p, 1080i, or 1080p.
5. 2nd Audio: Press this button to select the language of the audio used with the
Picture-in-Picture feature. This feature is available only on discs that support it.
See Operation > Adjusting the Sound for more information.
6. Volume –/+: Press these buttons to lower or raise the volume (respectively). If
these buttons do not work, set the Output Volume to Variable instead of
Fixed (see Adjusting the Settings > Setting > Audio Setup to learn how to
do this).
7. Number Buttons (0–9): Press these buttons to enter their corresponding
numbers. While playing media and not viewing an additional menu or screen,
entering a number or numbers will select that disc chapter or audio track.
8. Return: Press this button to return to the previous menu/screen.
9. Clear: Press this button to clear (delete everything in) the current field.
10. Home: Press this button to open the Home screen. See Operation > Getting
Started (Home Screen) for more information.
11. Setup: Press this button to open the Setup Menu. See
Operation > Adjusting
the Settings > Setting for more information.
12. Option: Press this button to open the Options Menu. See Operation > Adjusting the Settings >
Options for more information.
13. Info: Press this button to open the Information screen.
14. Cursor Buttons (): Use these buttons to navigate through the files and folders.
15. OK: Press this button to confirm a selection.
16. GoTo: Press this button to manually enter a time you want to skip to. See the Operation chapter for
more information.
17. Stop (): Press this button to stop playback.
18. Pause (): Press this button to pause playback.
19. Play (
): Press this button to start or resume playback.
20. Search Back/Forward (
/ ): Press these buttons to rewind/fast-forward, respectively. Each time
you press the same button, the speed will increase. You can do this up to 5 times before it returns to
normal playback speed.
21. Skip Back/Forward (
/ ): Press one of these buttons to skip to the previous or next track or
chapter.