DVD VIDEO AUTO CHANGER DVM-1815 OPERATING INSTRUCTIONS MODE D'EMPLOI INSTRUCCIONES DE OPERACION ®® £®®® @@@@ 50@@ U 2 _ 3_ _ _ _i_ _ _ _ _ _ _ LD Y_y Z_ _©gd_ _ .,fT-b, o o _ e....
WARNING: TO REDUCE THE RISK OF FIRE OR ELECTRIC APPLIANCE TO RAIN OR MOISTURE. SHOCK, DO NOT EXPOSE THIS I I CAUTION ,_ equilateral triangle, is intended to alert the user to the presence of uninsulated The lightning flash with 'dangerous arrowhead voltage" symbol, within within the an product's enclosure that may be of sufficient magnitude to constitute a risk of electric shock to persons. TO REDUCE THE RISK OF ELECTRIC SHOCK, DO NOT REMOVE COVER (OR BACK). NO USER SERVICEABLE PARTS INSIDE.
F Important Safeguards 1) 2) 3) 4) Read Instructions - All the safety and operating 13) Power-Cord instructions should be read before the product is operated. Retain Instructions - The safety and operating instructions should be retained for future reference.
• PRECAUTIONS .............................. Laser Safety ................................. Important Safeguards .......................... • INTRODUCTION .............................. About Copyright ............................... Supplied Accessories .......................... Symbols Used in this Manual ..................... 2 2 3 5 5 5 5 • DVD SETUP ................................ Language Setting ............................ Display Setting ............................... Audio Setting .........
Theserialnumberofthisproductmaybefoundon thebackofthe DVDplayer.Noothershavethe sameserialnumberasyours.Youshouldrecordthenumberandothervitalinformation hereand retainthisbookasa permanentrecordof yourpurchaseto aididentification in caseoftheft.Serial numbersarenotkepton file. Dateof Purchase DealerPurchase from DealerAddress DealerPhoneNo. ModelNo. SerialNo. About Copyright Unauthorized copying, broadcasting, public performance and lending of discs are prohibited.
• CD-I (Never play back, otherwise malfunction may result.) • SACD • Photo CD (Never play back, otherwise malfunction may result.) Any other discs without compatibility indications. J-_ PlayableDiscs The following DVD player.
• Progressive Scan system Unlike conventional interlace scanning, the progressive scan system provides less flickering and images in higher resolution than that of traditional television signals. • Dolby Digital sound This player can handle Dolby Digital surround sound having 5.1 channels when connected to a Dolby Digital decoder. • Still/fast/slow/step playback Various playback modes are available including still pictures, fast forward/reverse, slow motion and step frames.
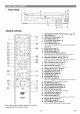
FRONT PANEL 1 3 32 2 I ? 15 4 12 11 13 [ REMOTE 14 CONTROL] 1. 2. 3. 4. 5. 6. 7. 1 ............................................ 8. 9. 10. 11. 12. 13. 14. 14 ..... 15. 16. 17. 18. 19. 20. 21. 32 .................... 13 _ 12 6_ 11 22. 23. 24. 25. 26. 4 27. 28. 29. DENON 30. 31. 32.
_ Tour of the remote control Buttons on remote control work in different ways for DVD and CD : Refer to the following table for correct use. DVD CD POWER _0wE_ OFF ON _ • Press this to switch the power between on and standby, • Press this to switch the power between on and standby. A-B REPEAT Button A-B _T • Marks a segment to repeat between A and B. • Marks a segment to repeat between A and B.
Tour of the remote control DVD CD MENU Button MENU © * Brings up the Menu on a disc. TOP MENU Button TOPME.U ° Brings up the Top Menu on a disc. © ENTER, CURSOR Buttons • Moves the cursor and determines its position. • Moves the cursor and determines its position, RETURN Button RFURN O • Returns to a previous menu. SETUP Button SETUp © • Brings up the DVD player's Setup menu. • Brings up the DVD player's Setup menu. • TO skip Chapters. • To skip Tracks.
_._ Display _>_ l, Stays on when repeat chapter function is on. _,.......................... Stays on when repeat track function is on. Stays on when repeat title function is on. _,,,,,,,,, Lights Stays on when _L_ Stays onrepeat when the A-B ....... the repeat function is on. function is on. _, }ii_J REPEAT I"t" 17 I'1" t'1 I"1 B !| CD _t"l TITLE CliP.TRK. _ _,._-_'L-_ _._-_"_,._-_0 Stays on when the inserted disc is being played back. During a DVD is inserted into the tray.
Description - rear panel _>_ © © COMPONENT _ S-VIDEO"AUDI(OUT]" DIGITALOUT "REMOTE_1 VIDEO OUT OUT / (PCM/BITSTREAM)C0NTROL I o© _!CPROGRESSIVE / RO0_, _TO RO0_, _I © ! 6 1. 3 4 5 1 7 DIGITAL OUT JACKS: Use either an optical or coaxial digital cable to connect to a compatible Digital decoder or DTS decoder. 2. AUDIO OUT JACKS Connect to the Audio input jacks of AN-compatible 3. VIDEO OUT JACK Dolby Digital receiver. Use to connect to a Dolby TV or wide screen TV, Stereo system.
The following show examples of connections commonly components. used to connect the DVD player either TV and other Notes • Be sure to turn off the power to all components in the system before connecting another component. • Refer to the Instruction Manuals for your TV, stereo system and any other components to be connected to the DVD player.
Connection to a TV (for video) _>_ [ Method 1 I Basic Audio Good picture I Method 2 1 Better picture I Method 3 ] Best picture COMPONENT VIDEO VIDEO IN IN AV Cable D I AUDIO OUT D COMPONENT __VIDE0OUT I Analog Audio out Video S-Video out out Component Video out • Method 1 DVD Player + TV with Video Input Jack • Method 2 DVD Player + TV with S-Video Input Jack • Method 3 DVD Player + TV with Component Video Jacks NOTES • If your TV is compatible with progressive scanning (480p), con
_,_ Basic Playback Pause Getting started [] During playback, press the STILL/PAUSE • Turn on the power of the TV, amplifier and any other components which are connected to the DVD. • Make sure the TV and audio receiver (commercially available) are set to the correct channel. [] Press the POWER ON button. [] [] [] • "P-ON" will appear briefly on the display panel. Press the OPEN/CLOSE button to open disc loading tray. Press the DISK SKIP button repeatedly or press the DISK NUMBER button.
_- Resume Zoom [] During playback, press the STOP button. • Resume message will appear on the TV screen. The Zoom function allows you to enlarge the video image and to pan through the enlarged image. [] Press the ZOOM button during playback. [] • Playback will continue. Press the ZOOM button repeatedly to select required zoom factor: x2, x4 or OFR the [] Press the PLAY button, playback will resume from the point at which playback was stopped. • To cancel resume, press the STOP button twice.
_" Track _ _ There are three ways to begin playback on an Audio CD, MP3 and WMA at a specific Track. [By using [] the Numeric Press the numeric Track number. buttons buttons I to enter the desired [] [] the SEARCH MODE button Press the SEARCH MODE button. _ • The track search display appears. (Audio buttons _ to display Ik31Within 30 seconds, enter a desired disc time with the numeric buttons. _ Ik-lpress the CLEAR button to erase the incorrect input.
I REPEATTRACK ] To activate the repeat function, press the REPEAT button during playback. • OFF 'miD-- repe_ off [] TRACK ,miD-- (_]r_e;ti:_Rkel_::;t) [] Program _>_ You may determine the order in which tracks will play. [] In stop mode press the MODE button. The repeat mode changes as described below every time you press the button. [] _ [] • The PROGRAM screen will appear. Press the cursor buttons ....................................................
MP3 / JPEG/WMA Applicable MP3 file Playback This DVD player can reproduce images and sounds from data recorded in MP3, JPEG and WMA formats on CD-R and CD-RW discs. The DVD player can also run JPEG files stored on Kodak picture CD. The user can enjoy picture images on the television set by reproducing picture CDs. * Picture CD is a service to convert a photograph taken by conventional film camera into digital data and write the data on a CD.
Notes on MP3, JPEG and WMA: Track Selection • Select "FIRST PLAY" and press the PLAY button, playback from the top of the disc in the order of tracks and groups. • The ninth and deeper hierarchies cannot be played. • The name of group and track can be displayed in up to 25 characters. Alphabets, numerals underline, asterisk or space may not be displayed. Unrecognizable characters will be replaced with asterisks. • Un-reproducible groups or tracks may be displayed depending on the recording conditions.
_" Program Audio Language The DVD player allows you to select a language during DVD disc (if multi language available) playback. [] Press the AUDIO button during playback. [] Press the AUDIO button repeatedly to select your This feature allows you to program a rap3 disc to play in a desired sequence• [] Press the MODE button while playback is stopped • • The PROGRAM screen will _....... ] desired appear• [] Press the • or • button to select a group, then press the ENTER button.
MX Subtitle Language /_ The DVD player allows you to select a language for subtitle during DVD disc (if available) playback. [] Press the SUBTITLE button during playback. [] Press the SUBTITLE button repeatedly to select your desired subtitle language. • The selected language will be displayed on the display bar at the top of the screen. [] To turn off subtitles, press the SUBTITLE button repeatedly until OFF Changing the On-Screen Display once during playback current Disc number. to show I: ....
Marker Setup Screen _ Use markers to memorise Press the SEARCH MODE button four times during playback. • The display screen and Markers will appear on the TV screen. [] Press the _1 or I_ button to select 1,2, 3, 4, 5, 6, 7, 8, 9, or 10 and ensure that" • : "appears in the display. [] When reaches the desired point, press the ENTER button. • The Title or Track and elapsed playing time will appear in the TV screen.
InSetupmenu,QUICKmodeandCUSTOMmodeareavailale.QUICKmodeconsistsof thesettingmenusoftenneeded,andyoucanmakeallsettingsrequiredin CUSTOMmode. Youcanmakethesettingsofthe itemswith_ markin QUICKmode. _" Language Setting _ Language options are not available with some discs. [] Press the SETUP button in STOP mode. [] Press the I_ button to select CUSTOM, then press the ENTER button. • CUSTOM mode will appear, j [] Press the _1 or I_ button to se,,"" lect LANGUAGE, then the EN_ _ _i_ _" TER button to confirm.
_ Audio Setting Ratings Control Choose the appropriate Audio settings for your equipment as it only affect during the playback of DVD discs of the DVD player. [] Press [] Press the I_ button the ENTER button. [] the SETUP button in STOP to select mode. CUSTOM, then press Ratings Control limits playback of discs with unsuitable audience ratings. A four digit code established by the user will unlock the parental lock.
Code Lan uguage Code Lan uguage Code Lan_ Abkhazian Afar Afrikaans Albanian Arnharic 4748 4747 4752 8563 4759 Frisian Galician Georgian German [GER] Greek [GRE] Greenlandic 5271 5358 5747 5051 5158 5758 Malay Malayalam Maltese Maori Marathi Moldavian 5965 5958 5966 5955 5964 5961 Somali Spanish Sundanese Swahili Swedish Arabic Armenian Assamese Ayr'nara Azerbaijani Bashkir Basque Bengali;Bangla Bhutani Bihari Bislama Breton Bulgarian Burmese Byelorussian 4764 5471 4765 4771 4772 4847 5167 4860
Cleaning the Cabinet • Use a soft cloth slightly moistened with a mild detergent ammonia or abrasives. solution. Do not use a solution containing alcohol, spirits, Cleaning Discs • When a disc becomes dirty, clean it with a cleaning cloth. Wipe the disc from the center out. Do not wipe in a circular motion. • Do not use solvents such as benzine, thinner, commercially available cleaners, detergent, adrasive cleaning agents or antistatic spray intended for analogue records.
If the DVD player does not perform properly when operated as instructed in this Operating sulting the following checklist.
SIGNAL SYSTEM NTSC color APPLICABLE DIGITAL AUDIO OUTPUT (1) DVD-Video discs l-layer 12cm single-sided discs, discs, 2-layer 12cm double-sided l-layer 8cm single-sided discs, discs, 2-layer 8cm double-sided (2) DVD-R/DVD-RW (3) Compact discs (CD-DA) 12cm discs, 8cm discs (4) CD-R/CD-RW S-VIDEO Optical digital output: Optical connector, Coaxial digital output: Pin jack, 1 set DISCS 2-layer 12cm single-sided discs (1 layer per side) 2-layer 8cm single-sided discs (1 layer per side) 1 set POWER SUPPLY AC
DENON, Ltd.