DENON AV SURROUND PRE-AMPLIFIER AVP-A1HDCI Owner's Manual
o SAFETY PRECAUTIONS SAFETY INSTRUCTIONS 1. A. RISK OF ELECTR~C SHOCK A ~ L.-_=D=O,--,-N=O~T,-"O...,P-"E",-,N~----, ~ CAUTION: TO REDUCE THE RISK OF ELECTRIC SHOCK, DO NOT REMOVE COVER (OR BACK). NO USER·SERVICEABLE PARTS INSIDE.
FCC Information (For US customers) o NOTE ON USE I OBSERVATIONS RELATIVES A l'UTILISATION 1. COMPUANCE INFORMATION Product Name: AV Surround Pre-Amplifier Model Number: AVP-A1HDCI This product contains FCC 10: BV2- MPGBR052. This product complies with Part 15 of the FCC Rules. Operation is subject to the following two conditions: (1) this product may not cause harmful interference, and (2) this product must accept any interference received, including interference that may cause undesired operation.
IGW'M!.gM. ~:ll&(B\j~l;!;f;;;;,;;. Contents ~~~~::~·~::1~0:0:~::·:··::·····::·:::·:. ·:·:::::.:.:::.:.::.:':.::'.:::::..:.:. :.~ About the Remote Control Unit·· Inserting the Batteries Operating Range of the Remote Control Unit ···············3 · 34 ·.. :·4 p~f~f~,~:T·4j Preparations···· .. ·.. ··· .. ·························.. ········· .. ······ .. ·.. ···· .. ······ .. ······· 8 Cables Used for Connections 8 ~~:aok~ro~::~~~O~. F.~.~.~~i~.~.
1,$I,I~Jtd "'~i;': ,.j HOME THX CiNEMA·····································································48 Surround Playback of 2-channel Sources·····································48 Playing Multi-channel Sources (Dolby Digital. DTS. etc.) ·············48 Standard Playback···························.·········································· .. 48 ·······-48 Surround Playback of 2-channel Sources·· Playing Multi-channel Sources (Dolby Digital. OTS. etc.
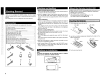
I About the Remote Control Unit Cautions on Handling • Before turning the power switch on Check once again that all connections are correct and that there are no problems with the connection cables. Getting Started Thank you for purchasing this DENON product. To ensure proper operation, please read this owner's manual carefully before using the product. After reading them, be sure to keep them for future reference. Accessories Check that the following parts are supplied with the product.
-N'U• Replace the batteries with new ones if the set does not operate even when the remote control unit is operated close to the unit. • The supplied batteries are only for verifying operation. • When inserting the batteries. be sure to do so in the proper direction. following the "EEl" and "e" marks in the battery compartment. • To prevent damage or leakage of battery fluid: • Do not use a new battery together with an old one. • Do not use two different types of batteries.
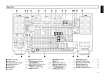
I [With the door open] Display ll_-i'~~'~r~'i...:~--~·_:----t----~ '-/1-' I~~ ;-'-/1-' U: :DODIGITALmAUTOlln5-f() 115TR DOTrueHD • :, 'ffi''UP3''-:s'TRE~~ ~~: ncv: NEO:6 96/24 DODIGITAL+ __. :[Q§Q)IE0[Qill::.r_~ 11';-;;; ; m g: I::::: :..:.. ::::: :g _.~m:_.': o DIRECT/STEREO button· . . f) Headphones jack (PHONES) 8 149) ·······156, 70) CINEMA button· o RESTORER button o MUSIC button o NIGHT button f) MENU button o CH SEL / ENTER button o RETURN button .. .
I Rear Panel fR···rsi····ld~··~ 'ld ld CJ:, ••••••/D•••••••• \Y"••••• 'W SWIlCtliDTOTAll20Wl1A)MAX. AC OUTLETS I At 120V 60Hz o CONTROL LINK connector .... (111 o XLR PRE OUT connectors ..... (111 RS-232C connector······ .. ·················.. ····· .. ·· (231 o HD Radio antenna terminals (DTU ANTENNA) .. . (20) e Analog audio connectors (AUDIO) (14) ~ COMPONENT VIDEO connectors (13, 221 o RCA PRE OUT connectors (11, 221 o EXT.
I Remote Control Unit ::J Main remote control unit (RC-1067) o Signal transmission indicator (73) f) Mode select buttons .. 8 . Quick select / System call buttons···· (72, 771 o Surround mode buttons· ··(48 - 50) o System buttons ·(74. 75) o Audio delay button (A. DL) .. (541 o Tuner system buttons ...... ....... (57, 75) (1) Input mode button (INPUT) (45) o MENU button· (241 \ 1\\\ \1\\ • 1 • 3 0 0 • lic5,~eB~ 11".. lieD, CD!: . I sa no: IT] lTD 4Dl Cursor buttons (i'; \7
Preparations Connections Connections for all compatible audio and video signal formats are described in these operating instructions. Please select the types of connections suited for the equipment you are connecting. With some types of connections, certain settings must be made on the AVP·A 1HOCI. For details, refer to the instructions for the respective connection items below. -Nu.- • Do not plug in the power cord until all connections have been completed. • When making connections.
[Flow of video signals for ZONE3] ZONE3 I - This function automatically converts various formats of video signals input to the AVP-A1HOCI into the format used to output the video signals from the AVP-Al HOCI to a monitor. -The AVP-A1HOCl's video input/output circuitry is compatible with the following four types of video signals: Oigital video signals: HOMI Analog video signals: Component video. S-Video and Video [Flow of video signals inside the AVP-A1HOCI] ~:i9h -'i q"'"{r""'' ' s-v~~o
Connecting to the Power Amp The illustration below shows a basic example of installation of the amplifier combined with 8 speakers and a monitor. Subwoofer Center speaker _ - - - - - Surround back speakers Front speakers Place the front speakers to the sides of the monitor or screen and as flush with the screen surface as possible. '- ~_ • Connect the AVP-A 1HDCI pre-out terminal to the power amp (sold separately). • AVP-A1HDCI has a RCA pre-out terminal and XlR pre-out terminal.
:J Connecting the XLR pre-out terminal (Example: 9.3-channelsl Connections # When uSing Subwoofer 2 or 3, set GUI menu "Manual Setup" - "Speaker Setup" - "Subwoofer Setup" l!:Tpage 291 :J Connecting the RCA pre-out terminal (Example: 9.3-channelsl I ISubwoofer 1 1 *L Left R. Right I *L Left R.
Operations 1 Connect AVP-AlHDCI and POA-AlHDCI with the control link cable. * The control link cable is included with the POA-A 1HDC!. * AVP-A1HDCI can be connected and control to up to 2 POAA1HDCI units. Refer to the POA-A1 HDCI user's manual for how to connect. 2 Set the POA·AIHDCI's control selector switch to "AVP". 3 Set the POA-AIHDCI's mode select switch according to the number of POA-AIHDCI units you are connecting.
-t"·". I o Use a CPPM-compatible DVD player to play DVD-Audio discs that are copyright-protected by CPPM. o The audio signals output from the HDMI connector (sampling frequency, bit rate, etc.) may be restricted by the connected device. o Video signals are not output properly when uSing devices that are not HDCP-compatlble.
Record Player Turntable (MM cartridge) CD Player Connect the cables to be used. CD player - - - - - , - - - - AUDIO - - - - XLR AUDIO COAXIAL OUT OUT OUT L R 00 L R Use a DENON Control Dock for iPod (ASD-l R, sold separately) to connect the iPod to the AVP-A1HDCI. For instructions on the Control Dock for iPod settings, refer to the Control Dock for iPod's operating instructions. Example: G~ ,...-,..
II TV/CABLE Tuner II Satellite Receiver Connect the cables to be used. Connect the cables to be used. TV tuner DBS / BS tuner - - - - VIDEO I VIDEO OUT S VIDEO OUT I'F0\ ~ - - AUDIO-- COMPONENT VIDEO OUT YPaPA i®I i®I. i®I \gJ ~ \:;J OPTICAL OUT ~ b=J AUDIO OUT LA i®I i®I \@ vg;; ----VIDEO---VIDEO S VIOEO COMPONENT VIDEO our 'OUT Y Pe --AUDIO-HOMI OUT COAXIAL OUT AUDIO OUT §) ~ ~~ eR ~~~ L A 1----1--- - 1 - - - - - - - • When using a coaxial digital cable or a BNC cable f
Carefully check the left (Ll and right (R) channels and the inputs and outputs, and be sure to interconnect correctly. Digital Video Recorder Connect the cables to be used. "'0 Digital video recorder ---AUDIO-- - - - - - - VIDEO - - - - viDEO OUT S VIDEO COMPONENT VIDEO OUT Y OUT P8 PA ~~e HOMI OUT OPTICAL OUT AUDIO OUT L A ~~ --VtDEO-- S VIDEO IN VIDEO --AUDIO-- AUDIO OPTICAL IN IN Ilj L A GG • Make analog connections if you wish to record analog audio signals.
CD Recorder I MD Recorder I Tape Deck Video Cassette Recorder Connect the cables to be used. Make analog connections if you wish to record analog audio signals, or digital connections if you wish to record digital audiO signals, depending on the types of connectors on the components being used.
• • Carefully check the left (l) and right (R) channels and the inputs and outputs, and be sure to interconnect correctly, Video Camera I Game Console Component with Multi-channel Output connectors Video camera / Game console --AUDIO-AUDIO OUT L Components Equipped with a DENON LINK connector DVD player / Super Audio CD player / External decoder OPTICAL OUT A ~e I - - - - - - AUDIO - - - - - - - IT£] SUB· FRONT CENTER SURROUND WOOFER L ~~ Multi-channel playback is possible with DVD-Aud
~ XM connector USB Port :J Front panel ::J Rear panel USB memory device I o • The AVP-A 1HOCI is an XM Ready® receiver. You can receive XM® Satelille Radio by connecting to the XM Mini-Tuner and Home Doc (includes home antenna, sold separately) and subscribing to the XM service. • Plug the XM Mini-Tuner and Home Dock Into the XM connector on the rear panel. • Position the Home Dock antenna near a south-faCing Window to receive the best signal.
II HD Radio ™ broadcast Antenna terminals HD Radio broadcast is a service that is only available within the United States. An Hype FM antenna cable plug can be connected directly. Direction of broadcasting station AM/FM Direction of broadcasting station ~ AM loop antenna J ',m,". '"PP'"'' IFFC:~===::Tv\ihTiET:'~,:(BiaCkr==== @~~~;""~-i-~~~~~' 75 O/ohms Coaxial cable ~ 7501ohm, "'" , " " ;;;;;;J FM'"' ""'l FM antenna Jl ii:il 1 1 1 1 1 1 1 _I :;;;;;;:::::;;;;:::=I:::::==~~ 1 1 I_..,..
work Audio [Wired LAN] . Al.ti.'[l=, : ::J ~: II ~ ToWANside D~-----~!Dl " To LAN port o (] For connections to the Internet, contact an ISP (Internet Service Provider) or a computer shop. ::J Modem Modem Internet D # ::J Broadband Internet connection A broadband line connection to the Internet is required in order to use the AVP-A 1HDCI's Internet radio function and firmware update.
'~(.)i. ZONE2 or ZONE3 Pre-out Connections ·If another power amplifier or pre-main lintegrated) amplifier is connected, the ZONE2 or ZONE3 pre-out Ivariable or fixed level) connectors can be used to playa different program source in ZONE2 or ZONE3 the same time ((1f'page 82, 83) .
II External Controller Wait until all connections have been completed before connecting the power cord. I ~;--=:--"";"i~~~~:W~~~+------;;::::li!z(.~"IJ~:I:I Power cord lincluded) To household power outlet lAC 120 V, 60 Hzl RS·232C connector This connector is used for an external controller * i I I If you use an external controller to operate the unit via the RS-232C terminal, you must confirm the following beforehand. Turn on the AVP-A 1HDCI's power.
. GUI Menu Operations . Some typical examples are described below. Cursor Position Display o Icon Switch the selected item Example: Browse Menu (Top Menu) With the AVP-A 1HDCI, settings and operations for most functions can be performed by operating while looking at the GUI menus displayed on the monitor screen. Switch to the next item I • The GUI cannot be superimposed when xvYCC signals and component 1D8Dp signal, computer's resolution le.g.VGA) are input.
Source Select • ...J Status • MAIN ZONE • ZONE2/3/4 ...J Audio Input Signal ...J HDMI Information ...J Auto Surround Mode ...J Ouick Select ...J Preset Station ...J TUNER (FM/AMI • Play • Auto Preset • Preset Skip • Preset Name • Video · Video Select · i/p Scaler · Resolution ~. • (~page 43 - 47) ...J PHONO • Video . Video Select . i/p Scaler . Resolution • Input Mode • Rename • Source Level • Input Alt. ...J CD, DVD, HDP, TV/CBL, SAT, VCR, DVR-l, DVR-2, V.
~ ~ 1 Auto Setup • Audyssey MUltEO® XT automatically measures the acoustical problems in the listening environment to create the best audio experience for your home theater. • It optimizes a large listening area where one or more listeners are seated. Measurements are performed by placing the calibrated microphone (DM-A505Z) successively at multiple positions throughout the listening area as shown in Example j).
Start Pre-out Assign Start Auto Setup. The Audyssey MultEQ XT Auto Setup process automatically calculates the size. level. distance. bass management crossover frequency, and optimal settings for each speaker and subwoofer. Audyssey MultEQ XT corrects acoustical distortions within the listening area. Before starting. connect and position all your speakers. Once started, MultEQ XT will playa series of test tones through each speaker. • ( STEP2: Measurement Change the pre-out assignment.
Room EO """"">:",," . ''''' ""''''', ""d'S"",,}''} '\W:;';l" .,,~,=i. iIE~'~,{"~J !fi', ,.:L "','~' ' No microphone or speaker • Included setup microphone is not connected.. ..kill,FeW: ': '[ . "'~Iit,;l ""'~Iit,;l "";'~\. . 9;;"'. • Connect the included setup microphone to the SETUP MIC jack on the main unit • Check the speaker connections.. • Not all speakers could be detected . • The front L speaker was not properly detected..
~ fUr Manual Setup c [Selectable items] ljiiiiil;~ .., Configuration Surround A n § Subwoofer Select subwoofer use. Make detailed settings for various parameters ~, [Selectable items] ~ z;; III 'I_J li.1 Select number of subwoofers and configuration. Select surround speakers A use and size. Surround B til. Select surround speakers B use and size, Subwoofer Configuration [Selectable items] ~ I~!!,~I 1SP 2SP LJR Surround Back 2SP MIX Select surround back speaker use and size.
Mode Feet I Meters Select test tone playback method. Select unit for distance. [Selectable items] Step Surround Select step. (smallest distance) Select surround speaker from which test tone is output. [Selectable items] [Selectable items] ~ ~.JlJ: '. 1< LRttt;~}1 ~lu&~ni: Can be selected when "Feet" is set. ~~':1";;'1 ~: Can be selected when" Meters" is set. [:_::1 at!!!!!' 1__"1 Start Output test tone. Default [Variable range] Resets the settings to the default values.
• Please set all THX Certified speakers, set the "Speaker Configuration" for all speakers to "Small". We recommend using with the crossover frequency set to "FIXED-THX-", but depending on the speaker, setting it to a different frequency may improve frequency response near the crossover frequency. • The "Crossover Frequency" can be set when there are speakers that have been set to "Small" at GUI menu "Speaker Configuration" or when "Subwoofer" is set to "Yes" (r:rpage 29).
Control I Set HOMI control function to ON/OFF. GUI menu "HOMI Control"- "Control" is "ON", the "Amp" and "lV" will switch with the operation of any television not related to this setting. [Selectable items] ~ lllil ~~.i,{J Control Monitor • Select the interlocking monitor through the HOMI controls. [Selectable items] I~ 1..!!!I!!!li Monitor Out HOMI Control This can be set when "Control" is set to "ON".
Surround Speaker Select the surround speakers to use. [Selectable items] • IliA;;] Setting • This can be set when "Mode" is set to "Analog". • This can be set when GUI menu "Speaker Setup" - "Speaker Configuration" - "Surround A" and "Surround B" are used (@"page • 291. Downmix Option [Selectable items] I.~ Subwoofer I~"'''' (:,.,1.-1 Input Att. Select playback mode. Setup when input level is too large and playback volume is distorted. [Selectable items] IOCRff",'d ·'1 Surround Back Input ,.
[Selectable items] iiirtil".,I Adjust CH Select speaker adjustment method. • Set this to "ON" if the sound from the front speakers seems distorted. • When not using the center speaker or surround speakers, the playback sound is down-mixed and output from the front speakers. [Selectable items] l~ 1'::.1,1,,1" AU • Select the speaker and frequency band and adjust the level. [Selectable items] rnib'1 ~•.Jcu;"~,~j£" ~j i;.~ L• ...;~i !;.II1Jb'" ~~~~~. ..,,",,, r1:~uH'7IiM"~ !.lJ'M,t\!!' ~~-Jl '!!,' ij
Wired LAN settings Make settings for wired LAN. II Network Intonnation At the GUI menu ·Manual Setup· - ·Network Setup· - ·Network Setup· - ·Detail· setting. set ·DHCP· to ·OFF· and enter the IP address. subnet mask. default gateway. primary DNS and secondary DNS. N g '" -~: This setting is required when the network is established via proxy servers. At the GUI menu ·Manual Setup· - ·Network Setup· - ·Network Setup· - ·Detail· - ·Proxy· setting.
Wireless LAN settings Make settings for wireless LAN. Connection The mode automatically switches to MWirelessM. • Display GUI menu MManual SetupM - MNetwork SetupM - MNetwork SetupM. At the GUI menu MManual Setup· - MNetwork SetupM - MNetwork SetupM - MDetail· setting, set MDHCPMto MOFF Mand enter the IP address. subnet mask, default gateway. primary DNS and secondary DNS. CD Input the SSID. @ "there is security, select the encryption method. ® Input the encryption key.
Rhapsody Account Set or change Username and Password. "Listening to Rhapsody" (r:rpage 00) ~. .,~,::~::_::;::~+i.l ~::_ ::;::~+i .1 ~>" "~' Q Enter username : ~ Power Saving [Input characters] Make setting for power saving when not connected to network. [Selectable items] 1.1£iQ,I1~J • IIIi To use the web control function, set this setting to "OFF". .jA~{;.)1.:. 8.'t;.11.3 !\.1~1 i9li:: _~ ~1f] '.jl~aJMI .iili:tll;r~••ii,a!\tA\hlri§~ .iili:tlli!fJ•• itrl• ~~.
Lch Level Power On Level Gi Adjust the left channel output level. Define the volume setting that is active when the power is turned on. '" [Variable range] :.slid,,? - r'<~lr I - ,,*1_; ~. ~o ~ <:> Co ~----- The "Lch Level" and "Rch Level" can be set when "Channel" is set to "Stereo". g4 This can be set when "Volume Level" is set to "Variable". Rch Level Mute Level Adjust the right channel output level. Set the amount of attenuation when muting is on. [Variable range] iL. - l':,l!!I.
Setting "Free Assign" allows you to freely assign each pre-out to any channel, depending on the environment used. [Selectable • items)ItM_.
if't POA 1/POA2 Mute Level Set POA-A' HDCI for which the MODE select switch is set to '" " or "2". This sets the amount of attenuation of the volume when the mute mode is set in the MAIN ZONE. [Selectable items] Ij.f~ ~!'.lW;i ~==~ See the POA-A' HDCI operating instructions. CD o ® o Input Selector Select the setup channel. 0·" [Selectable items] lli.k.~;J Operating from the main unit * The GUI menu is not displayed when performing this setting.
Setting with Respect to the Monitor When the HOMI monitor set to on is selected. the trigger out turns on. This is effective when the "MAIN ZONE" has been set to "ON" for the "Setting with Respect to the Zone" and the input source which is set to "ON" has been selected for the" Setting with Respect to the Input Source" . _@(to_ The ZONE4 operations cannot be performed when set to "Rec Select".
[Selectable items] b_I.')HIl? ;~ This function allows a DENON serviceperson or installer to check the AVP-A1HDCl's status and make settings via the Internet. Operating from the main unit Press the DIMMER button. C - - Dim ~ Bright OFF - Dark -u·n. Only use this function if so instructed by a DENON serviceperson or installer. Upgrade ..--J If POA-A1HDCI is connected using the control link, POA-A1HDCI meter operation is turned OFF when the AVP-A 1HDCI display is turned "OFF".
~ Source Select [Selectable items] I criJ Use this procedure to select the input source and make the settings related to playing input sources. '_iil < Operating from the main unit or main remote control unit (Operation on the main unit) Turn the SOURCE SELECT knob. If "Rec Select" or "Video Select" is selected, press the SOURCE button before turning the SOURCE SELECT knob. * (Operation on the main remote control unit) Press the SOURCE SELECT button. The desired input source can be.
Play Auto Preset Preset Skip Preset Name Video Input Mode Rename Source Level Video Input Mode Rename III Source Level m InputAtt. CO, OW, HOP-TV/CBL, SAT. VCR, DVR-1, OVR-2, V.AUX D II II 1.1 II Antenna Aiming B Rename II Source Level Play Preset Skip Select the preset channel(s) you do not want to display. Video [Input source] Input Mode [Selectable items] ., [Selectable items] HORadio D Play ~"'i fJ Auto Preset II D 1.
Operating from the main unit I Resolution Set resolution for video signal output to HOMI. Press the VIDEO SELECT button, then turn the SOURCE SELECT knob until the desired picture appears. To cancel, press the main unit's VIDEO SELECT button, then turn the main unit's SOURCE SELECT knob and select "SOURCE". * [Selectable items] i.:~.:Jk~.i~:_~ <§.--',;~.->- ~~~~J.~ .. _~[tii_ ~ Operating from the main unit • It is not possible to select HDMI input signals.
Decode Mode Set the decode mode for this source. • With an HDMI connection, video and audio signals are transmitted simultaneously. To play the video signal assigned at "HDMI" combined with the audio signal assigned at "Digital", select" Digital" at the GUI menu "Source Select" - "Input Mode" (GT'page 45). • When the AVp·A 1HDCI and monitor are connected with an HDMI cable, if the monitor is not compatible with HDMI audio signal playback, only the video signals are output to the monitor.
Component iPod dock Select component video input to assign to this source. Assign Control Dock for iPod to this source. [Input source] ~I DVD II HDP II TV/Cal II IV.AUX I • SAT II VCR II DVR-1 II DVR-2 1 iiii ;~ [Selectable items] Input source Defauh setting • With the default settings, the Control Dock for iPod can be used connected to the VCR (iPod) connector.
~ Surround Mode .A ~ I'.:> j;i,,':i0}',I'IDUt:$i Dolby Digital Source HOME THX CINEMA THX surround sound mode to recreate the autl',entlc sour,d of mOvie sOllndtracl s{)llndtracl s mnvle DTS Surround Source sl,lr;pu~
.Multi...cbannea. •.YDig~ttj)T$~ .tt~~ [Selectable items] &ir~· • This mode is for decoding the input signals according to their format and playing surround sound. The display when the STANDARD mode is selected depends on the input signal and surround back output playback mode. . ,ei1r> 1 : ;' . $ia... Dolby Digital Source DTS Surround Source DOLBY DIGITAL (other than 2chl / DOLBY DIGITAL EX DOLBY DIGITAL Plus DOLBYTrueHD DTS (5.1 chI / DTS·ES Discrete 6.1/ DTS-ES Matrix 6.
~ Direct Playback {Tffil --- ' [Selectable items] i~n••c~;~:: ;;;n'Bll!"F,w. d:::::lJm!!~rmZL • •rmflb 2~::c'r;·:·",T:'.::?":W In this mode the signals bypass the tone control circuitry for high quality sound. The display when the DIRECT mode is selected depends on the input signal. For multi-channel sources, the display depends on the surround back output's play mode.
o In the THX mode (for 2-channel sources) DRC Dimension [Selectable items] Compress dynamic range (difference between loud and soft sounds). Shift sound image center to front or rear, to adjust playback balance. lli:ij~!~iliitlilij.~_J [Selectable items] h!.~ DIiI iiJIIliii ItBi o In the THX mode (for Multi-ehannel sources) Center Width [Selectable items] hinr SurtD' ,"~l~~Pm;p ES UCIlT' ,pUTDY "U+11tX 1J1l. i::t!l!~f:! f'1:!t. £,!~::=< '1'J-'_~~~~~ '.~~~$ i;: .,' .,'.<'''''-),''').\/.'-'-.0::.
AFDM Input Channel Bass Auto-select surround mode by source. This function only works for software containing a special identification signal. If the software being played is recorded in Dolby Digital EX or DTS-ES. it is played in 6.1-ehannels. If not, it is played in 5.1-ehannels. Select channel using external input connectors (EXT. IN) for source being played. Adjust bass for all channels together. [Selectable items] brQ">l rJ)ff.
Subwoofer Adjust each subwoofer channel tone. [Selectable items] • "Audyssey", "Audyssey Byp. LJR" and "Audyssey Flat" can be selected after the auto setup procedure has been performed. • If the settings of the speakers for which" None" has been determined at "Auto Setup" are changed, "Audyssey", "Audyssey Byp. LJR" and" Audyssey Flat" cannot be selected and measurements have to be taken again to include the newly-added speakers. • When using headphones, "Room EO" is always set to "OFF". ~.;,.
IW Delay audio. This sets the delay time for audio signals. [Variable range] 1;'8,.,·1 - Information ,.~ ' !!!'J!!!. Operating from the main unit or the main remote control unit • * The GUI menu is not displayed when carrying out this setting. CD Press the AUDIO DELAY button on the main unit or A. DLbutton on the main remote control unit. @ Use the button to set. MAIN ZONE ZONE2/3/4 • This cannot be adjusted when playing in the EXT. IN (when in analog model.
• [Items to be checked] :'''iiJi~!('''''¥ ·'f~'·.-~'--"'''''''<'''-~\-'''~- Yl."L~·. : The currently set surround mode is displayed. : The input signal type is displayed. ~~!:ii';~~: ~~ " ~~'&V~~I: The input displayed. signal's sampling frequency The number of channels in the input signal (front, surround, LFE) is displayed. ••!i~'111 !lI~'lI : The dialogue displayed.
SOURCE SELECT Turning Off the Sound Temporarily (Muting) MASTER VOLUME 6 (5 Press [MUTE]. Playback 11 To cancel. press [MUTE] again. Muting can also be canceled by adjusting Preparations the master volume. Listening with Headphones r~-' PI~~eheadpbones into . Ih~!>ounc.i frolll th~ pre-out connectors is automatically cut. -,"._-.. .,', -d·n- ------r------r- 2 ~ or [POWER ON]. . The power indicator flashes : : _ :::.>,.,. -'::}: ,P,?\~/:
b. \l 6 Listening to FM/AM Broadcasts "N: 1 Either ~ ' or,press or, press, [TO,NER] .' (AMP mode) to ~ ~ed "TUNER". ,,' .' 1 Tune in the broaclcast station you want to preset. 2 Press [.,U'O]. I 3' 3 Pr~[B~PJ tAl- select ~'FM"~r "~\ 4 Tun~:~tbe d~ broad~t 4 (i)To tu~in .~atIc.UylAlfto TunQ1g) ,Press [MODE] to light the "AUTq"jndicator 'J ioselect the station you IfJ8nt to ,hear.
o Default settings r'";t!.I<::J(~:ii\b~'"i]·,:,,,~,,'·lt£~}V~;5~;f£~Auto·'~~;w~'!!i·""'Iii· ~"""iLJ;~:,,~,··y'~\:m.~ F ., ." . ~w'·' D~I-~. ·~"",,;,fe+"···· ~ Traffic Program (TP) A1 -A8 87.5/89.1 /98.1 / 107.9/90.1 /90.1 /90.1 / 90.1 MHz TP identifies programs that carry traffic announcements. This allows you to easily find out the latest traffic conditions in your area before leaving home. Bl _ B8 B1 - 88 520/600/1000/1400/1500/1710 kHz, 90.1/90.1 MHz Radio Text (RT) C1 Cl - C8 90.
Listening to XM Satellite Radio Programs ~ l:;:~~)~~'f:~~~~~)rp~ rw~E~l 2:::u=::.~e=:=RcO:~::I;:;.~t·~ 2:::u=::~e=:=RcO:~::I;:;.~t·~ ((Fpage 73 "Remote~l)trol "Remote~l)trol UnitOperations") 3 Pr.~ [~EARCH1~ select' ~'. I b. \l ENTER 4 4~r~~=~~~maticalo/, • ,TP search begins alJtpmatically, If no station 'is f()U~d~it!)the above oper<:ition. all the reception· ban(jsare searched., searched, ' .•. •. ......• . The ·statiollnii(11~. i~ display~' on 'stops:, ".
Note: The XM Radio 10 does not use the letters "I", "0", "S" or "F". Activate your XM Satellite Radio service in the U.S. online at http://activate.xmradio.com or call 1-80o-XM-RADI0 (1-800-9672346). Activate your XM Satellite Radio service in Canada online at https:!lactivate.xmradio.ca or call1-877-GET-XMSR (1-877-438-9677). You will need a major credit card. XM will send a signal from the satellites to activate the full channel lineup.
Listening to HD Radio ™ Stations HD RadIO stations (Itter l-ilgr-IEf S:':UII,j qualIty tndn (unvent1ona l FM/AM bma:kasts. It I~ diS;) ;"(">Ible:o ;"(">Ibie:o lecelve data 58f\1(85 and select broa:kasts frem from arllc'''il arlIC'''il up IC ,,'(jilt fl,ultlCast fJ!C(jldnlS Using the HD Radio Receiver HD Radio technology provides higher quality sound than conventional broadcasts and allows reception of data services.
iPod® Playback Tile musIc on an IPOri can be playeri by uSllig tile Control Dod for IPod ,';50-1 R SOI(J separate I, I Tilt' operat,on ran also be periorrneeJ uSing the hutrons on the rnalll 'mil or ,p,nnle rnntro un,! '.11111' ,\atrh.nq thE' GUI mer,'Js ' Press (SEARCH) or A V to select the audio program. If the station you are listening to has multiple audio programs. "HD1" is indicated on the display. If it only has cine audio pr9gram, "HD" is indicated.
Shuffling playback Press [CHANNEL +] or [RANDOM] on the sub remote control unit. [Selectable items] 19Y!!: b. \1 <11> ENTER ~!!IEt fii] ThiS procedure canlle used to pia, Internet radiO statlCons or music or still picture IJPEGI Ii les stored on a computer or USB memory device or Rhaps,)dy MSource Select M- M(input source)- -Playback Mode (iPod)- - ·Shuffle- (a::Fpage 46) Searching up or down pages Press [SEARCH]. then press
[Slide show function] Still picture (JPEG) files stored in folders on a media server can be played as slide shows. The time for which each picture is displayed can be set. IJ When still picture (JPEG) files are played on the AVP-A1HDCI, they are played in the direction in which they are stored in the folder, so store in them in the direction in which you want them to play.
ENTER b. \l (5 To pause 1 Make the During playback. press ENTER. Press again to resume playback. ~ecessary· ~eparati()JIS. ' . @f'repare the computer. (l::Ji"CompiJtei's ~rating instructions) Inst~1I uWindovvs rv,edia tv1edia Player vef:' 11 U . 2 I Either tum
Presetting Internet Radio Stations Registering Internet Radio Stations as Your Favorites Preset Internet radio stations can be selected directly. Favorites are listed at the top of the menu screen. so when a station is registered as a favorite it can be tuned in easily. Whlle the radio station you want to preset 1 Press [MEMO] while the Internet radio station you press [MEMO). . 1 playing, want to register playing.
t::. V to seI~:'Media... s~er",. .~en pres$ .~.m . .• ' .,R or [ > . " , . . . ," ." 1. ·.use ,' '. '. .use'A Vtosel~tth~bos(nlun~ofthe' COlDpu~rOD 2 the music fMeyouwant tophlyis . press prt'3SENTER ENTER or I>• . . . w~ t::. \11> ENTER loqt~,then 3· ENTERL::. 4 U~. L::.. Use V to se~tthesearchitegtor folder, then press or. [>. . . ' seIec. ' . PlavPack starts. once buffering reaches "1000/9". 'NET/DTU] [I. dDEV11 mode) Y~f r.~ ,i, Selecting tracks During playback, either press D.
-k(·,i4 -n·il4 • The AVP-A1HOCI is equipped with two USB ports, one each on the front and rear panels. It is not possible to use the set with USB memory devices connected to both the ports at the same time. Select the USB port you want to use at the "Source Select" - "NET/ USB" - "Playback Mode" - "USB Select" menu. • OENON will accept no responsibility whatsoever for any loss or damage to data on USB memory devices when using the USB memory device connected to the AVP-A 1 1HOCI. HOCI.
SOURCE SELECT 6 Surround mode INPUT MODE ~-- Other Operations and Functions 1 Press . until . .'.. 2.is'. displayed. : to-~- ~-o~ .- ~~~-~: ;) --~ -,~~ ~- ~- / ~-_,.,..--_i_··:"_··_~~·i~~'~ "ZONE3 SOURCE" is $own on the display. Other Operations I . the "Dlgital"$dting or 1.· 46). ''llDMI''withthe,''HDMI''setdJlg (Gf"page 2· Either>~ <$f;)URCESEl.£CT> Or p~. lSOliRCE.. ' 3.. to, 3 Select 4 Play thePrognun source. . . .- -.,. Assign ~'D.
.~,[.ll. Recordings you make are for your personal enjoyment and should not be used for other purposes without permission of the copyright holder. o When "DENON LINK" is assigned at the GUI menu "Assign" setting, the PCM signals, network audio signals (Internet radio, media server, USB and Rhapsody), XM signals and HD Radio signals input from the digital input connectors cannot be output from the analog REC OUT connectors.
QUICK SELECT Operations Connect the HDMI to the AVP-AIHDCI AVP-AIHOCI with equipment compatible with Jbe HDMI control function. 1 the the HDML,. ' ' ' ' . . .' ". . ," , 2·Put Check the (or au the~ui~nt connect~ to' 3 the ;~~:~:~in::::rH~:ea:~:=:::~~ to HOMI and HOM! avaiJableto them., . :. .• . ... - - . . > . pow~r o~for ~~e t9uip~ent~onnfl~ t9uip~ent~onnfl~ to.,. . * I .* CH SELECT t::.. '1 <] I> * . settings make Please consult' the .
2 , u~ b. "V or CH SELECT to ~lect the speaker. . , , '" The '. speaker that can be s~t s\iVitches each time' one of the ' buttons is pressed. 3U~ to adj~t the v~l~. and holdtbe desired ClUICK SELECT. ".. 2 Presspre~sinQt~ebu1-lilnlJnWtl1~~lJick~el~ct , " ' ,'Keep . .' iqdi<;ator lights. is set to-12dS.
, _"r:8~in'g:,qiNQ~ _"r:8~in'g:,qsfiNQ~ 1 =:00£ =:ODES~~O~rfor S~~O~rfor Remote Control Unit Operations the ~o~fOl1ent t,o be [MOOESElfCTOR] 1 Press [MODESElfCTOR] Press preset. The indicator for the component t6 be operated flashes. ~ . - On thB m,,1n rBmote cOlitrol 1.11i1t. the display s;"itches "ccordlng to lhB devrce being operated and the mode -In moeles other than IPod, the mode sWitches between"~" and "@.
Functions of Buttons by Component ElDisplay MODE SELECTOR DVD ~ .. ......-...... -- ....... __.. --- ii ! IDlYzl IDIYII ...... II Pause Pause Pause Pause Pause Pause - Stop Power on Power off Stop - Stop SOURCE ON SOURCE OFF Stop Power on Power off Stop Power on Power off Stop - Stop - - - Menu Cursor Enter Page forward screen / Browse/ Remote mode switching (Press and hold) Return I-track/album shuffle play 1·track/all-track repeat play • .. I··,· iPod IDIVII ..........
...m---l ~·~;:~;~~--i----mm~---m-.--"--,-.m---m-_--------._. ' , ...._... _.~"'" [MODE l~rI. ELE.C.TOR)--+rlo>;SELE.C.TOR)--+rlo>;- £. II ;' , ["-), . .i .. ........ .. i [SETUP) I I~®rnr",~,.;8 '.•. I.~ ...1.•'. [0 .. 9,+10) il' •• _ ••• _ ••••• _ . - . _••" "••• _ _••••• _ ••• _ •• , 'l ... t::.V .ENTER SETUP ........ DISPLAY .. , t:lh/""' t:lh/"" , .. 0-9.+10 ' lYNeR " Salellile Receiver / CUle lY IDlval ..
....- [I· Signal transmission Indicator [GAMP] [.. 'TU] 'NET/DTU] ~ TUNER SELECTOR AMP (MAIN) Remote 10 1 (Default! 81001 IDEv,1 IDIV21 (Analog TUNER) (XM) 52863 52864 '.
Calling out Signal transmission ---..., 1 [l.~~I~;t;; ~.~ ::~~ J'~-", LU:~2i' r ~.QLJIUlLi [SYSTEM CALL] 2 _/[MODE SELECTOR] ' ~ '~: . , r"") :' -." ~ <>,~' ~.-' Press [AMP), to select ''SYSTEM CALL". Press [SYSTEM. CALl] (1,2 or 3) at whicb the signals were~red. . The registered signals are transmitted in the registered sequence. . Registering .".: ~~[POWER ON] I [CHANNEL+/-] -+B :;.:~: I·:~ seconds. Press (~], [1] and [8J, in thatord~r~. , i ' . ' " . " . .
Punch-through function Press and hold in [RC SETUP] for at leasp sec:onds. 1 2 Press [9], [7] and [3], . The signal transmission indicator flashes twice.. . . ' ••. . in that order. The signal transmission indicator flashes twice and the backlight on time setting mode is set. 3 . Set the light on time. .' .• reset (TV or SAT/CBL). (Resetting button by button) . Press [,..OQE ~~~~OR] ·for tlt.e de~(e de~(:e Yo~ ",8ilt to reset. . .. . . . · 1. Pr~ and hold ip [RC .SUUP] for at least3.St':onds.
Sub Remote Control Unit Operations - The sub remote control unit IS equlppeci with frequently used buttons. so It can be used for slInple ren10te control unit operations. - The sub remote control unit Gan a;so be used for multi-zone. so you can use it to control the AVP-A 1HDCI trorn onier r,)C,ms - The operations listed belov\' can be jj8lfOrn12d witr, ti'e SUll relr,ote control unit. - SWltchrng the IrIput source - AdJustrng the volume - Tuner IAIvl/FMI. XM.
SATTU (XM) Device operated Zone seleetiOll M ZONE SELECT ZONE Off ZONE ON SOURCE SELECT CHANNEI..+/~ Z2 I Z3 .
~ Multi-zone mdlcatorfu rl--€s ~ I [ZONE OFF] J I', " .. [ZONE SHECn p < [ADVANCED SETUP] At; :'-. Use tbe tip of a pen to press ~VANCED SETUP). 1 2 Select the mUIti-zonero'beset. All the O1ul(i,-zone indicators light. . . . '0'> . . " 2 .' . The selected multi-zone indicator lights.. , I (DTo set to ';MAIN ZONE" :Press(REPfAT]. ®To set to "ZONE2"" ; Press (RANDOM). (VTo set to "ZONE3": Press (USB). @Toset to "ZONE4" . Pres~ [ALl~SICIFAVORITES). . «-;i ~-, ' /".
Multi-Zone Connections and Operations Multi-Zone Connections • For ZONE2, it is necessary to set in sequence with the signal connected to either the power amplifier or bit stream amps. The amp should be the power amplifier in the case of ZONE3, and the bit-stream for ZONE4. • If the signal inputted to ZONE2 is analog, change to PCM(2-channel) signal, and output it from ZONE2 optical output connectors.
OOURC~Ucr , or for the zone to be operated. When the power turns on, the multi-zone indicator lights on the display. [Operation on the remote control unit] In the zone mode you want to operate, press [ON] or [OFF].
Change of positioning and acoustic image with 6.l-ehannel systems [E]llEJ[£] 1El Other Information About Speaker Installation The THX Surround EX format adds new "Surround Back" (SB) channels to the conventional 5.1 channel system. This makes it easy to achieve sound positioned directly behind the listener, something that was previously difficult with sources designed for conventional multi surround speakers.
(I) Setting for primarily watching movies using diffusion type speakers for the surround speakers For the greatest sense of surround sound envelopment. diffuse radiation speakers such as bipolar (THX) types, or dipolar types, provide a wider dispersion than is possible to obtain from a direct radiating speaker (monopolar). Place these speakers at either side of the prime listening position, mounted above ear level.
Dolby Pro Logic II DTS 96/24 Dolby Pro Logic II is a matrix decoding technology developed by Dolby Laboratories. Regular music such as that on CDs is encoded into 5-channels to achieve an excellent surround effect. The surround channel signals are converted into stereo and full band signals (with a frequency response of 20 Hz to 20 kHz or greater) to create a "three-dimensional" sound image offering a rich sense of presence for all stereo sources.
Timbre Matching™ The human ear changes our perception of a sound depending on the direction from which the sound is coming. In a movie theater, there is an array of surround speakers so that the surround information is all around you. In a home theater, only two speakers located to the side of your head are used. The Timbre Matching feature filters the information going to the surround speakers so that they more closely match the tonal characteristics of the sound coming from the front speakers.
THX and Ultra2 are trademarks of THX Ltd. THX may be registered in some jurisdictions. All rights reserved. Surround EX is a trademark of Dolby Laboratories. Used with permission. Neural Surround™, a breakthrough in audio technology, will bring the excitement of surround music to more of America's listening audience. It provides the rich envelopment and discrete image detail of surround sound in a format 100 % compatible with stereo.
HDMI is a digital interface standard for next generation TVs based on DVI (Digital Visual Interface) standards and optimized for use in consumer equipment. Non-compressed digital video and multi-channel audio signals are transmitted with a single connection. HDMI is also compatible with HDCP (High-bandwidth Digital Contents Protection), a technology for protecting copyrights that encrypts digital video signals in the same was as with DVI.
Signals and adjustability in the different modes '" '" Parameter (default values are shown in parentheses) PRO LOGIC IIIDx MUSIC mode only Surround Mode Mode Decoder Room Size Effect Level DelayTime Subwoofer Panorama Dimension PURE DIRECT, DIRECT x DSD DIRECT x x x x NEO:6 MUSIC mode only Center Width Center Image Subwoofer Alt.
Differences in Surround Mode Names DependinQ on the Input SiQnals Input signals Button Surround mode Note ANALOG DTS ES MTRX (With Flag) DTS ES DSCRT (With Flag) DVD-AUDIO DOLBY DIGITAL DTS WMA !Windows LINEAR Media Audio) PCM/ /MP3/ WAV MPEG-4 AAC/FLAC DTS 96/24 DOLBY DIGITAL EX IWith Flag) DOLBY DIGITAL EX (With no Flag) x x x x. 0 0 x x x x x DTS 15.1ch) DVDDOLBY DOLBY DOLBY Audio DIGITAL DIGITAL DIGITAL (2ch) (multi ch) (5.115/4ch) (4I3ch) HOMETHX CINEMA ·1 ·1 ·1 ES DSCRT6.
Input signals Button Surround mode Note ANALOG WMA (Windows LINEAR Media Audio) PCM/ /MP3/ WAY MPEG-4 AAC/ FLAC DTS ES DSCRT (With Flag) DTS ES MTRX (With Flag) DVD-AUDIO DOLBY DIGITAL DTS DTS (5.1ch) DTS 96/24 x x X X x x x DOLBY DIGITAL EX (With Flag) DOLBY DVDDOLBY DOLBY DOLBY DIGITAL EX DIGITAL DIGITAL DIGITAL Audio (With no (2ch) (multi chi (5.1/5/4chl (4/3chl Flag) DVDAudio (2ch) Super Audio CD DSD (multi chi DSD (2chl STANDARD DOLBY SURROUND DOLBY DIGITAL EX ._.
Input signals Button () ft, 2' Note Cry Surround mode ~ ~ n "" '~" ANALOG LINEAR PCM/ WAV WMA (Windows Media Audiol /MP3/ MPEG-4 AAC/FLAC DTS ES DSCRT (With Flagl DTS ES MTRX (With Flag) DVD-AUDIO DOLBY DIGITAL DTS DTS (5.1ch) DTS 96/24 DOLBY DIGITAL EX (With Flag) DOLBY DOLBY DOLBY DIGITAL DIGITAL DIGITAL EX (With no Flag) (5.
IEEE 802.119 About Networks A copyright-protected technology developed by Microsoft. This is a media player distributed free of charge by Microsoft Corporation. It can be used to play playlists created with Windows Media Player ver. 11 as well as files in such formats as WMA, DRM WMA, MP3 and WAV. This is a free online contents server for Internet radio. Note that usage fees are included in upgrade costs. For inquiries about this service. visit the vTuner site below. vTuner website: http://www.
WPA (Wi-Fi Protected Access) This is a security standard established by the Wi-Fi Alliance. In addition to the conventional SSID (network name) and WEP key (network key). it also uses a user identification function and encrypting protocol for stronger security. WPA2 (Wi-Fi Protected Access 2) This is a new version of the WPA established by the Wi-Fi Alliance. compatible with more secure AES encryption.
Q MAIN ZONE Video Convert HDMI x x x x x x x x x x x X x x x x -". Inout si nal COMPONENT S-VIDEO x x x x x X ~ -_ 1,08.QQL.. _ 1480n - 72001 _ 1480.'1576, ~1'-080n) "- - .- (480n - 72001 1480,/S76, 1'08001 1~-72001 1480,/S76,1 _ 1'08001 14800 - 72001 ~ 1480,/S76,1 x x x .- X ('08001 ., ON W,th HDMI monitor f--------*--- .:::. 1480p - nOD) ~ 1480ilS76,1 -. .. ~ .- 1108001 _ 14800 - 72001 ~ (480, S76,) -=.J.lQ§Q2L___ ..
Input signal Video Convert COMPONENT S-VIDEO VIDEO HDMI COMPONENT S-VIDEO VIDEO HDMI COMPONENT S-VIDEO VIDEO x x x x x x 0 0 0 0 x x x x 0 0 0 0 x x 0 0 x x 0 0 x x 0 0 x x 0 0 x 0 x 0 x 0 x 0 x 0 x 0 x 0 x 0 x x x x x x x x 0 0 0 0 0 0 0 0 0 0 0 0 0 0 0 0 x x 0 0 0 0 0 0 0 0 0 0 0 0 0 0 0 0 x x x x x x x x x x x x x x 0 0 0 0 0 0 0 0 OFF Monitor output (when GUI menu displayed) Monitor output (Normally) HDMI x x x x x x x o (HDMI) o (HDMI) o (HDMI) o (HDMI) (HOM I) o (HDMI)
Video Convert Input signal S-VIDEO Monitor Out - Used Not used OFF - Used Not used Monitor output COMPONENT S·VIDEO VIDEO COMPONENT S-VIDEO x x x x x 0 0 0 0 0 x x 0 0 0 x x 0 0 0 x 0 x 0 0 x 0 x 0 0 x x x x x x x o (COMPONENT) o (COMPONENT)" o (COMPONENT)'2 o (COMPONENT)'2 o (COMPONENT)" o : Output present o o o o (S-VIDEO) (S-VIDEO) - x x (S-VIDEO) (S-VIDEO) - VIDEO o x (VIDEO) x o (VIDEO)*2 o (VIDEO) o x (VIDEO) x o (VIDEO)*2 o (VIDEO) x No output .
Power turns off suddenly and power indicator flashes red. Troubleshooting If a problem should arise, first check the following: 1. Are the connections correct? 2. Is the set being operated as described in the owner's manual? 3. Are the other components operating properly? If this unit does not operate properly, check the items listed in the table below. Should the problem persist. there may be a malfunction. In this case, disconnect the power immediately and contact your store of purchase.
[Audiol :>$. No sound is produced from center speaker. No sound is produced from surround speakers. No sound is produced from surround back speaker, No sound is produced from subwoofer. . .w· :~~ ;',) ....&""., " ,... ,,"'::i"- ,,' 'i;;i)ii:k:$;f;qU~"':> are playing a monaural • The mode is set to something • You source (lV, AM radio broadcast, other than "STANDARD" (Dolby! etc.) in the "STANDARD" (Dolby! DTS Surround) or "HOME THX DTS Surround) or "HOME THX CINEMA" . CINEMA" mode.
c", (iPod] iPod cannot be played. • The input source assigned to • Switch to the input source assigned at "iPod dock'.' "iPod dock" is not selected. • Cable is not properly connected. • Reconnect. • Control Dock for iPod's AC • Plug the Control Dock for iPod's adapter is not connected to AC adapter into a power outlet. power outlet. 47 14 (NETfUSB f Rhapsody] Files on a USB memory device cannot be played. • USB memory device is connected via USB hub.
'/i)/'. .)/ ,,,' Cannot login to Rhapsody. ("Username or Password is incorrect" is displayed) • Login information is incorrect. • Trial period has expired. • Check if the Username for Rhapsody has been properly entered. • Re-enterthe Password. (password is not displayed.) • Get a full account. www.rhapsody.com/denon/signup ~ 37 64, 68 Stops in the middle of playing. • When the trial period has finished, • Get a full account.
(XM Satellite Radio) ",';;;'., , "LOADING" is displayed in the XM mode. "NO SIGNAL:' is displayed in the XM mode. "OFF AIR" is displayed in the XM mode. "UP DATING" is displayed in the XM mode. --~ "XM---" is displayed in the XM mode. I .0 , ...•.,+" ~.. ,';~:~:',i .0 T,,!i{~ ·~ig;1Sf.;·'t!, - The XM Mini-Tuner is acquiring - This message should disappear audio or program information in a few seconds in good signal from the XM satellite signal. This conditions.
o HD Radio section Receiving Range: Usable Sensitivity: 50 dB Quieting Sensitivity: S/N(lHF-AI: Total hannonic Distortion (at 1 kHz): [FM) (note: ~V at 75 OIohms, 0 dBf = 1 x 10'''W) 87.5 MHz - 107.9 MHz 1.0 ~V (11.2 dBfl MONO 1.6 ~V (15.3 dBfl STEREO 23 ~V (38.5 dBf) MONO 77 dB STEREO 72 dB HD 85 dB MONO 0.2 % STEREO 0.3 % HD 0.010/0 [AM) 530 kHz - 1710 kHz 20 ~V 85dB 0.010/0 o Wireless LAN Network type (wireless LAN standards) : Conforming to IEEE 802.11b Conforming to IEEE 802.
List of preset codes Denon Amp D Denon Denon Tuner D Denon IAnalog) 81001, 82001, 83001, 84001 Fujitsu 01497 GE 00237,00144 52863, 52795, 52800, 52805 General Instrument 00476, 00810,00276, 00003 ~!)~t~iO!-,c_;;p2s~~iJ t~!l!L~;~;;{p/\\1,a~ Denon Digital Tuner D ,Denon (NET) (~ETI ,62865,62837,62838,62839 ~~im!~~i~"l_,j;_~ ~~im!i1tt~i~"l_,j;_~ GNI Denon Cable A A-Mark StarHub 00008, 00144 C Supercable TCl Torx K L ;J~"i~:,~~~4!j;:~5ii~~ M Macab 00817 ~~~~i~~J Maspro 01510 00237 00000
~I~&~~~~~~:4JA~ ~I~d22~~~~~~:4JA~ u Technics 40029.40303 Thomson 40053 Thule Audio 40157 ~~~d?Z:8JS,;§i::,=1:ii;:~}~~)=~ ~~~~Z:8JS,;§i::.=1:ii;:~}~~)=~ Yamaha Polk Audio RCA S Denon R RCA T Teac T 40766.42868 ,.";,i\j,j;;;:zt~3",,, ",,';f;'Xilk.i1;,;;.4! ;',,·if;'~l;,;;.4! TaeKwang fiI!!flft:~~~tJ)ii$~lQ3:<~~ii'.fl(:;;~t~ ~~ sS :,~~;iZ;J:;t;:i~~s~~w!Jl~.J:]~s;'1 :,~~£;J:;t;:i~~s~~w!Jl~.
l:"~_;~£A,,~~~,;;:d~L~;'x""'>~A t',~;.;;A:.~,_,';;:~~:'x""'>~j EuroLine Kreiselmeyer 01251 L fJJ'fe:~;k~~--~~L;;'~l~~~){p~ Europhon 00299 ~~""",,' ~Will.kl···~;i4····Lza..a Eurostar Hirschmann 00818 Expressvu 00775.01775 ;r,~qii;~,ii##;q1;li'l!
~~.i"iE;~"","A1Q!!$;;;'k,:i;,d:~L~iL;;,li ~~.i"iE;~"","A1Q!!$;;;'k.:i;,d:~L~iL;;.li Schaub Lorenz T ;;;T~;;.,,;;,;;,;;;%,::~;,;.00:t:i?~\@ijj2id;;dJ ;;;T~;;.~.::~;,;.00:t:i?.JJ.\@ijj2id;;dJ 01214 ~~~Jk~l!WJ~9J~,1l!6P.i~~;}j'.,,,i ~~~Jk~l!WJ~9J~,1l!6P.i~~;}j'""i Schwaiger 01225 T8oston TBoston 01659 01200 Tecatel " ."," :'. . 01283,01610 Technomate 01429 Technotrend Servimat 01611 00003,01099' I':~t.· ;;:''i;~ii:!!!g5>~~~!':::'~ ;;:''i.;~ii:!!!g5>~~~!':::'~ 00871 01412 ":~:'00455 ll~~.
~~~1"~);;,"';iS:l~;i~~k~,,,,;,jilL;; Akiba 10037,10218,10455 ~ra ;;;;';;'vl"~i*,J~l!I~;;;ii; ;";;;¢vl"~i*,J~l!I~;;;ii; L:~, c,;' Akito 10037 1,1!lJ80;,~~: Auchan ,~ii';;kf~gLeO,j>~' Audiosonic '''1 lllf$. l17SS. 10163 ~""i> 11900;'1" ,.lO5ll6; . 11900/1" ,t0499,J0374.102li4. ,t0499,J0374.102li4.1!I218, f!l218, 10009,10037.10109.10217, 10009,10037.10109,10217, 10218,10264,10370,10374, 10218,10264,10370.10374, 10486,10714,10715,10820 10486,10714.
E ;.E~LLjy~fSi;£,;"lwlJL~~~~%~ ;.E~L~fSi;£,;"lwlJL~~~~%~ Eaton 10060 ECE 10037 Gooding 'Il! ilJ:ll!Pl!,,\".~,.i';;;;)'i¥J~Q?Ej,;;~~ ilJ:ll!Pl!,,\""~ .• i';;;;)'i¥J~Q?Ej,;;~~ 10487 ",. Hewlett Packard 11494,11502 Indiana 10037,10217,10218,10362, 10610 ~~Jd..!;";,.","",,,,,,<,,,,,,lQl~iii;, ....).i;.k,~i:;i~".;;j, ~~Jd..!~","",,,,,.,<,,,,,lQl~jfi;, Electroband 10000 iJj~l,~t15JL~,:' iJj~£!t~lt5i:i Electrohome Elec;~home' ~c· .
~\'~~!049J!!Al~i.~J& 10163.10217 10163,10217 L J!'s.lj~4*i!111l!i1!J!!llW!!§?~ K Larl< 10009,10264,10817 10009.10264.10817 10009:~t0,Q37.'10217;10218, Kaige Kaiaui ,':~$Ui " Lavis Lecson Lenco Lexsor ~.·i;~~S£;==h~~'0., ~'iE~~S£;==h~~'0., Kathrein 10556 Kawasho 10030 i~i;i;"b,><:",.l~~ i~i;i;"b.>::",.l~~ LG o J ~~i@;,i;"*i¥jt'O?:l~t;4ifi~A~ta 10051.10009,10208,10226, 10051.10009.10208.10226. 10264.10817 Mudan Liesenkotter 10037. 10327 Khind 10706 &lQA1lJ'tQllO.\ &!QA11Ji:tQOO.\ 1 ~~i
LS!L;.:sL"*,J~.~",,i·"''';''''~''''L''''' LS!L;.:sL""",J~.~""i·"''';''''~''''L''''' \i~~.wg2mJ2i;
:. SjLllIlll '..;.,r,~",,:kdill§iJ4,l§.1.i2&~~ ,..;.,r,~",,:k.;';!ill§iJ4,l§'l.i2&~~ Studio Expenence Technics 10843 J~~",~l.iJJ!!f~,Jlit,~~ J~ll.tt.,;~l.iJJ!!f~,i!it,~~ ;,s~ff,.' ;,s~ff'.' ,~..itt2tt,td"'+'~.;'" Sunkai 10218,10455,10487,10610, 10865 ,-LlI)S~~\~'j~l~)li264! 10218,10287.10335 SV2000 10054 ,!O!llqtJ Jiji~~j~~~~~j~'llD~~~ ~>%W1iiGti?.LiMt"jlll7j'l:i!!mlM(j.
E ,,~~i:1;;;L/i,,' "~~;\'~;d./i,,' 1!Q:iLE~"j"""~"<"';;;':.t,~ 1.!Q:iLE~~"j"""~"'''''':.t.~ F Ferguson 11037 E E1funk 30713, 30884 ;Jti!8i~di;:~~~~~~~~~~lj ESA 31268 F J~itW,'ii';:w~~~~~~';i J~itW,2';:W~~~~~~';i Funai 31268 G ;~~.,.~;&~~::k:;.ig;.;:';,:;';,J ;~~.,.~;&~~::k:;,ig;.;:';,:;;';,J K K KLH ~LH ... L ~~~:>' utm~:;~:>·.... ..... "" ~ ~!b-.....a~~ Logik Grandin H I J Maxim ~';C~,,~ ~,;c~,"~ .• ... 1 ~QMllllJ!l .\.. l."'c,:i;JJl1k"':~.~hi~ l."'c,:i;JJl1k-:~.~hi~ ~&0~·~k,..
S Sharp 11917 §§~!:·k£Sj4kAJ~~;:.>;.k; §§~!-k£Sj4kAJ~~;:.>;.k; Symphonic T ~,<~;"",c..Jl~&tL8;~};t~··+,J ~1~_1j_~"),L.~;"",c..Jl~&tL8;~};t~ .'.,;,J *3 S Fujitsu General *4 D A~~~;,' A~~L· E Emerson G 30821 Gemini 20046 BPL Denon ro some somc 20081. 20042 ~~l.SDlIii!jQ Diamant &I!ilM;:.::~J1·;~\I '"' =2'0184. 20121. 20209~20002. B k 20037. 20240. 20000. 20278.
:,~u~£~~U~~rk~~{~j :,~~:~~U~~rk~~{~j LXI 20037,20000,20042,20067 M~t!1J~g»;;Ltbl,,~~J9~,~_;i Magnadyne 20081 ~i,~;:':~~~ii~J!~L~~ 20035, 20037, 20048, 20039, Magnavox 20081, 20240, 20000, 20226, 2(618,20642,21593,21781 ~.Di.~~~~~~~..L.-<·:?~10.-~~ ~.R~~~~~~~..L.-<·:?~10.-~~ Magnum 2(642 L~:jti;~~,~;;~~,~~.,Y;~;';; Marantz 20035, 20081, Marta 20037 i~,EJ!(~;&~:dL~~ii,t;~:.:.2* NEC Sampo Nesco Newave ~~'p." Nikko 20000 Pilot 20037 20037,20278 d!!i!_~~~a~\Il,;l, ~""~4...Ji ~""~4...
Blue Sky A C ABS 21972 Dalton ~~~L1}!R2;d,;.2. CyberPower 21972 , Dantax D "-O!!L;';:;;,,,'~.J~2~~,,:~:,;,,··.', "'':'~:id DirecTV G" 20739 30872 ~!£:~~.~~l17iibi:F;£&:;l;i;idJ.di; 20614 H "~~;;:~~PJ!!1,.,;"~~,,.,;iita Howard Computers 21972 Jt~~.£~~~~"~~'~~~-~;. Hughes Network 20739 System;" ,...... -:,' , Trix Hush 20240 20037,20081,20240,20000, 20104, 20209, 20106, 20348, V &Y~~~jJ~ki;,~8ji~~;jj:?~ &Y~~~~jJ&J:i;,~8ji~~;jj:?~ Vector Research p s ~~~;.
S~,!k;~ei",~!l5g:k~:ni;d ;';;d~~ s~'!4:~ei",~!l5g:k~:ni;d Enzer i.cE~~~"".~,,~1±§!!.~ EuroLine Home Electronics Hoyo :4. ;4. Ingelen 30651.30713.30843.30869. 31530 G 31268 ~~t~7·.316Mi;f~.i,~~ Irradio 31158 30869,31115.31224.31233 30869.31115.31224.31233 30095 30717 ~~.'~JJ!!11>Y~:p ,~~ ;':'~.:c~JJ!!11>Y~:p Global Link • 31152 ~ A 4 31036 .. ,::...h~ J08 30730 Jeken 30699 JM8 30695 ~gclt;&%Ii~~... ~17;~.3~i~27U.;;Ji~all ~17;~,.a~i~27U.;;Ji~all JSI ~~iihi~m.
LSaiQ"M::~~1-~~11~.£;~~~Jt~~ LSaiQ"~~~1-~~11~.£;~~~Jt~~ !Jl~l«~j~'ii;d·i$t2&h3!!L!ig";;;'.;,v;ii;,,'5·,,,wLif !Jl~l«~j~'ii;d·;$t2&h3!!L!ig";;;'·;,q~,,'5.,,,wLif ; .,304!l),aDSP,;10744. ~99. ~t@I.~:~JlIm*~~;,,:~~:.~,~::!tk Sampo 30752. 31321. 31347 . .' ;~~:t,y ,;~*./3m2ll311"""·;~1'W.h ;~~"Y .;~*./3m2ll311"""·'~1'W.h;3.1044;~10'l5; C . M<",""",*,M~"L._~~_~'~~'; M<",""",*,M~d:.,._~~_~'~~'; 30784. 30095. 30751. 30763. 30768.31051.31228.31230. 31695.31832 Sansui Soundwave Standard *~£:t~;~ .
DENON Model No. / Modele numero 1*: DVD-555 DVD-755 DVD-900 DVD-910 DVD-955 DVD-1000 DVD-1200 DVD-1500 DVD-1710 DVD-1910 DVD-1930CI DVD-2200 DVD-2800 DVD-2800Il DVD-2900 DVD-2910 DVD-2930CI DVD-3800 DVD-3910 DVD-3930CI DVD-5900 DVD-5910 DVD-9000 DVM-715 DVM-1800 DVM-1805 DVM-1815 DVM-2815 DVM-4800 DVD-800 DVD-1600 DVD-2000 DVD-2500 DVD-3000 DVD-3300 Preset codes set upon shipment from the factory. Les codes preregles different en fonctiom des livraison de "usine.
DENON www.denon.com Holdings 004 Inc.
'40s Pojl HMig Band I 'SOs Pojl Hits Hip-Hop & Urban ~ Cla5skSouI 62 &dl',t( Adu~R&8Hits 60 ~ '60s Pojl Hits 64 t1ltID 70sPojlHits 6S '8Os PojlHits 66 '9Os Pop Hits 67 d'ity UrbanlR&8IMix Shows 68 t~e4~e~t Hip-Hop/Cro
@j . TwonkYViSiOnhaSjoinedpacketVideo ~ TWONKV . . . . . . .@I . . ~ e packetvideo· ENGLISH FRANCAIS To connect your Denon product to your DLNA-compatible home network, to learn more about the TwonkyVision Media Server and for a 30-day free trial, visit http://www.twonkyvision.com/Denon/ Pour brancher votre appareil Denon avotre reseau compatible DLNA ainsi que pour en savoir plus sur Ie TwonkyVision Media Server et obtenir une periode d'essai gratuit de 30 jours, visitez Ie site http://www.
DENON SERVICE NETWORK I ijlX~~~ • • • • • • • • Please consult the outlet where the equipment was purchased. Bitte wenden Sie sich an den Handler, bei dem Sie das Produkt gekauft haben. SVP veuillez consulter votre revendeur. Neemt u alstublieft contact op met het verkooppuntwaar u de apparatuur heeft gekocht. Por favor consulte en el establecimiento donde compr6 el equipo. Vanligen ta kontakt med butiken dar du kopt utrustningen. Rivolgetevi al rivenditore che vi ha venduto I'apparecchio.
DENON® LIMITED WARRANTY (USA / CANADA) PAGE USA (ENGLISH) CANADA (ENGLISH) CANADA (FRENCH) 2 3 4 USA DENON ELECTRONICS (USA), LLC (a D&M Holdings Company) 100 Corporate Drive Mahwah, NJ 07430-2041 (800) 497-8921 (888) 544-8434 Fax DENON REGIONAL SUPER SERVICE CENTERS (Repair only-No parts orders please) PYRAMID AUDIO UNITED RADIO SERVICE AUDIO SERVICES 305 E. Braker Lane 5717 Enterprise Parkway 544 Central Dr., Suite 101 Austin, TX 78753-2746 E.
I DEN 0 N® ~·lIlll""""II"'''''III'''''''IIII ......,tll'''''''IIII'''''''1111··. .·,'11.··. . . ·.111'··. . .·.'111··.... ·,1111··. . . ·.1111'·. . .·.1111··. . .·.1111··. .·.1111·....·•• 11'·....·.'"'··....·.'"'··.... ·.1111.....·.'111··. .·,'111··. . .·,'111··. .·,'11'··. .·.111'··. . Thi'"_'yw;Ureho"o~o"'y;" . .
~"'III"~"lllh''''''IIII''''''lltl':''''IIl''''''''''II''''''''''1l" ~ 'II~I ,IIII 'III' ThIs warranty WIll be honored only m ~ ~ t t t • ; ~ i 'II" 'III" '11l1 '111" 111 11' '", '.111 1111' 11I1·· ·.III"·. .·.'"' ·.lll' ··II..•• ·.1I11·· ·'IIII ·.
~"'II"'''''llll'''''''~II''''''IIl., ..... • ,'tll!''''''III''''''111"·. .·,,t1Io·. .·,'II..·. .·"II..·. . .·'IIII'·. . .·~III'·. .·,IIII'·. .·'1111'. . . .'111'.....'1111'.....'1'........ '"1....... '1'.......'1111'.....,111'......'1111...... '1".......'1111.....'1111......'1111......'1111......'1111.......,"11..... "11.,.....'1111'..... '1111. Cette garantie ne sera honoree qu' au ~ ~ ~ I I ",," t t ~ d, ,.m"" DENON® ""."",~'"b1.