AV SURROUND RECEIVER AVR-1707 OPERATING INSTRUCTIONS
ENGLISH SAFETY INSTRUCTIONS ¢SAFETY PRECAUTIONS CAUTION RISK OF ELECTRIC SHOCK DO NOT OPEN CAUTION: TO REDUCE THE RISK OF ELECTRIC SHOCK, DO NOT REMOVE COVER (OR BACK). NO USER-SERVICEABLE PARTS INSIDE. REFER SERVICING TO QUALIFIED SERVICE PERSONNEL.
ENGLISH FCC INFORMATION (For US customers) ¢NOTE ON USE 1. PRODUCT This product complies with Part 15 of the FCC Rules. Operation is subject to the following two conditions: (1) this product may not cause harmful interference, and (2) this product must accept any interference received, including interference that may cause undesired operation. 2. IMPORTANT NOTICE: DO NOT MODIFY THIS PRODUCT This product, when installed as indicated in the instructions contained in this manual, meets FCC requirements.
ENGLISH Thank you for choosing the DENON AVR-1707 AV Surround Receiver. This remarkable component has been engineered to provide superb surround sound listening with home theater sources such as DVD, as well as providing outstanding high fidelity reproduction of your favorite music sources. As this product is provided with an immense array of features, we recommend that before you begin hookup and operation that you review the contents of this manual before proceeding.
ENGLISH Advanced Setup – Part 1 System setup items and default values·······························38, 39 Navigating through the System Setup items ···························40 About the front display································································40 Input Setup Setting the Digital In Assignment ················································41 Setting the iPod Assignment ······················································41 Setting the Component In Assignment ·························
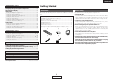
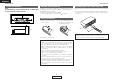
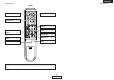
ENGLISH Getting Started Getting Started Cautions on installation About the remote control unit Note: For heat dispersal, do not install this unit in a confined space such as a bookcase or similar enclosure. In addition to controlling the AVR-1707, the attached remote control unit (RC-1048) can also be used to control the following products: q DENON component products w Component products other than DENON: • Set using the preset memory function ( page 48).
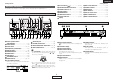
ENGLISH Getting Started Getting Started !6 Cursor buttons (D, H) ·························(22, 40) Part names and functions !7 MASTER VOLUME control knob··············(19) !8 TUNING buttons (•, ª) ·····························(31) !9 STATUS button ··········································(20) @0 DIMMER button ·········································(20) @1 VIDEO SELECT button ······························(33) @2 OUTPUT indicators······························(22, 36) @3 Display For details on the fu
ENGLISH Getting Started Getting Started Rear panel Remote control unit !4 !3 !2 !1 !0 o i [ Front ] u y Remote control signal transmitter ························(3) Indicator ····················(48, 52) Power buttons··········(10, 50) Input source selector buttons ····························(19) q w e r Tuner system/System buttons······················(31, 32) t System buttons········(50, 51) q PRE OUT terminal········································(8) w EXT.
ENGLISH Getting Started Getting Started [ Rear ] ZONE2 buttons···············(36) MAIN buttons ·················(36) Input source selector/ Number buttons·······(19, 51) SURROUND MODE buttons······················(21, 29) Tuner system/System buttons······················(31, 51) TEST TONE/DISPLAY button························(47, 51) Cursor buttons ···(11, 22, 51) SYSTEM SETUP/SETUP button························(40, 51) SURROUND PARAMETER/ AUDIO button···········(22, 51) ENTER button···········(3
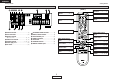
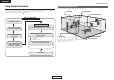
ENGLISH Easy Setup Procedure Speaker layout [Basic layout] Easy Setup Procedure Example of basic layout with eight speakers and a monitor. • This section contains the basic steps necessary to configure the AVR-1707 according to your listening room environment and the source equipment and loudspeakers you are using. • To set the sound field manually ( page 45). Subwoofer Center speaker Surround back speaker Easy to setup flow Placing the speakers. Auto setup flow Connecting the speakers.
ENGLISH Easy Setup Procedure Easy Setup Procedure ¢ Connections Speaker connections Connect the speaker terminals with the speakers making sure that like polarities are matched (< with <, > with >). NOTE: When making connections, take care that none of the individual conductors of the speaker cable come in contact with adjacent terminals, with other speaker cable conductors, or with the rear panel and screws. NEVER touch the speaker terminals when the power is on.
ENGLISH Easy Setup Procedure Easy Setup Procedure • For best picture quality (especially with progressive DVD and other high definition sources), choose the component video connection to your monitor. S-Video and composite video outputs are also provided if your monitor does not have component video inputs. Connecting a DVD player and monitor • To connect the video output from the DVD player to the AVR-1707, you only need to choose one connection type.
ENGLISH Easy Setup Procedure Easy Setup Procedure w Before performing the Auto Setup procedure Auto Setup The AVR-1707’s auto setup use the attached microphone to measure the acoustic properties in the room and automatically make the optimum settings. • To make the sound field settings manually ( D H F G page 45). q Connecting a microphone the attached setup microphone to . 1 Turn on your subwoofer.
ENGLISH Easy Setup Procedure Easy Setup Procedure r Starting Auto Setup 2 Press D H to select “Store”, then press F. 1 Press F to start the Auto Setup. Store: Store the checked measurement values. All parameters are stored. • Start the measurements. Measurement of each channel is performed as follows: 1 FL FR C 2 SW SL SR SBL SBR 1: The subwoofer speaker is measured twice. 2: Not displayed when “ZONE2” is set at “Setting the Power Amplifier Assignment” ( page 43).
ENGLISH Easy Setup Procedure Easy Setup Procedure Error messages An error message is displayed if the measurements could not be completed automatically due to the speaker layout, the measuring environment, etc. Please check the following matters, reset the pertinent items, and measure again. Be sure to turn off the AVR-1707’s power before checking the speaker connections.
ENGLISH Connecting Other Sources Cable indications The video conversion function With the AVR-1707, the Video signal and the S-Video signal which were inputted are mutually converted. And also the Video signal and the S-Video signal which were inputted are converted into a higher quality. The hookup diagrams on the subsequent pages assume the use of the following optional connection cables (not supplied).
ENGLISH Connecting Other Sources Connecting Other Sources Connecting a TV/DBS tuner Connecting the external inputs (EXT. IN) terminals • These terminals are for inputting multi-channel audio signals from an outboard decoder, or a component with a different type of multi-channel decoder, such as a DVD-Audio player, or a multi-channel Super Audio CD player, or other future multi-channel sound format decoder. • The video signal connection is the same as that for a DVD player ( page 9).
ENGLISH Connecting Other Sources Connecting Other Sources Connecting a CD player Connecting a VCR To connect the digital audio output from the CD player, you can choose from either the coaxial or optical connections. If you choose to use the optical connection, it needs to be assigned. For more information about Digital Input Assignment ( page 41). • For best picture quality choose the component video connection to your VCR. S-Video and composite video outputs are also provided.
ENGLISH Connecting Other Sources Connecting Other Sources Connecting the antenna terminals NOTE: • Do not connect two FM antennas simultaneously. • Even if an external AM antenna is used, do not disconnect the AM loop antenna. • Make sure the AM loop antenna lead terminals do not touch metal parts of the panel. An FM antenna cable plug can be connected directly.
ENGLISH Connecting Other Sources Connecting the Connecting Other Sources iPod® Connecting the MULTI ZONE terminals When using an iPod, you must connect the Control Dock for iPod (ASD-1R, sold separately) and the DOCK CONTROL jack on the AVR-1707 with a mini-jack and assign the iPod to any AUDIO and/or S-VIDEO terminal(s). The diagram below shows an example of connections for when the iPod is assigned to the DVD/VDP terminal. For instructions on operations using the MULTI ZONE functions ( page 36).
ENGLISH Connecting Other Sources Connecting Other Sources ZONE2 speaker out connections Connecting the power supply cord • When the surround back’s power amplifier is assigned to the ZONE2 output channel at Power Amplifier Assignment mode, the surround back speaker terminals can be used as the ZONE2 speaker out terminals ( page 36). • The connections diagram below is an example for when the surround back speaker is assigned to the ZONE2 stereo 2 channel.
ENGLISH INPUT MODE STATUS INPUT SELECTOR DIMMER VOLUME Basic Operation Playing the input source 1 4 Use VOLUME to adjust the volume. Use INPUT SELECTOR to select the input source you want to play. 2 Press INPUT MODE. SURROUND PARAMETER AUTO PCM EXT. IN DTS INPUT SELECTOR [MUTING] DIMMER STATUS AUTO (All auto mode): The type of input signal is detected and the AVR-1707’s surround mode is switched automatically.
ENGLISH Basic Operation Basic Operation Turning the sound off temporarily (MUTING) Checking the currently playing program source, etc. Press [MUTING]. You can adjust the muting level ( page 44). Using the surround modes Types of surround modes and their features Press STATUS. • The current program source and various settings are indicated on the display. The AVR-1707 is equipped with many surround modes.
ENGLISH Basic Operation Sources recorded in stereo Sources recorded in monaural Basic Operation Selecting the play mode (DIRECT/STEREO) INPUT MODE STATUS F G, ENTER DIRECT / STEREO • Effective for achieving pure playback. • If there is no need for tone control or distribution of the low frequencies in function of the speaker configuration, select the DIRECT mode to achieve the best sound quality. ¢ DIRECT mode This mode is for playing with high quality sound.
ENGLISH Basic Operation Basic Operation Selecting the Dolby Digital and DTS Surround mode (only with digital input) an input source for which digital (COAXIAL or 1 Select OPTICAL) is set ( page 41). D.COMP.: The dynamic range is compressed. Select one of 4 modes: “OFF”, “LOW”, “MID” (middle) or “HIGH”. Effective source / mode Dolby Digital / DTS (For DTS sources, only displayed for compatible software.) 2 Press INPUT MODE to select “AUTO”. [STANDARD] to select “STANDARD (Dolby/DTS 3 Press Surround)”.
ENGLISH Basic Operation Basic Operation F G, ENTER Selecting the Dolby Pro Logic IIx (Pro Logic II) mode It is possible to play analog input signals and digital input signals (2channels) in the surround mode. This mode is optimal for playing program sources recorded in Dolby Surround. 5 Press D H to select the item, then press F G to set. The mode switches as shown below each time the button is pressed. • When the Cinema mode: CINEMA EQ MODE CINEMA 1 Press [STANDARD] to select “DOLBY PLIIx”.
ENGLISH Basic Operation Basic Operation Selecting the DTS NEO:6 mode It is possible to play analog input signals and digital input signals (2channels) in the surround mode. 1 Press [STANDARD] to select “DTS NEO:6”. DOLBY PLIIx DTS NEO:6 NEURAL SURROUND 2 Play a program source. 3 Press SURROUND PARAMETER. 4 Press F G to select the play mode. CINEMA: This mode is optimum for playing movies.
ENGLISH Basic Operation Basic Operation Surround modes and parameters Signals and adjustability in the different modes Parameter (default values are shown in parentheses) Channel output Surround Mode STEREO EXT.
ENGLISH Basic Operation Basic Operation ¢ Differences in surround mode names depending on the input signals Button Input signals DTS Surround Mode STANDARD DTS SURROUND DTS ES DSCRT6.1 DTS ES MTRX6.
ENGLISH Basic Operation Basic Operation Button Input signals DTS Surround Mode DIRECT DIRECT DSP SIMULATION 5CH/7CH STEREO MONO MOVIE ROCK ARENA JAZZ CLUB VIDEO GAME MATRIX VIRTUAL STEREO STEREO Note *1 DOLBY DIGITAL DOLBY DOLBY DIGITAL EX DIGITAL (With no Flag) (5.1ch) DOLBY DIGITAL (2ch) DVD-Audio (multi ch) DVD-Audio (2ch) 176.
ENGLISH Basic Operation Basic Operation Using the DENON original surround modes The AVR-1707 is equipped with a high performance digital signal processor (DSP) that uses digital signal processing to recreate sound fields artificially. One of seven surround modes can be selected according to the program source and parameters can be further adjusted to achieve even more realistic sound fields.
ENGLISH Basic Operation Basic Operation Selecting the DSP surround simulation F G, SELECT/ENTER ¢ To operate the surround mode and the surround parameters from the remote control unit 1 Press [DSP SIMULATION]. MONO MOVIE 5CH/7CH STEREO ROCK ARENA VIRTUAL MATRIX , SURROUND PARAMETER DH VIDEO GAME JAZZ CLUB The 5CH/7CH STEREO mode can be selected directly by pressing [5CH/7CH STEREO]. SB CH OUT • ON: Surround back channel played.