AV SURROUND RECEIVER AVR-3802 OPERATING INSTRUCTIONS BEDIENUNGSANLEITUNG MODE D’EMPLOI ISTRUZIONI PER L’USO INSTRUCCIONES DE OPERACION GEBRUIKSAANWIJZING BRUKSANVISNING POWER ON / SOURCE OFF RC-884 REMOTE CONTROL UNIT TV CD VCR DBS/CABLE CDR/MD/ TAPE RECEIVER VDP DVD DISPLAY MENU SURR. PARA.
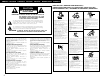
ENGLISH DEUTSCH FRANCAIS ITALIANO ESPAÑOL NEDERLANDS CAUTION SVENSKA NOTE ON USE / HINWEISE ZUM GEBRAUCH / OBSERVATIONS RELATIVES A L’UTILISATION / NOTE SULL’USO NOTAS SOBRE EL USO / ALVORENS TE GEBRUIKEN / OBSERVERA RISK OF ELECTRIC SHOCK DO NOT OPEN CAUTION: TO REDUCE THE RISK OF ELECTRIC SHOCK, DO NOT REMOVE COVER (OR BACK). NO USER SERVICEABLE PARTS INSIDE. REFER SERVICING TO QUALIFIED SERVICE PERSONNEL.
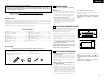
ENGLISH We greatly appreciate your purchase of the AVR-3802. To be sure you take maximum advantage of all the features the AVR-3802 has to offer, read these instructions carefully and use the set properly. Be sure to keep this manual for future reference, should any questions or problems arise. 2 2 “SERIAL NO. PLEASE RECORD UNIT SERIAL NUMBER ATTACHED TO THE REAR OF THE CABINET FOR FUTURE REFERENCE” 2 INTRODUCTION Thank you for choosing the DENON AVR-3802 Digital Surround A / V receiver.
ENGLISH 4 FEATURES 1. Digital Surround Sound Decoding Featuring 32 bit high speed DSP, operating entirely in digital domain, surround sound from digital sources such as DVD, LD, DTV and satellite are faithfully re-created. 2. Dolby Pro Logic II decoder Dolby Pro Logic II is a new format for playing multichannel audio signals that offers improvements over conventional Dolby Pro Logic.
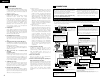
ENGLISH Connecting video components Connecting a video component equipped with S-Video jacks • To connect the video signal, connect using a 75 Ω/ohms video signal cable cord. Using an improper cable can result in a drop in video quality. • When making connections, also refer to the operating instructions of the other components.
ENGLISH Connecting a Video Component Equipped with Color Difference (Component - Y, PR/CR, PB/CB) Video Jacks (DVD Player) Connecting the antenna terminals DIRECTION OF BROADCASTING STATION • When making connections, also refer to the operating instructions of the other components. • The signals input to the color difference (component) video jacks are not output from the VIDEO output jack (yellow) or the S-Video output jack.
ENGLISH Connecting the external input (EXT. IN) jacks Speaker system connections • These jacks are for inputting multi-channel audio signals from an outboard decoder, or a component with a different type of multi-channel decoder, such as a DVD Audio player, or a multi-channel SACD player, or other future multi-channel sound format decoder. • When making connections, also refer to the operating instructions of the other components.
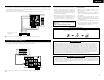
ENGLISH Connections • When making connections, also refer to the operating instructions of the other components. Connection jack for subwoofer with built-in amplifier (super woofer), etc. FRONT SPEAKER SYSTEMS (L) CENTER SPEAKER SYSTEM (R) SURROUND SPEAKER SYSTEMS (A) (L) 6 PART NAMES AND FUNCTIONS Front Panel • For details on the functions of these parts, refer to the pages given in parentheses ( ).
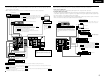
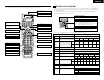
ENGLISH 7 SETTING UP THE SYSTEM Remote control unit • For details on the functions of these parts, refer to the pages given in parentheses ( ). Remote control signal transmitter ...................................(16) • Once all connections with other AV components have been completed as described in “CONNECTIONS” (see pages 4 to 8), make the various settings described below on the monitor screen using the AVR-3802’s on-screen display function.
ENGLISH NOTES: • The on-screen display signals are not output from the color difference (component) video signal (MONITOR OUT) jacks. • The on-screen display signals are output with priority to the S-VIDEO MONITOR OUT jack during playback of a video component. For example, if the TV monitor is connected to both the AVR-3802’s S-Video and video monitor output jacks and signals are input to the AVR-3802 from a video source (VDP, etc.
ENGLISH 2 Selecting the surround speakers for the different surround modes Switch to the speaker configuration screen. ENTER This screen is displayed when using both surround speakers A and B. • At this screen preset the surround speakers to be used in the different surround modes. SHIFT 3 TUNING BAND MODE TUNING Set whether or not speakers are connected and, if so, their size parameters.
ENGLISH NOTES: — Assignment of low frequency signal range — • The only signals produced from the subwoofer channel are LFE signals (during playback of Dolby Digital or DTS signals) and the low frequency signal range of channels set to “Small” in the setup menu. The low frequency signal range of channels set to “Large” are produced from those channels.
ENGLISH 4 Setting the channel level Once “Meter” or “Feet” is selected in Step 3, the Delay Time screen appears automatically. 5 • • • • 1 Select the speaker to be set. TUNING Use this setting to adjust so that the playback level between the different channels is equal. From the listening position, listen to the test tones produced from the speakers to adjust the level. The level can also be adjusted directly from the remote control unit. (For details, see page 27.
ENGLISH 7 Select “Yes”. When you adjust the channel levels while in the SYSTEM SETUP CHANNEL LEVEL mode, the channel level adjustments made will affect ALL surround modes. Consider this mode a Master Channel Level adjustment mode. After you have completed the SYSTEM SETUP CHANNEL LEVEL adjustments, you can then activate the individual surround modes and adjust channel levels that will be remembered for each of those modes.
ENGLISH Setting the multi vol. level Set the multi pre-out output level adjustment. 1 TUNING ENTER BAND MODE SHIFT At the “System Setup Menu” screen, select “Multi Vol. Level” and press the ENTER button. Auto tuner preset Use this to automatically search for FM broadcasts and store up to 40 stations at preset channels A1 to 8, B1 to 8, C1 to 8, D1 to 8 and E1 to 8.
ENGLISH 8 REMOTE CONTROL UNIT After completing system setup This button can be pressed at any time during the system setup process to complete the process. 1 At the System Setup Menu, press the SYSTEM SETUP button. SETUP • The included remote control unit (RC-884) can be used to operate not only the AVR-3802 but other remote control compatible DENON components as well.
ENGLISH Operating DENON audio components 1 Preset memory Use the mode selector buttons to select the component you want to operate. The mode switches between “AMP”, “TUNER” and “MULTI” each time the RECEIVER button is pressed, between “CDR”, “MD” and “TAPE” each time the CDR/MD/TAPE button is pressed, between “DBS” and “CABLE” each time the DBS/CABLE button is pressed, and between “DVD” and “DVD SETUP” each time the DVD button is pressed, and between “VCR” and “VCR2” eachtime the VCR button is pressed.
ENGLISH The preset codes are as follows upon shipment from the factory and after resetting: TV, VCR......................................................................HITACHI CD, MD, TAPE, CDR, VDP, DVD, DVD SETUP .........DENON DBS ...........................................................................GENERAL INSTRUMENT CABLE .......................................................................JERROLD 2 Some models cannot be operated with this remote control unit. 1.
ENGLISH Learning function System call If your AV component is not a Denon product or if it cannot be operated using the preset memory, it can be controlled with the included remote control unit by storing its remote control signals in the remote control unit. 1 Press the power ON/SOURCE button and the OFF button simultaneously. • “SET UP” appears on the remote control unit’s display. POWER 1, 5, 8 ON / SOURCE OFF CD CDR/MD/ TAPE RECEIVER ON / SOURCE VCR DBS/CABLE VDP DVD DISPLAY MENU SURR.
ENGLISH 5 Use the D and H cursor buttons to select the mode for the button at which the system call signals are to be registered, then press the ENTER button. 7 q Press the mode selector button according to the button with the remote control signals to be registered. TUNING TV CD VCR DBS/CABLE 4 CDR/MD/ TAPE RECEIVER VDP q To reset CALL 1 or CALL 2, select “SYS CALL 1” or SYS CALL 2”, then press the ENTER button.
ENGLISH 4 Use the D and H cursor buttons to display “RESET PRE” on the remote control unit, then press the ENTER button. • After “SEL PRE” is displayed on the remote control unit’s display, the registered preset memory is displayed on the remote control unit’s display. 6 When the mode you want to reset is shown on the remote control unit’s display, press the ENTER button to reset the preset memory. (4) All reset function • This function is for resetting all the settings to the factory defaults.
ENGLISH 9 OPERATION Auto search function • The set is equipped with a function for searching for the registration number if you do not know the preset code (a 4-digit number) when setting the preset memory. 1 2 For TV, DBS or CABLE components, turn on the component’s power. For CD, MD, TAPE, DVD, VCR and VDP component’s, turn on the component’s power and load a disc or tape. Press the power ON/SOURCE button and the OFF button simultaneously. • “SET UP” appears on the remote control unit’s display.
ENGLISH • Selecting the PCM mode Press the PCM button to switch to the PCM signal input. Playing the input source 1 1 5 BAND 2 3 PCM VOLUME AUTO ENTER SHIFT SKIP MUTING - PHONO CD 1 2 3 CDR/ TAPE VDP DVD 4 5 6 VCR-1 VCR-2 /V.AUX TV/DBS 7 8 9 TV/ VCR 0 +10 PTY SPEAKER DIGITAL ANALOG • In the DIGITAL PCM mode 4 - TEST TONE INPUT AUTO 1 • Selecting the DTS mode Press the DTS button to switch to the DTS signal input. RT DTS OUTPUT DOLBY/DTS SURROUND DSP SIMU.
ENGLISH Playback using the external input (EXT. IN) jacks 1 Set the external input (EXT. IN) mode. Press the EXT. IN to switch the external input. After starting playback [1] Adjusting the sound quality (TONE) The tone control function will not work in the Direct mode. B 1 EXT.IN EXT.IN The tone switches as follows each time the TONE CONTROL button is pressed.
ENGLISH [4] Combining the currently playing sound with the desired image 1 Simulcast playback Use this switch to monitor a video source other than the audio source. VIDEO SELECT Press the VIDEO SELECT button repeatedly until the desired source appears on the display. Multi-source recording/playback [1] Playing one source while recording another (REC OUT mode) B 1 Press the REC/MULTI button. REC / MULTI 2,4 2 B (Main unit) (Main unit) 1 Cancelling simulcast playback.
ENGLISH [3] Remote control unit operations during multi-source playback (selecting the input source) This operation is possible when Multi mode is selected. This operation is not possible in the REC OUT mode. 1 Select “MULTI” using the RECEIVER button. TV CD VCR DBS/CABLE CDR/MD/ TAPE RECEIVER 1 RECEIVER VDP DVD MENU DISPLAY SURR. PARA. OSD SETUP RETURN TUNING A/B (Remote Control unit) MEMORY BAND MODE CHANNEL 2 Press the input source button. The multi source switches directly.
ENGLISH 10 SURROUND Fader function • This function makes it possible to lower the volume of the front channels (FL, C and FR) or the rear channels (SL, SR, SBL and SBR) together. Use it for example to adjust the balance of the sound from the different positions when playing multi-channel music sources. Before playing with the surround function • Before playing with the surround function, be sure to use the test tones to adjust the playback level from the different speakers.
ENGLISH 3 Set the surround parameter mode. Display SURROUND PARAMETER SURR. PARA. (Main unit) MODE CINEMA (Remote control unit) The on-screen display differs according to whether the operation is performed from the main unit or the remote control unit. 4 Select the play mode. TUNING SELECT BAND MODE TUNING (Main unit) (Remote control unit) Surround parameters q Pro Logic II Mode: The Cinema mode is for use with stereo television shows and all programs encoded in Dolby Surround.
ENGLISH 3 Play a program source with the , mark. Light • The Dolby Digital indicator lights when playing Dolby Digital sources. Light • The DTS indicator lights when playing DTS sources. DIGITAL Operate the 6.1/7.1 Surround button to switch Surround Back CH ON/OFF. 6.1 / 7.1 SURROUND • The SIGNAL DETECT indictor lights SIGNAL DETECT Light when playing DTS-ES/6.1-channel surround sources containing the identification signal.
ENGLISH 11 DSP SURROUND SIMULATION • The AVR-3802 is equipped with a high performance DSP (Digital Signal Processor) which uses digital signal processing to synthetically recreate the sound field. One of seven preset surround modes can be selected according to the program source and the parameters can be adjusted according to the conditions in the listening room to achieve a more realistic, powerful sound.
ENGLISH • Operating the surround mode and surround parameters from the main unit‘s panel. 1 Turn the SELECT knob to select the surround mode. Tone control setting • Use the tone control setting to adjust the bass and treble as desired. • To operate the tone control from the remote control unit. B SELECT 1 SURR. PARA.
ENGLISH Surround parameters e MODE: (DTS NEO:6) • Cinema This mode is optimum for playing movies. Decoding is performed with emphasis on separation performance to achieve the same atmosphere with 2-channel sources as with 6.1-channel sources. This mode is effective for playing sources recorded in conventional surround formats as well, because the in-phase component is assigned mainly to the center channel (C) and the reversed phase component to the surround (SL, SR and SB channels).
ENGLISH 12 LISTENING TO THE RADIO 5 BAND Auto tuning 1 TUNING MODE TUNING 1 Set the input function to “TUNER”. (Remote control unit) Press the TUNING UP or DOWN button to tune in the desired station. The frequency changes when the continuously button is held in. B FUNCTION TUNER 1 (Main unit) 2 Preset memory (Remote control unit) Press the RECEIVER button on the remote control unit to select “TUNER”.
ENGLISH 2 Traffic Program (TP) TP identifies programs that carry traffic announcements. This allows you to easily find out the latest traffic conditions in your area before you leaving home. 2 Radio Text (RT) RT allows the RDS station to send text messages that appear on the display. NOTE: The operations described below using the RDS, PTY and RT buttons will not function in areas in which there are no RDS broadcasts. Recalling preset stations • To call out preset stations from the remote control unit.
ENGLISH PTY search TP search Use this function to find RDS stations broadcasting a designated program type (PTY). For a description of each program type, refer to “Program Type (PTY)”. 1 TUNER 1 Use this function to find RDS stations broadcasting traffic program (TP stations). 1 Set the input function to “TUNER”. TUNER 1 Set the input function to “TUNER”.
ENGLISH 13 LAST FUNCTION MEMORY 15 TROUBLESHOOTING • This unit is equipped with a last function memory which stores the input and output setting conditions as they were immediately before the power is switched off. This function eliminates the need to perform complicated resettings when the power is switched on. • The unit is also equipped with a back-up memory. This function provides approximately one week of memory storage when the main unit’s power switch is off and with the power cord disconnected.
ENGLISH Remote control unit Symptom Cause Measures • Batteries dead. • Remote control unit too far from this unit. This unit does not operate • Obstacle between this unit and properly when remote control remote control unit. unit is used. • Different button is being pressed. • < and > ends of battery inserted in reverse. Page • Replace with new batteries. • Move closer. 16 16 • Remove obstacle. 16 • Press the proper button. • Insert batteries properly.
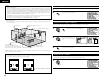
ENGLISH (3) When using different surround speakers for movies and music To achieve more effective surround sound for both movies and music, use different sets of surround speakers and different surround modes for the two types of sources. Speaker setting examples Here we describe a number of speaker settings for different purposes. Use these examples as guides to set up your system according to the type of speakers used and the main usage purpose. Front speakers Center speaker 1.
ENGLISH Surround The AVR-3802 is equipped with a digital signal processing circuit that lets you play program sources in the surround mode to achieve the same sense of presence as in a movie theater. Dolby Surround (1) Dolby Digital (Dolby Surround AC-3) Dolby Digital is the multi-channel digital signal format developed by Dolby Laboratories. Dolby Digital consists of up to “5.
ENGLISH DTS-ES Extended Surround TM DTS Digital Surround Digital Theater Surround (also called simply DTS) is a multi-channel digital signal format developed by Digital Theater Systems. DTS offers the same “5.1” playback channels as Dolby Digital (front left, front right and center, surround left and surround right) as well as the stereo 2-channel mode.
ENGLISH System setup items and default values (set upon shipment from the factory) System setup Surround modes and parameters Default settings Front L/R CENTER SURROUND L/R SUBWOOFER SURROUND BACK L/R When playing Dolby Digital Signals DIRECT C E E B E C C C C STEREO C E E B E C C C C EXTERNAL INPUT C B B B B E E E C C B B B B * C E C C DTS NEO:6 C B B B B E E C C DOLBY DIGITAL C B B B B C E E E C B B B B E C E E Channel output (
ENGLISH 17 SPECIFICATIONS 2 Audio section • Power amplifier Rated output: Dynamic power: Output terminals: • Analog Input sensitivity / input impedance: Frequency response: S/N: Distortion: Rated output: • Digital D/A output: 105 W + 105 W (8 Ω/ohms, 20 Hz ~ 20 kHz with 0.05% T.H.D.) 150 W + 150 W (6 Ω/ohms, 1 kHz with 0.7% T.H.D.) Center: 105 W (8 Ω/ohms, 20 Hz ~ 20 kHz with 0.05% T.H.D.) 150 W (6 Ω/ohms, 1 kHz with 0.7% T.H.D.) Surround: 105 W + 105 W (8 Ω/ohms, 20 Hz ~ 20 kHz with 0.05% T.H.D.
ESPAÑOL 2 Agradecemos que haya comprado el equipo AVR-3802. 2 Para obtener el máximo rendimiento de todas las prestaciones que el AVR-3802 le ofrece, lea atentamente estas instrucciones y utilice el equipo de forma correcta. Conserve este manual para su consulta posterior, en caso de que surgieran dudas o problemas.
ESPAÑOL 4 CARACTERÍSTICAS 1. Decodificación de sonido digital surround (envolvente) Con un sistema de procesadores de alta velocidad DSP a 32 bit, operando enteramente en campo digital, son fielmente recreados generadores digitales del sonido surround tales como DVD, LD, DTV y satélite. 2. Descodificador Dolby Pro Logic II Dolby Pro Logic II es un nuevo formato para reproducir señales de audio, que ofrece mejoras frente al sistema convencional Dolby Pro Logic.
ESPAÑOL Conexión de aparatos de video Conexión de aparatos de video equipados con tomas S-Video • Para conectar la señal de video utilice un cable de señal de video de 75 Ω/ohmios. El utilizar un cable no adecuado puede empeorar la calidad del video. • Al hacer las conexiones consulte también las instrucciones sobre los otros componentes.
ESPAÑOL Conexión de aparatos de video equipados con tomas de video de diferencia de color (componente - Y, PR/CR, PB/CB) (reproductor DVD) • Al hacer las conexiones, consulte también las instrucciones de funcionamiento de los otros componentes. • La entrada de señales en las tomas de video de diferencia de color (componente) no son salidas procedentes de la toma de salida de VIDEO (amarilla) ni de la toma de salida S-Video.
ESPAÑOL Conexión de las tomas de entrada exteriores (EXT. IN) • Estos conectores son para recibir señales de audio multicanal desde un descodificador externo o desde un componente con un tipo de descodificador multicanal distinto, como un reproductor Audio DVD o un reproductor SACD multicanal, o para descodificadores de formato de sonido multicanal futuros. • Al hacer la conexión, consulte las instrucciones de funcionamiento de los otros componentes.
ESPAÑOL Conexiones • Al hacer las conexiones consulte las instrucciones de funcionamiento de los otros aparatos. Toma de conexión del altavoz de bajas frecuencias (subwoofer) con amplificador incorporado (super woofer), etc.
ESPAÑOL 7 CONFIGURACIÓN DEL SISTEMA Mando a distancia • Para mayor detalle sobre las funciones de estas piezas, consúltese las páginas que figuran entre paréntesis ( ). Transmisor de señal de mando a distancia ..................................
ESPAÑOL NOTAS: • Las señales de visualización de “on-screen“ no salen de los tomas del video componente de color (MONITOR OUT). • Las señales de visualización en pantalla son salidas prioritarias de la toma S-VIDEO MONITOR OUT durante la reproducción en un aparato de video.
ESPAÑOL 2 Selección de los altavoces envolventes para los distintos modos de sonido envolvente Cambie a la pantalla de configuración de altavoces. ENTER SHIFT 3 TUNING BAND MODE TUNING Esta pantalla se visualiza cuando se utiliza tanto el altavoz de sonido envolvente A (sonido envolvente) el B. • En esta pantalla indique los altavoces envolventes que se van a usar en los distintos modos de sonido envolvente.
ESPAÑOL NOTAS: — Asignación del margen de señales de baja frecuencia — • El canal del altavoz de frecuencias ultrabajas sólo produce señales LFE (durante la reproducción de señales Dolby Digital o DTS) así como el margen de señales de baja frecuencia de canales ajustados a “Small” en el menú de configuración. El margen de señales de baja frecuencia de canales ajustados a “Large” es emitido desde estos canales.
ESPAÑOL 3 TUNING BAND MODE Ajuste del nivel de canal Seleccione la unidad que se deseada, metros o pies. Seleccione (oscureciéndolo) las unidades que se desean usar, “Meters” (metros) o “Feet” (pies). TUNING Exemple: Lorsque “Meters” (Mètres) est sélectionné 4 1 Cuando se haya seleccionado “Meters” (metros) o “Feet” (pies) en el paso 3, aparece automáticamente la pantalla de tiempo de demora. 5 BAND En el menú de configuración del sistema seleccione “Channel Level” (nivel de canal).
ESPAÑOL 7 Cuando ajuste los niveles de los canales mientras esté en el modo SYSTEM SETUP CHANNEL LEVEL, los ajustes de nivel de canal que se hayan hecho afectarán a TODOS los modos de música envolvente. Tome este modo como modo maestro de ajuste de nivel de canal. Una vez haya hecho los ajustes SYSTEM SETUP CHANNEL LEVEL, podrá activar los modos de sonido envolvente individuales y ajustar los niveles de canal, que quedarán grabados para cada uno de esos modos.
ESPAÑOL Ajuste del nivel multi vol. Pre-ajustes del Auto Sintonizador Fijar el ajuste del nivel múltiple anterior a la salida. 1 TUNING ENTER BAND MODE SHIFT TUNING En la pantalla “System Setup Menu“( Menú de Configuración del Sistema) seleccione “Multi Vol. Level“(Nivel Multi Vol.) y pulse el botón ENTER. Utilizarlo para buscar automáticamente emisoras FM y para almacenar hasta 40 emisoras en los canales ajustados previamente A del 1 al 8, B del 1 al 8, C del 1 al 8, D del 1 al 8, E del 1 al 8.
ESPAÑOL 8 MANDO A DISTANCIA Después de haber configurado el sistema Este botón puede pulsarse en cualquier momento durante el proceso de configuración del sistema para terminar el proceso. 1 Pulse el botón SYSTEM SETUP (configuración del sistema) en el menú de configuración del sistema. Los ajustes modificados son ingresados y la visualización de pantalla se apaga.
ESPAÑOL Funcionamiento de los componentes de audio DENON 1 Memoria preestablecida Utilice los botones selectores de modo para seleccionar el componente que desee manejar.
ESPAÑOL Los códigos de preajuste a la salida de fábrica y después de un reajuste son los siguientes: TV, VCR ..............................................................HITACHI CD, MD, TAPE, CDR, VDP, DVD, DVD SETUP ..DENON DBS ....................................................................GENERAL INSTRUMENT CABLE ................................................................JERROLD Pulse el botón de alimentación ON/SOURCE y el botón OFF al mismo tiempo.
ESPAÑOL Recuperación de sistema Función aprendizaje Si su componente AV no es un producto Denon o si este no puede ser operado utilizando la memoria preajustada, este puede ser controlado con la unidad de mando a distancia mediante el almacenamiento de sus señales de mando a distancia en la unidad de mando a distancia. 1 Pulse simultáneamente el botón de alimentación ON/SOURCE y el botón OFF. • Aparece “SET UP“ en la pantalla de visualización de la unidad de mando a distancia.
ESPAÑOL 5 Utilice los botones de cursor D y H para seleccionar el modo para el botón en el cual las señales de llamada de sistema se van a registrar, luego pulse el botón ENTER. 7 q Pulse el botón selector de modo de acuerdo al botón que va a ser registrado con las señales de mando a distancia. TV CD VCR DBS/CABLE 4 CDR/MD/ TAPE RECEIVER TUNING ENTER BAND VDP DVD SHIFT Se visualiza “SELECT KEY“(seleccionar tecla).
ESPAÑOL 4 Utilice los botones de cursor D y H para visualizar “RESET PRE“ en la unidad de mando a distancia y luego pulse el botón ENTER. • Después de que se visualiza “SEL PRE“ en la pantalla de visualización de la unidad de mando a distancia, la memoria preajustada registrada se visualiza allí también. 6 Cuando aparezca el modo que desee reajustar en la pantalla de visualización de la unidad de mando a distancia, pulse el botón ENTER para reajustar la memoria de preajustes.
ESPAÑOL 9 FUNCIONAMIENTO Función de búsqueda automática • El conjunto está equipado con una función de búsqueda para el número de registro si usted no sabe el código de preajuste (un número de 4 dígitos) cuando se configura la memoria preajustada. 1 2 Para los componentes de TV, DBS o de CABLE encienda la alimentación del componente. Para los componentes de CD, MD, TAPE, DVD, VCR y VDP, encienda la alimentación del componente y reproducción un disco o cinta.
ESPAÑOL • Selección del modo PCM Pulsar el botón PCM para PCM cambiar a la señal de entrada PCM. Reproducción de la fuente de entrada 1 1 5 BAND VOLUME B SKIP 3 ENTER 1 4 - SHIFT SKIP MUTING - TUNER PHONO CD 1 2 3 CDR/ TAPE VDP DVD 4 5 6 VCR-1 VCR-2 /V.AUX TV/DBS 7 8 9 TV/ VCR 0 +10 RDS PTY RT TEST TONE SPEAKER OUTPUT DSP SIMU. 5CH / 7CH STEREO 6.1 / 7.
ESPAÑOL Reproducir utilizando las tomas de entrada exterior (EXT. IN) 1 Posicionar el modo de entrada exterior (EXT.IN). Pulsar el EXT.IN para encender la entrada externa. EXT.IN EXT.IN (Unidad principal) B Anulación del modo de entrada exterior Para anular el ajuste de entrada exterior (EXT. IN), pulse el botón entrada deseada (AUTO,PCM,DTS) o ANALOG para cambiar al modo de entrada deseada. (Véase la página 183.
ESPAÑOL [3] Quitar el sonido momentáneamente (MUTING) 1 Utilice esta facilidad para desactivar la salida de audio momentáneamente. Pulse el botón MUTING (silenciador) Anulación del modo MUTING. Pulse de nuevo el botón MUTING.
ESPAÑOL [3] Uso de la unidad de control remoto durante la reproducción del MULTI-SOURCE (selección del generador salida) Esta operación es posible cuando se selecciona el modo Múltiple. Esta operación no es posible en el modo REC OUT. 1 Seleccione “MULTI“ utilizando el botón RECEIVER. TV CD VCR DBS/CABLE CDR/MD/ TAPE RECEIVER 1 RECEIVER VDP DVD MENU DISPLAY SURR. PARA. OSD SETUP RETURN TUNING A/B (Mando a distancia) MEMORY BAND MODE CHANNEL 2 Pulsar el botón de entrada de fuente.
ESPAÑOL 10 SURROUND Función disminución de volumen Antes de poner en marcha la función surround • Antes de poner en marcha la función surround, utilice los tonos de prueba para ajustar el nivel de reproducción de los distintos altavoces. Este ajuste puede hacerse con la configuración del sistema (véase la página 173) o con el mando a distancia, como se describe a continuación.
ESPAÑOL 3 Ajuste el modo de parámetros de sonido envolvente. Pantalla SURROUND PARAMETER SURR. PARA. (Unidad principal) MODE CINEMA (Mando a distancia) La visualización en pantalla difiere de acuerdo a si la operación se lleva a cabo desde la unidad principal o desde la unidad de mando a distancia. 4 Seleccione el modo de reproducción.
ESPAÑOL 3 Reproduzca una fuente de programas con la marca DIGITAL S’allume S’allume • El indicador Dolby Digital se ilumina cuando se reproducen fuentes Dolby Digital. , . Operar el botón Surround 6.1/7.1 para cambiar el canal surround posterior ON/OFF. • El indicador DTS se ilumina cuando se reproducen fuentes DTS. 6.1 / 7.1 SURROUND • El indicador SIGNAL DETECT se ilumina cuando se reproducen fuentes de sonido envolvente de 6.1 canales/ DTS-ES que contienen la señal de identificación.
ESPAÑOL 11 SIMULACIÓN SURROUND DSP • El AVR-3802 está equipado con un DSP (procesador de señales digitales) de gran calidad que procesa señales digitales para recrear sintéticamente el campo sonoro. Se puede seleccionar uno de siete modos surround preajustados, según la fuente de programas, y los parámetros pueden ajustarse de acuerdo con las condiciones existentes en la sala de audición, para obtener un sonido poderoso y más realista.
ESPAÑOL • Cómo operar el modo surround y los parámetros surround desde el panel de la unidad principal. 1 Girar el botón SELECT para seleccionar el modo surround. Ajuste del control de tonos • Use el ajuste control de tonos para ajustar los sonidos graves y agudos según su deseo. • Para operar el control del tono desde el mando a distancia. B SELECT 1 SURR. PARA.
ESPAÑOL • Para operar el control del tono desde la unidad principal. 1 TONE CONTROL El tono se activa de la siguiente forma cada vez que se pulsa el botón TONE CONTROL. BASS 0 SELECT (Unidad principal) Salida de canal 1 TREBLE Una vez seleccionado el canal del volumen que se desea ajustar, girar el botón SELECT para ajustar el nivel. • Para aumentar los graves o los agudos gire el mando hacia la derecha : (Los tonos graves o agudos pueden aumentarse hasta +12 dB en pasos de 2 dB.
ESPAÑOL 12 RECEPCIÓN DE RADIO 5 BAND Sintonización automática 1 TUNING MODE TUNING 1 Ajuste la función de entrada a “TUNER“ (Mando a distancia) Presione el botón TUNING arriba o abajo para sintonizar la estación deseada. La frecuencia cambia continuamente cuando el botón se mantiene pulsado. B FUNCTION TUNER 1 (Unidad principal) (Mando a distancia) Memoria de preajuste 2 Pulse el botón RECEIVER en la unidad de mando a distancia para seleccionar “TUNER“.
ESPAÑOL 2 Programas de tráfico (TP) TP identifica los programas que dan anuncios del tráfico. Esto le permite informarse rápidamente de las últimas condiciones del tráfico en su área antes que parta de su casa. 2 Texto de radio (RT) RT permite a las estaciones RDS enviar mensajes de texto que aparecen en el visualizador. NOTA: Las operaciones que se describen abajo usando los botones RDS, PTY y RT no pueden efectuarse en áreas donde no haya emisiones RDS.
ESPAÑOL Búsqueda PTY Búsqueda TP Use esta función para buscar las estaciones RDS que transmitan un tipo de programa designado (PTY). Para una descripción de cada tipo de programa, ver “Tipo de programa (PTY)“. 1 Utilice esta función para encontrar estaciones RDS que emitan programas de tráfico (estaciones TP). 1 Ajuste la función de entrada a “TUNER“. TUNER POWER 1 ON / SOURCE OFF TUNER 1 Ajuste la función de entrada a “TUNER“.
ESPAÑOL 13 MEMORIA DE LA ÚLTIMA FUNCIÓN 15 RESOLUCIÓN DE PROBLEMAS • Este equipo está equipado con una memoria de la última función ejecutada, que almacena las condiciones de ajuste de entradas y salidas tal como eran inmediatamente antes de que la alimentación eléctrica se cortara. Esta función elimina la necesidad de realizar reajustes complicados cuando la alimentación eléctrica se activa. • Este equipo también está equipado con una memoria de “seguridad“.
Mando a distancia ESPAÑOL Síntoma Causa Este aparato no funciona bien cuando se utiliza el mando a distancia. • Las pilas están agotadas. • El mando a distancia está demasiado lejos del aparato. • Existen obstáculos entre este aparato y el mando a distancia. • Se está pulsando un botón distinto. • Los polos < y > de las pilas están colocados en posición invertida. Medidas a tomar Página • Ponga baterías nuevas. • Póngalo más cerca. 176 176 • Retire los obstáculos. 176 • Pulse el botón correcto.
ESPAÑOL • Las señales procedentes de los canales surround se reflejan en las paredes, como aparece en la ilustración de la izquierda, y crean una atmósfera de sonido envolvente realista. Sin embargo, para fuentes de música multicanal, la utilización de altavoces bipolares o dipolares montados a los lados de la posición de escucha, puede no resultar satisfactoria para crear un campo sonoro envolvente de 360 grados.
ESPAÑOL Sonido envolvente (surround) El AVR-3802está equipado con un circuito de procesado de señales digitales que permite programar fuentes en el modo surround para obtener la misma sensación que si estuviera en una sala de cine. Dolby Surround (1) Dolby Digital (Dolby Surround AC-3) Dolby Digital es el formato de señales digitales multicanal desarrollado por los Laboratorios Dolby.
ESPAÑOL Formato Surround Digital DTS DTS-ES Extended Surround ™ El Digital Theater Surround (también denominado DTS más sencillamente), es un formato de señales digitales multicanal desarrollado por Digital Theater Systems. DTS ofrece los mismos 5,1 canales de reproducción que Dolby Digital (frontal izquierdo, frontal derecho y central, surround izquierdo y surround derecho) y también el modo estéreo de 2 canales.
ESPAÑOL Modos y parámetros surround Elementos de configuración del sistema y valores por defecto (establecidos a la salida de fábrica) Configuración del sistema Surround Sp. A /B Surround Back Sp. Yes Small Small / 2spkrs DOLBY/ DTS SURROUND 5CH/7CH STEREO A DSP SIMULATION A A A — 80 Hz LFE SB CH Auto Flag Detect Seleccione el método de reproducción del canal de sonido envolvente trasero para señales digitales. DTS-ES / 6.
ESPAÑOL 17 ESPECIFICACIONES 2 Sección de audio. • Amplificador de potencia Salida: 105 W + 105 W (8 Ω/ohmios, 20 Hz ~ 20 kHz con 0,05% de T.H.D.) 150 W + 150 W (6 Ω/ohmios, 1 kHz with 0,7% T.H.D.) 105 W (8 Ω/ohmios, 20 Hz ~ 20 kHz con 0,05% de T.H.D.) 150 W (6 Ω/ohmios, 1 kHz with 0,7% T.H.D.) Surround: 105 W + 105 W (8 Ω/ohmios, 20 Hz ~ 20 kHz con 0,05% de T.H.D.) 150 W + 150 W (6 Ω/ohmios, 1 kHz con 0,7% T.H.D.) Surround back: 105 W + 105 W (8 Ω/ohmios, 20 Hz ~ 20 kHz with 0,05% de T.H.D.