AV SURROUND RECEIVER AVR-3806 OPERATING INSTRUCTIONS
SAFETY INSTRUCTIONS 2 SAFETY PRECAUTIONS CAUTION RISK OF ELECTRIC SHOCK DO NOT OPEN CAUTION: TO REDUCE THE RISK OF ELECTRIC SHOCK, DO NOT REMOVE COVER (OR BACK). NO USER-SERVICEABLE PARTS INSIDE. REFER SERVICING TO QUALIFIED SERVICE PERSONNEL.
2 NOTE ON USE / OBSERVATIONS RELATIVES A L’UTILISATION • Avoid high temperatures. Allow for sufficient heat dispersion when installed in a rack. • Eviter des températures élevées. Tenir compte d’une dispersion de chaleur suffisante lors de l’installation sur une étagère. • Keep the apparatus free from moisture, water, and dust. • Protéger l’appareil contre l’humidité, l’eau et la poussière. • Unplug the power cord when not using the apparatus for long periods of time.
Getting Started Getting Started Thank you for choosing the DENON AVR-3806 Digital Surround A / V amplifier. This remarkable component has been engineered to provide superb surround sound listening with home theater sources such as DVD, as well as providing outstanding high fidelity reproduction of your favorite music sources. As this product is provided with an immense array of features, we recommend that before you begin hookup and operation that you review the contents of this manual before proceeding.
2 System setup menu page 9~13 page 80 page 80 page 80 page 81 page 75 page 76 page 76, 77 page 77, 78 page 78, 79 page 79 page 69 page 63 page 70 page 63, 64 page 70 page 64 page 70, 71 page 64 page 65, 66 page 72 page 66, 67 page 72, 73 page 67 page 73, 74 page 67 page 74 page 67, 68 page 68 page 68, 69
2 We greatly appreciate your purchase of the AVR-3806. 2 To be sure you take maximum advantage of all the features the AVR-3806 has to offer, read these instructions carefully and use the set properly. Be sure to keep this manual for future reference should any questions or problems arise. “SERIAL NO.
Getting Started Getting Started Advanced Setup – Part 1 Navigating through the System Setup Menu····················61 On screen display and front display ···································62 Audio Input Setup Setting the Digital In Assignment·········································63 Setting the DENON LINK ·····················································63 Setting the EXT.
Getting Started Getting Started Cautions on installation Noise or disturbance of the picture may be generated if this unit or any other electronic equipment using microprocessors is used near a tuner or TV. If this happens, take the following steps: • Install this unit as far away as possible from the tuner or TV. • Run the antenna wires from the tuner or TV away from this unit’s power supply cord and input/output connection cables.
Getting Started Getting Started Part names and functions Display !4 !3 !2 Front panel !1 !0 o iu y For details on the functions of these parts, refer to the pages given in parentheses ( ). !4 @0 !3 !9 !2 !1 !0 q w !5 !6 !7 !8 #8 #7# #5 # #00 @9 @8 @ #66 #5 #44 #3 #2 # #11 # @77 q Input signal indicator The respective indicator will light corresponding to the input signal.
Getting Started Getting Started Rear panel Remote control unit For details on the functions of these parts, refer to the pages given in parentheses ( ).
Easy Setup and Operation Speaker system layout Easy Setup and Operation 2 Basic system layout • This section contains the basic steps necessary to configure the AVR-3806 according to your listening room environment and the source equipment and loudspeakers you are using. • For optimum performance, we recommend using the Auto Setup function. • If you wish, you can set the various settings manually without using Auto Setup ( page 75 ~ 79).
Easy Setup and Operation Easy Setup and Operation 2 Connections Speaker connections • Connect the speaker terminals with the speakers making sure that like polarities are matched (< with <, > with >). Mismatching of polarities will result in weak central sound, unclear orientation of the various instruments, and the stereo image being impaired.
Easy Setup and Operation Easy Setup and Operation For best picture quality (especially with progressive DVD and other high definition sources), choose the component video or HDMI connection to your monitor TV. S-Video and composite video outputs are also provided if your TV does not have component video inputs. Connecting a DVD player and monitor TV • To connect the video output from the DVD player to the AVR-3806, you only need to choose one connection type.
Easy Setup and Operation Easy Setup and Operation Auto Setup / Room EQ The Auto Setup and Room EQ function of this unit performs an analysis of the speaker system and measures the acoustic characteristics of your room to permit an appropriate automatic setting. The AVR-3806’s Audyssey MultEQ XT function has the feature that it provides the optimum listening environment at all listening positions in the home theater, where there are often multiple listeners viewing programs together.
Easy Setup and Operation Easy Setup and Operation Connecting a microphone POWER ENTER SETUP MIC 1 Connect the microphone for Auto Setup to the SETUP MIC jack on the front panel of the unit. Turning on the power 1 Turn on your subwoofer. Set the volume to halfway and set the crossover frequency to the maximum or Low pass filter off if your subwoofer can adjust the output volume and the crossover frequency Some subwoofers have a standby mode.
Easy Setup and Operation Starting Auto Setup 1 2 Press the SETUP button. • The “System Setup Menu” appears. Press the CURSOR D or H button to select the “Auto Setup / Room EQ”, then press the ENTER button. Easy Setup and Operation Power Amp Assign Preliminary measurements The AVR-3806 has available surround back amplifier channel. If no surround back speakers are used in the main room, their amplifier channels can be assigned for multi-zone use or the front speaker‘s Bi-Amp connection.
Easy Setup and Operation 3 Check the results of the speaker detection, then press the ENTER button. • The second screen appears. [ Second screen ] 4 If the check ends, press the ENTER button again. NOTE: • If the results are not as expected or if an error message is displayed, select “Retry” and perform the measurements again. (For details on the error messages ( page 13).
Easy Setup and Operation 3 4 If the check ends, press the ENTER button again. Press the CURSOR D or H button to select whether or not to save the data you have checked. Easy Setup and Operation About the error message These error messages will be displayed when performing the measurements of Auto Setup and the automatic measurements can not be completed because of the speaker arrangement, measurement environment, or other factors.
Connecting Other Sources Connecting Other Sources NOTE: • Do not plug in the power supply cord until all connections have been completed. • When making connections, also refer to the operating instructions of the other components. • Be sure to connect the left and right channels properly (left with left, right with right). • Note that binding pin-plug cables together with power supply cords or placing them near a power transformer will result in hum or other noise.
Connecting Other Sources Connecting Other Sources The video conversion function The AVR-3806 is equipped with a function for up and down converting video signals. Because of this, the AVR-3806’s MONITOR OUT terminal can be connected to the monitor (TV) with a set of cables offering a higher quality connection, regardless of how the player and the AVR-3806’s video input terminals are connected.
Connecting Other Sources Connecting Other Sources Connecting equipment with HDMI (High-Definition Multimedia Interface) terminals [To convert analog video signals to HDMI signals] Connecting a TV tuner • For best picture quality choose the component video connection to your TV. S-Video and composite video outputs are also provided if your TV does not have component video inputs. • To connect the digital audio output from the TV, you can choose from either the coaxial or the optical connections.
Connecting Other Sources Connecting Other Sources Connecting a DBS tuner Connecting the external inputs (EXT. IN) terminals • These terminals are for inputting multi-channel audio signals from an outboard decoder, or a component with a different type of multi-channel decoder, such as a DVD Audio player, or a multichannel Super Audio CD player, or other future multi-channel sound format decoder. • The video signal connection is the same as that for a DVD player ( page 8).
Connecting Other Sources Connecting Other Sources Connecting a DVD recorder Connecting a VCR • There are two sets of video deck (VCR) terminals, so two video decks can be connected for simultaneous recording or video copying. • For best picture quality choose the component video connection to your DVD recorder. S-Video and composite video outputs are also provided. If you choose to use the component video connection, it needs to be assigned.
Connecting Other Sources Connecting Other Sources Connecting a CD player Connecting a CD recorder or MD recorder To connect the digital audio output from the CD player, you can choose from either the coaxial or optical connections. If you choose to use the optical connection, it needs to be assigned. For more information about Digital Input Assignment ( page 63).
Connecting Other Sources Connecting Other Sources Connecting equipment with HDMI (High-Definition Multimedia Interface) terminals DENON LINK connections • High quality digital sound with reduced digital signal transfer loss can be enjoyed by connecting a separately sold DENON LINK compatible DVD player.
Connecting Other Sources Connecting Other Sources NOTE: • The audio signals on the multi/stereo area of Super Audio CDs are not output. If the Super Audio CD is a hybrid CD, only the audio signals in the CD area are output. • Use a compatible player to play DVD Audio discs that are copyright protected by CPPM. • Among the devices that support HDMI, some devices can control other devices via the HDMI connector; however, the AVR-3806 cannot be controlled by another device via the HDMI connector.
Connecting Other Sources Connecting Other Sources 2 AM loop antenna assembly Connecting the antenna terminals An F-type FM antenna cable plug can be connected directly. 1 2 Connect to the AM antenna terminals. 3 FM ANTENNA DIRECTION OF BROADCASTING STATION Connection of AM antennas 1. Push the lever. AM LOOP ANTENNA (Supplied) Remove the vinyl tie and take out the connection line. 75 Ω/ohms COAXIAL CABLE Bend in the reverse direction. 4 a. With the antenna on top any stable surface. 2.
Connecting Other Sources Connecting Other Sources Connecting the CONTROL terminal Connecting the XM terminal • AVR-3806 is the XM Ready® receiver. You can receive XM Satellite Radio® by connecting to the XM Connect-and-PlayTM (sold separately) and subscribing the XM service. • Plug the XM Connect-and-Play antenna into XM terminal on the rear panel. • Position the XM Connect-and-Play antenna near a south-facing window to receive the best signal. For details, see “XM Satellite Radio” ( page 45).
Connecting Other Sources Connecting Other Sources Connecting the MULTI ZONE terminals ZONE2 / ZONE3 speaker out connections For instructions on operations using the MULTI ZONE functions ( • When the surround back’s power amplifier is assigned to the ZONE2 or ZONE3 output channel at “Power Amp Assign” in the “System Setup Menu”, the surround back speaker terminals can be used as the ZONE2 or ZONE3 speaker out terminals ( page 57).
Connecting Other Sources Connecting Other Sources Connecting the pre-out terminals Connecting the power supply cord • Use these terminals if you wish to connect external power amplifier(s) to increase the power of the front, center, surround and surround back sound channels, or for connection to powered loudspeakers. • When using only one surround back speaker, connect it to the left channel.
Basic Operation 2 ZONE3 mode Basic Operation To operate the ZONE3 function. Playback Operating the remote control unit The RC-1024 remote control has a backlit EL display whose contents change according to the mode or function selected, with the appropriate remote commands for that mode or function. The EL display switches as shown below with respect to the selected mode. 2 AMP mode To operate the MAIN ZONE function.
Basic Operation Basic Operation Playing the input source VIDEO SELECT FUNCTION 2 To choose the surround sound mode STANDARD VOLUME 1 Select the input source to be played. Example: Dolby Digital Press the STANDARD button. Example: CD For more information about the surround modes ( 33, 34). (Main unit) SOURCE PHONES EXT.
Basic Operation Basic Operation Playback using the external input (EXT. IN) terminals Press the EXT. IN button on the main unit or INPUT MODE button on the remote control unit to switch the external input. When operating the remote control unit: (Remote control unit) The mode switches as shown below each time the INPUT MODE button is pressed: AUTO EXT.IN PCM DTS ANALOG • Cancelling the external input mode: Press the INPUT MODE or ANALOG button to switch to the desired input mode ( page 29, 30).
Basic Operation Basic Operation DIMMER ROOM EQ Checking the currently playing program source, etc. Press the INPUT MODE button. 2 On screen display Press the ON SCREEN button. INPUT MODE Each time an operation is performed, a description of that operation appears on the display connected to AVR-3806’s VIDEO MONITOR OUT terminal. Also, the unit’s operating status can be checked during playback. Such information as the position of the input selector and the surround settings is output in sequence.
Basic Operation Basic Operation 2 Selecting the analog mode 2 Input signal display Room EQ function • DOLBY DIGITAL Press the ANALOG button on the main unit or INPUT MODE button on the remote control unit to switch to the analog input. • DTS ANALOG (exclusive analog audio signal playback mode): The signals input to the analog input terminals are decoded and played.
Basic Operation Basic Operation Sources recorded in stereo Sources recorded in monaural Surround Playing modes for different sources The AVR-3806 is equipped with many surround modes. We recommend using the surround modes as described below in order to achieve the maximum effect for the specific signal source. is a 6.1-channel/7.1-channel surround Dolby Digital or DTS Surround (5.
Basic Operation Basic Operation Playing audio sources (CDs and DVDs) 2-channel playback modes PURE DIRECT DIRECT/STEREO • The AVR-3806 is equipped with three 2-channel playback modes exclusively for music. • Select the mode to suit your tastes. 2 STEREO mode Use this mode to adjust the tone and achieve the desired sound. Press the DIRECT/STEREO button to select the STEREO mode. 2 PURE DIRECT mode This mode reproduces the sound with extremely high quality.
Basic Operation STANDARD Basic Operation SURROUND ENTER PARAMETER Dolby Digital mode and DTS Surround (only with digital input) 1 2 NIGHT CURSOR SURROUND BACK Press the STANDARD button to select the “STANDARD (Dolby/DTS Surround)” mode. Play a program source with the , mark. • The Dolby Digital indicator lights when playing Dolby Digital sources. • The DTS indicator lights when playing DTS sources. light light Press the SURROUND BACK button. Lights when the Surround Back CH is on.
Basic Operation Basic Operation 2 Dialogue Normalization 2 Checking the input signal The dialogue normalization function is activated automatically when playing Dolby Digital program sources. Dialogue normalization is a basic function of Dolby Digital which automatically normalizes the dialog level (standard level) of the signals which are recorded at different levels for different program sources, such as DVD, DTV and other future formats that will use Dolby Digital.
Basic Operation 2 Surround parameters q CINEMA EQ. (Cinema Equalizer): The Cinema EQ function gently decreases the level of the extreme high frequencies, compensating for overly-bright sounding motion picture soundtracks. Select this function if the sound from the front speakers is too bright. This function only works in the Dolby Pro LogicIIx, Dolby Pro Logic, Dolby Digital, DTS Surround, DTS NEO:6 and WIDE SCREEN modes. D.COMP.
Basic Operation STANDARD Basic Operation SURROUND ENTER PARAMETER Dolby Pro LogicIIx (Pro LogicII) mode • To play in the PLIIx mode, set “Sp.Back” at the Speaker Configuration setting to “1spkr” or “2spkrs”. • To play in the PLIIx mode, set “Surround Back” at the Power Amp Assign setting. 1 When the “SB CH OUT” parameter is set to “OFF”. (Set “Sp.Back” at the System Setup to “None”). Display Press the STANDARD button to select the “Dolby Pro LogicIIx” mode.
Basic Operation STANDARD Basic Operation SURROUND ENTER PARAMETER 6 Press the CURSOR F or G button to adjust the parameters setting. DEFAULT setting: Press the CURSOR F button to select “Default Yes 0”, then parameters set to default setting. CURSOR USER MODE 7 Press the ENTER or SURROUND PARAMETER button to complete the setting. USER MODE STANDARD • There are four Dolby Surround Pro Logic modes (NORMAL, PHANTOM, WIDE and 3 STEREO).
Basic Operation Basic Operation DTS NEO:6 mode Surround playback can be performed for the analog input and digital input 2-channel signals. 1 Press the STANDARD button to select the “DTS NEO:6” mode. The mode switches as shown below each time the STANDARD button is pressed. DOLBY PLIIx 2 3 DTS NEO:6 Play a program source. Press the SURROUND PARAMETER button. • The surround parameter menu is displayed. 5 6 7 Press the CURSOR D or H button to select the various surround parameters.
Basic Operation Basic Operation DENON original surround modes The AVR-3806 is equipped with a high performance DSP (Digital Signal Processor) which uses digital signal processing to synthetically recreate the sound field. One of ten preset surround modes can be selected according to the program source and the parameters can be adjusted according to the conditions in the listening room to achieve a more realistic, powerful sound.
Basic Operation 7CH STEREO Basic Operation SURROUND ENTER PARAMETER DSP surround simulation 1 Select the surround mode for the input channel. Example: DSP surround simulation mode (Remote control unit) Example: 7CH STEREO mode 3 4 5 Press the CURSOR D or H button to select the various surround parameters. Press the CURSOR F or G button to adjust the parameter settings. Press the ENTER or SURROUND PARAMETER button to complete the setting.
Basic Operation Basic Operation 2 Surround parameters r ENTER EFFECT: This parameter turns the effect signals with multi surround mode speaker effects on and off in the WIDE SCREEN mode. When this parameter is turned off, the SBL and SBR channel signals are equivalent to the SL and SR channels, respectively. SURROUND PARAMETER • Use the tone control setting to adjust the bass and treble as desired. • The tone control function will not work in the PURE DIRECT or DIRECT mode.
Basic Operation 4 Press the CURSOR G button to select the “Tone Defeat OFF”. Basic Operation Channel level You can adjust the channel level either according to the playback sources or to suit your tastes, as described below. 1 5 6 Fader function Press the ENTER button. • The “Channel Vol.” screen is displayed. 1 2 Press the CURSOR D or H button to select the “Bass” or “Treble”. Press the CURSOR F or G button to set the level.
Basic Operation Basic Operation Listening to the radio Manual tuning Check that the remote control unit is set to AMP or TUNER. 1 Auto tuning Set the input source to “TUNER”. FUNCTION 1 Set the input source to “TUNER”. (Main unit) (Remote control unit in the AMP mode) (Main unit) 2 TUNING PRESET 3 TUNER Press the TUNER button on the remote control unit to select the TUNER mode. (Remote control unit) Watching the display, press the BAND button to select the desired band (AM, FM or XM).
Basic Operation Basic Operation Preset memory 1 2 3 4 Checking the preset stations Use the “Auto tuning” or “Manual tuning” operation to tune in the station to be preset in the memory. Press the TUNER button on the remote control unit to select the TUNER mode. Press the ON SCREEN button (in the AMP mode) repeatedly until the “Tuner Preset Stations” screen appears on the OSD. (Remote control unit) Press the MEMORY button. Press the MEMORY BLOCK (A to G) button.
Basic Operation Basic Operation Checking the XM signal strength and Radio ID XM Satellite Radio AVR-3806 is the XM Ready® receiver. You can receive XM Satellite Radio® by connecting to the XM separately) and subscribing the XM service. Connect-and-PlayTM (sold 2 Introducing XM Satellite Radio FUNCTION ENTER STATUS There’s a world of audio listening pleasure beyond AM and FM. XM Satellite Radio. Select from over 150 channels of music, news, sports, comedy, talk, and entertainment.
Basic Operation Basic Operation Channel selection 1 2 3 Direct access of channels Set the input source to “TUNER”. Press the TUNER button on the remote control unit to select the TUNER mode. Set the input source to “TUNER”. Watching the display, press the BAND button to select the XM mode. 1 2 Press the SEARCH button in the XM mode. Press the NUMBER buttons to enter the desired channel. For example, if you want to access channel 123 (ex.XM123) press the Number buttons as shown below.
Advanced Operation Advanced Operation Select “ZONE3” mode. Remote control unit Example: Select “AMP” mode. MODE SELECTOR Select “SYSTEM CALL” mode. Select “ZONE2” mode. AMP/LAST 2 Operating DENON audio components 1 Operate the audio component. For details, refer to the component’s operating instructions. It may not be possible to operate some models. Press the MODE SELECTOR buttons to select the component you want to operate. • The icon for the selected mode flashes.
Advanced Operation 1. CD player (CD), CD recorder (CDR) system buttons 6, 7 2 1 8, 9 3 0 ~ 9, +10 : : : : : : Manual search (forward and reverse) Stop Play Auto search (to beginning of track) Pause Number Default setting = CD The preset codes of a CDR can be recorded in the CD mode so that the CD recorder can be operated ( page 49). It is only possible to set the preset memory for either the CD or CDR. To operate a DENON CDR player, preset “30626” or “31868”.
Advanced Operation Advanced Operation IR segment 3 MODE SELECTOR Referring to the included List of Preset Codes ( End of this manual), press the NUMBER to input the preset code (a 5-digit number) for the manufacturer of the component whose signals you want to store in the memory. •The top IR segment blinks once after each key press. •If the remote recognizes the manufacturer’s code, the IR segment blinks twice. You have 10 seconds to press each digit.
Advanced Operation 1. DVD player (DVD), DVD recorder (DVDR) system buttons Advanced Operation 2. Satellite (SAT) tuner, cable (CABLE) system buttons 6, 7 2 1 8, 9 3 : : : : : Manual search (forward and reverse) Stop Play Auto search (cue) Pause Default setting = SAT The preset codes of a CABLE can be recorded in the SAT/CBL mode so that the cable device can be operated ( page 49). It is only possible to set the preset memory for either the SAT or CBL.
Advanced Operation Advanced Operation 3. Video deck (VCR) system buttons 4. Monitor TV (TV), system buttons When there are codes usable for the preset device, those codes are sent when the buttons below are pressed. If not, by default the DVD codes are punched through. If the punch through setting is made after the preset memory is set, the codes are sent with priority.
Advanced Operation Advanced Operation IR segment 4 MODE SELECTOR Press the button that you wish to be learned. • The display will go off and the unit will enter the learning standby mode. If a button that cannot be “learned” is pressed, the IR segment lights and the learning setup mode is cancelled. The AMP/LAST button cannot be “learned”. SYSTEM CALL 5 Point the remote control units directly at each other and press and hold in the button on the other remote control unit which you want to “learn”.
Advanced Operation Advanced Operation IR segment 2 Press the 9, 7, 8 button (9 → 7→ 8) to select system call setting. 3 4 Press the SYSTEM CALL button (1 to 3) you want to register the system call. MODE SELECTOR SYSTEM CALL ON NUMBER SETUP System call The accessorius remote control unit is equipped with “system call” function allowing a series of remote control signals to be transmitted by pressing a single button.
Advanced Operation Punch through Buttons used in the CD, DVD, and VCR modes can be assigned to the buttons which are not normally used in the TV and SAT/CBL modes. For example, when the DVD mode is set to the punch through mode in the TV mode, the DVD mode’s PLAY (1), STOP (2), MANUAL SEARCH (6, 7), AUTO SEARCH (8, 9) and PAUSE (3) button’s signals are sent in the TV mode. — ( ) 1 Press and hole hold the the SET SETUP UP button for at least three seconds. • The IR segment blinks twice.
Advanced Operation Advanced Operation IR segment MODE SELECTOR 2 Resetting all learned buttons 2 Resetting the punch through setting 1 Press and hole hold the the SET SETUP UP button for at least three seconds. andMODE hole the SET UP button button(TV for or atSAT least/ Press the SELECTOR three seconds. CBL) you want to reset. 2 3 → 7→68)). to select a the 9,9,7,7,6 button 8 button (9→ 7→ Press the (9 → • The IR segment blinks twice. setting.
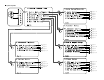
Advanced Operation Advanced Operation Multi zone music entertainment system • When the outputs of the “ZONE2 (ZONE3)” OUT terminals are wired and connected to power amplifiers installed in other rooms, different sources can be played in rooms other than the MAIN ZONE in which this unit and the playback devices are installed. (Refer to ZONE2 (ZONE3) on the diagram below.
Advanced Operation Advanced Operation Multi-zone playback using the SPEAKER terminals 2 When using the SURROUND BACK amplifier as the ZONE2/ZONE3 output • When the surround back’s power amplifier is assigned to the ZONE2 or ZONE3 output channel at “Power Amp Assign” in the “System Setup Menu”, the surround back speaker terminals can be used as the ZONE2 or ZONE3 speaker out terminals ( page 72).
Advanced Operation Advanced Operation Outputting a program source to amplifier, etc., in a ZONE2 room (ZONE2 SELECT mode) FUNCTION 1 Press the ZONE2/3/REC SELECT button to display the “ZONE2 SOURCE” on the display. • The MULTI indicator lights. The display switches as follows each time the button is pressed. ZONE2/3/REC SERECT ZONE2 ON/OFF 2 With “ZONE2 SOURCE” displayed, turn the FUNCTION knob to select the source you want to output appears on the display.
Advanced Operation Advanced Operation Other function FUNCTION POWER SURROUND MODE Playing Super Audio CDs with DENON LINK 1 Select the input source to which DENON LINK was assigned at the “Digital In Assign” ( page 63) in the system setup. Example: DVD (Main unit) NIGHT PURE DIRECT ZONE2/3/REC SERECT When playing DSD signals in the DIRECT or PURE DIRECT mode, the DSD signals are converted into analog signals.
Advanced Operation Advanced Operation Multi-source recording / playback 2 Playing one source while recording another (REC OUT mode) 1 2 Press the ZONE2/3/REC SELECT button until “ZONE2 SOURCE” appears on the display. With “ZONE2 SOURCE” displayed, turn the FUNCTION knob until “RECOUT SOURCE” appears on the display. Last function memory • This unit is equipped with a last function memory which stores the input and output setting conditions as they were immediately before the power is switched off.
Advanced Setup – Part 1 Advanced Setup – Part 1 You can customize a variety of system setup so that it may be fitting for your listening environment. For the contents of a system menu and the initial setting of this unit ( page 82 ~ 84). Navigating through the System Setup Menu You can change setting using the buttons on the front panel or remote control unit. 1 2 CURSORD CURSORF ENTER SYSTEM SETUP CURSORH CURSORG Press the AMP button on the remote control unit.
Advanced Setup – Part 1 Advanced Setup – Part 1 Main menu On screen display and front display Main menu The AVR-3806 is equipped with an intuitive and easy-to-understand on screen display, and is equipped with an alpha-numeric front panel display tube that can also be used to check and adjust settings. We recommend that you use the on screen display when you make system adjustments. Some representative front panel and on screen display examples are shown below. *Audio In Setup Digital In No.
Advanced Setup – Part 1 Advanced Setup – Part 1 Audio Input Setup 2 Make the audio-related settings. Setting the Digital In Assignment This setting assigns the digital input terminals of the AVR-3806 for the different input sources. 1 Press the CURSOR D or H button to select “Audio Input Setup” at the “System Setup Menu”, then press the ENTER button. • The “Audio Input Setup” menu screen appears.
Advanced Setup – Part 1 SW Level: Sets the playback level of the analog signal that was input to the EXT. IN subwoofer terminal. Select according to the specifications of the player being used. Also refer to the player’s operating instructions. +15dB (default) recommended. (0, +5, +10 and +15 can be selected.) 3 Advanced Setup – Part 1 Setting the Function Rename The names of the input sources displayed on the front display and on the on screen display can be changed.
Advanced Setup – Part 1 Tuner Presets 2 Auto Preset Memory Use this to automatically search for FM broadcasts and store up to 56 stations at preset channels A1 to 8, B1 to 8, C1 to 8, D1 to 8, E1 to 8, F1 to 8 and G1 to 8. 1 Advanced Setup – Part 1 2 Preset Skip When selecting preset channels pressing the PRESET button, it is possible to skip specific preset channels. 1 Press the CURSOR D or H button to select the “Tuner Presets” at the “Audio Input Setup” menu, then press the ENTER button.
Advanced Setup – Part 1 4 Repeat step 3 to input the preset channel name. Advanced Setup – Part 1 9 Press the CURSOR D or H button to select “Exit”, then press the ENTER button. • The “System Setup Menu” reappears. If you wish to set the preset channel name back to as it was initially, press the CURSOR H button with the preset channel name highlighted. If the same digital input terminal is selected, the setting for the input source that was previously assigned switches to “OFF”.
Advanced Setup – Part 1 6 Press the ENTER button to enter the setting.. • The “Video Setup” menu reappears. • If a monitor is connected with an HDMI cable but the monitor is not compatible with HDMI audio signal playback, only the video signals are output to the monitor from the AVR-3806 (DVI mode). Press the STATUS button to check which mode is set for outputting HDMI signals from the AVR-3806 (HDMI and DVI modes). • Input signals input from the analog and digital terminals are not output to the TV.
Advanced Setup – Part 1 2 Press the CURSOR D or H button to select the setting, then press the CURSOR F or G button to select the parameter. Analog to HDMI Convert: • ON: Setting for converting analog video signals into HDMI signals. • OFF: Setting for not converting analog video signals into HDMI signals. Advanced Setup – Part 1 Setting the Audio Delay • When watching a DVD or other video source, the picture on the monitor may seem delayed with respect to the sound.
Advanced Setup – Part 1 3 4 Press the ENTER button to enter the setting. • The “Video Setup” menu reappears. Press the CURSOR D or H button to select the “Exit”, then press the ENTER button. • The “System Setup Menu” reappears. Advanced Setup – Part 1 Advanced Playback Makes more detailed audio playback settings. Setting the 2ch Direct/Stereo Set this when you want to change the speaker settings when the surround mode is set to the 2-channel Direct or Stereo mode.
Advanced Setup – Part 1 Setting the Dolby Digital Setup Sets the down-mixing method when not using a center speaker or surround speakers. 1 Press the CURSOR D or H button to select the “Dolby Digital Setup” at the “Advanced Playback” menu, then press the ENTER button. • The “Dolby Digital Setup” screen appears. 2 Press the CURSOR F or G button to select the “ON” if you want to use the Compression, “OFF” if you do not want to use it.
Advanced Setup – Part 1 3 Advanced Setup – Part 1 Press the CURSOR F or G button to select the speaker to be set. • The screen switches to the character input screen. Example: When “L/R CH” is selected. 5 6 Press the ENTER button to enter the setting. 7 Press the CURSOR D or H button to select the “Exit”, then press the ENTER button. • The “Manual EQ” screen reappears. Press the CURSOR D or H button to select the “Exit”, then press the ENTER button.
Advanced Setup – Part 1 Advanced Setup – Part 1 Option Setup Setting the Volume Control Setting the Power Amplifier Assignment If no Surround back speakers are used in the main room, their amplifier channels can be assigned for multi–zone use or the front speaker‘s bi-amp connection. 1 Press the CURSOR D or H button to select the “Power Amp Assign” at the “Option Setup” menu, then press the ENTER button.
Advanced Setup – Part 1 Mute Level: Set the volume attenuation level when the mute mode is set for the different zones. • FULL The volume is fully muted. • –40 dB The volume is lowered 40 dB from the current level. • –20 dB The volume is lowered 20 dB from the current level. Volume Level: Set whether to fix the output level for the different zones or make it variable. • Variable The level can be adjusted freely using buttons on the remote control unit.
Advanced Setup – Part 1 7 Press the CURSOR D or H button to select the “Exit”, then press the ENTER button. • The “Option Setup” menu reappears. Advanced Setup – Part 1 • When the setup lock function is activated, the settings listed below cannot be changed, and “Setup Locked” is displayed when related buttons are operated.
Advanced Setup – Part 2 Advanced Setup – Part 2 This Speaker Setup section describes the procedures to make speaker settings manually (without using the Auto Setup function), as well as to make manual changes to settings that have already been made by the Auto Setup function. 3 Press the CURSOR D or H button to select the speaker, then press the CURSOR F or G button to select the parameter. Speaker Setup Center Sp.
Advanced Setup – Part 2 A subwoofer with sufficient low frequency playback capability can better handle deep bass than most main and surround speakers, and the system’s overall performance will be greatly enhanced when SMALL is set for the main (front) and surround speakers. When “Front” is set to “Small”, “Subwoofer” is automatically set to “Yes”, and when “Subwoofer” is set to “No”, “Front” is automatically set to “Large”.
Advanced Setup – Part 2 4 F or G button to set the Press the CURSORF distance between the center speaker and listening position. Example: When the distance is set to 10 feet for the center speaker Advanced Setup – Part 2 Setting the Channel Level Surr. Sp. : A Adjusts the balance of the playback level between the channels when using surround speaker A. • Use this setting to adjust so that the playback level between the different channels is equal.
Advanced Setup – Part 2 Example: When the volume is set to –11.5 dB while the test tone is being produced from the Front Lch speaker The volume can be adjusted between –12 dB and +12 dB in units of 0.5 dB. 5 -2 When “Manual” mode is selected: Press the CURSOR D or H button to select the speaker, then press the CURSOR F or G button to adjust all the speakers to the same volume. Example: “Manual” mode is selected.
Advanced Setup – Part 2 • If “LFE+Main” is set at “Subwoofer Setup”, “SW:LFE+Main” ( page 76) is displayed at the top right of the screen. Advanced Setup – Part 2 3 Press the CURSOR F or G button to select the frequency. 2 Press the CURSOR D or H button to select the surround mode, then press the CURSOR F or G button to select the surround speaker. A: When surround speakers A is used. B: When surround speakers B is used.
Advanced Setup – Part 2 Advanced Setup – Part 2 Others Setup Setting the Direct Mode Setup Setting the Room EQ Setup Front: Adjusts the frequency response of the surround speakers to match the characteristics of the front channel speakers. Select the setting of an Equalizer that has been set with Auto Setup or Manual EQ. 1 Press the CURSOR D or H button to select the “Room EQ Setup” at the “Auto Setup / Room EQ” menu, then press the ENTER button.
Advanced Setup – Part 2 Check the parameter • The results of the measured items can be checked. • The EQ parameters that were set in Auto Setup can be checked. • This item is displayed, after the measurement result of the “Auto Setup / Room EQ” is decided. 1 Advanced Setup – Part 2 4 • The “EQ Check” screen appears.
Advanced Setup – Part 2 Advanced Setup – Part 2 System setup items and default values (set upon shipment from the factory) 1. Auto Setup/Room EQ Default settings Page 1 Auto Setup This unit performs an analysis of the speaker system and measures the acoustic characteristics of your room to permit an appropriate automatic setting. Auto Setup / Room EQ – 9~13 2 Room EQ Setup Set the Room EQ setting with All or Assign for each surround mode.
Advanced Setup – Part 2 Advanced Setup – Part 2 3. Audio Input Setup Audio Input Setup 1 Digital In Assign This assigns the digital input terminals for the different input sources. Default settings Input source Digital Inputs CD VDP TV DBS VCR-1 VCR-2 OPT 1 OFF OPT 2 OPT 3 OFF OPT 4 DVD COAX 1 COAX 2 4 Input The playback level is corrected individually for the different TUNER PHONO CD Function Lev. input sources.
Advanced Setup – Part 2 Advanced Setup – Part 2 5. Advanced Playback Advanced Playback Default settings Page The speaker settings can be changed specifically for 2ch 1 Direct/Stereo playing in the 2-channel direct or stereo mode. Basic 69 OFF 70 Auto Surround Mode = ON 70 All Channels and Frequency = 0 dB 70, 71 Default settings Page S. Back 72 2 Dolby Digital Setup Auto 3 Surround Mode 4 Manual EQ Setup Turn the audio compression on or off when down-mixing Dolby Digital signals.
Troubleshooting Symptom Troubleshooting No test tones produced. If a problem should arise, first check the following. 1. Are the connections correct? 2. Have you operated the receiver according to the Operating Instructions? 3. Are the speakers and other components operating properly? If this unit is not operating properly, check the items listed in the table below. Should the problem persist, there may be a malfunction. Disconnect the power immediately and contact your store of purchase.
Troubleshooting Troubleshooting Symptom Cause Measures Page “CHECK ANTENNA” is • AVR-3806’s XM terminal and the • Check that the connection are displayed in the XM XM Connect-and-Play antenna is correct. mode. not properly connected. 23 “NO SIGNAL” is • The signal cannot be received. displayed in the XM mode. 45 “OFF AIR” is displayed in the XM mode. Receiving only channels 0 and 1. • Reposition your XM Connect-andPlay antenna. • The selected channel is not • Select the another channel.
Additional Information Surround back speakers Additional Information • Other types of audio: These signals are designed to recreate a 360° sound field using three to five speakers. Optimum surround sound for different sources There are currently various types of multi-channel signals (signals or formats with more than two channels). FL SW C FR 2 Types of multi-channel signals Dolby Digital (including Dolby Digital EX), DTS (including DTSES), DVD-Audio, and Super Audio CD. Note on the above: MUSE 3.
Additional Information With this set, speaker(s) for 1 or 2 channels are required to achieve a 6.1-channel system (DTS-ES, etc.). Adding these speakers, however, increases the surround effect not only with sources recorded in 6.1 channels but also with conventional 2- to 5.1-channel sources. The WIDE SCREEN mode is a mode for achieving surround sound with up to 7.1 channels using surround back speakers, for sources recorded in conventional Dolby Surround as well as Dolby Digital 5.
Additional Information • Set the front speakers, center speaker and subwoofer in the same positions as in example (1). • It is best to place the surround speakers directly at the side or slightly to the front of the viewing position, and 60 to 90 centimers (2 to 3 feet) above the ears. • Same as surround back speaker installation method (1). Using dipolar speakers for the surround back speakers as well is more effective.
Additional Information Additional Information 2 Dolby Digital compatible media and playback methods Surround The AVR-3806 is equipped with a digital signal processing circuit that lets you play program sources in the surround mode to achieve the same sense of presence as in a movie theater. Marks indicating Dolby Digital compatibility: The following are general examples. Also refer to the player’s operating instructions.
Additional Information Additional Information [2] DTS Digital Surround 1: DTS Digital Surround (also called simply DTS) is a multichannel digital signal format developed by Digital Theater Systems. DTS offers the same “5.1” playback channels as Dolby Digital (front left, front right and center, surround left and surround right) as well as the stereo 2-channel mode.
Additional Information Additional Information When DTS-ES Discrete 6.1 or Matrix 6.1 encoded sources are decoded with a DTS-ES decoder, the format is automatically detected upon decoding and the optimum playing mode is selected. However, some Matrix 6.1 sources may be detected as having a 5.1-channel format, so the DTSES Matrix 6.1 mode must be set manually to play these sources. (For instructions on selecting the surround mode ( page 35).
Additional Information The two diagrams below illustrate two examples of microphone placement for two types of seating arrangements. There are six measuring positions shown in each case. Increasing the number of measuring points will provide a better sampling of the listening area and produce better results. The dotted line represents the area in which the room correction provided by Audyssey MultEQ XT is optimal. The microphone must be placed at ear height at each location.
Additional Information Additional Information Surround modes and parameters Signals and adjustability in the different modes Parameter (default values are shown in parentheses) Channel output Dolby Digital Surround Mode FRONT L/R PURE DIRECT, DIRECT DSD DIRECT DSD MULTI DIRECT MULTI CH DIRECT STEREO EXT.
Additional Information Additional Information Signals and adjustability in the different modes Parameter (default values are shown in parentheses) Surround Mode PANORAMA DIMENSION PURE DIRECT, DIRECT DSD DIRECT DSD MULTI DIRECT MULTI CH DIRECT STEREO EXT.IN MULTI CH IN WIDE SCREEN DOLBY PRO LOGICIIx DOLBY PRO LOGICII DTS NEO:6 DOLBY DIGITAL DTS SURROUND 7CH STEREO SUPER STADIUM ROCK ARENA JAZZ CLUB CLASSIC CONCERT MONO MOVIE VIDEO GAME MATRIX VIRTURL NEO:6 MUSIC MODE only EXT.
Additional Information Additional Information 2 Differences in surround mode names depending on the input signals Button DTS Surround Mode Note ANALOG LINEAR PCM *1 *1 E E E E E E E C C Input signals DOLBY DIGITAL DOLBY DIGITAL DOLBY DOLBY DIGITAL EX EX DIGITAL (With Flag) (With no Flag) (5.1ch) DVD-AUDIO DVD176.
Additional Information Additional Information Button DTS Surround Mode DIRECT DIRECT DSD DIRECT DSD MULTI DIRECT MULTI CH DIRECT M DIRECT + PLIIx CINEMA M DIRECT + PLIIx MUSIC PURE DIRECT PURE DIRECT DSD PURE DIRECT DSD MULTI PURE MULTI CH PURE DIRECT M PURE D + PLIIx CINEMA M PURE D + PLIIx MUSIC DSP SIMULATION WIDE SCREEN SUPER STADIUM ROCK ARENA JAZZ CLUB CLASSIC CONCERT MONO MOVIE VIDEO GAME MATRIX VIRTUAL 7CH STEREO STEREO STEREO Note ANALOG LINEAR PCM *2 *1 C E E E E E Input signals DOLBY DIGI
Additional Information Additional Information Relationship between the video input signal and monitor output according to the video convert settings Video convert ON Input signals HDMI E E E E E E E E E E E E E E E E C C C C C C C C C C C C C COMPONENT E E E E C (1080p) C (480p ~ 720p) C (480i/576i) C (1080p) C (480p ~ 720p) C (480i/576i) C (1080p) C (480p ~ 720p) C (480i/576i) C (1080p) C (480p ~ 720p) C (480i/576i) E E E E C (Other than 480i/576i) C (480i/576i) C (1080p) C (480p ~ 720p) C (480i/576i)
Additional Information Video convert S-VIDEO MONITOR OUT OFF – – – Used Not used – – – Used Not used – – – Used Not used – – – Used Not used Additional Information HDMI E E E E E E E E E E C C C C C C C C C C Input signals COMPONENT E E E E E C C C C C E E E E E C C C C C C : Signal input E : No signal MONITOR OUT S-VIDEO COMPONENT E E E E E S-VIDEO E S-VIDEO E – E COMPONENT COMPONENT ✳1 E COMPONENT ✳2 S-VIDEO COMPONENT ✳2 S-VIDEO COMPONENT ✳1 – E E E E E S-VIDEO E S-VIDEO E – E COMPONENT COMPONENT ✳
Specifications Specifications 2 Tuner section 2 Audio section • Power amplifier Rated output: Dynamic power: Output terminals: • Analog Input sensitivity / input impedance: Frequency response: S/N: Distortion: Rated output: • Digital D/A output: Front: 120 W + 120 W (8 Ω/ohms, 20 Hz ~ 20 kHz with 0.05 % T.H.D.) 160 W + 160 W (6 Ω/ohms, 1 kHz with 0.7 % T.H.D.) Center: 120 W (8 Ω/ohms, 20 Hz ~ 20 kHz with 0.05 % T.H.D.) 160W (6 Ω/ohms, 1 kHz with 0.7 % T.H.D.
2 List of preset codes / Liste de codes préréglés DVD B&K 40655, 40662 Clayton 40713 3D Lab 40539 Basic Line 40713 Coby 40730, 40770, 40778, 40852, 41086, Acoustic Solutions 40713, 40730, 41242 Baze 41165 Advent 41016 Bellagio 41004 Compacks 40826, 41265 AEG 40770, 40790 Black Diamond 40698, 40713, 40833, 40884 Conia 40516, 40672, 40798, 40852, 41004 AFK 41051 Blaupunkt 40717 Continental Edison 40768, 40831 Afreey 40698 Blue Parade 40571 Craig 40831 Aim 40699, 40778,
Digitor 40651, 40690 GE 40522, 40717, 40815 ISP 40695 Digitrex 40672, 41056, 41100 General Electric 40717 Jaton 41078 DIGIXmedia 40826 Global Solutions 40768 JBL 40702 DiK 40774, 40831 Go Video 40715, 40741, 40744, 40783, 40833, Jeken 40699 Disney 40675, 41270 40869, 41044, 41075, 41099, 41144, Jensen 41016 41158, 41304, 41730 Jepssen 41250 41071, 41072 JMB 40695 DiViDo 40705 DK Digital 40831 Go Vision DMTech 40783 GoldStar 40591, 40741 JNC 40672 Dragon 40831
Lunatron 40741 Momitsu 41082 Luxman 40573 MTlogic 41265 Luxor 40713, 41004, 41730 Mustek 40730, 41730 Panda 40717 Magnasonic 40651, 40769 Mx Onda 40651 Philco 40690, 40790 Magnavox 40503, 40539, 40646, 40675, 40713, NAD 40591, 40692, 40741 Philips 40503, 40539, 40646, 40675, 40854, 40821 Naiko 40770, 41004 41165 Narita 41115 Phonotrend Malata 40782, 41159 NEC 40591, 40692, 40785, 40869, 41404 Pioneer 40490, 40525, 40571, 40631 Manhattan 40705, 40713 Nesa 40717 Plu2
Ronin 40872 SM Electronic 40690, 40730, 40768 Tensai 40651, 40690, 40770 Rotel 40558, 40623 Smart 40705, 40713 Terapin 41031 Rowa 40516, 40717, 40823, 40872, 41004 Sonai 40755 Tevion 40651, 40768, 40798, 40833 Saba 40651, 40769 Sonashi 40831 Theta Digital 40571 Sabaki 40798 Sonic Blue 40783, 40869, 41099 Thomson 40522 Saivod 40831 Sony Sakyno 40768 Salora 40741 Sampo 40698, 40752 Samsung 40533, 40573, 40864, 41033, 41431, Tokai 40698, 40784, 40790 41533 Tokaido 4
WIZE 41115 Panasonic 40490 Anitech 20072 Xbox 40522 Philips 40646, 41158 Ansonic 20000 Xenius 40651, 40790 Pioneer 40631 Apelsound 20209 XLogic 40768, 40798 Polaroid 41086 Aristona 20081 XMS 40770 RCA 40522 ASA 20037, 20081 Xoro 41173, 41250 Samsung 40490 Asha 20240 Yakumo 41004, 41056 Sensory Science 41158 Asuka 20037, 20038 Yamada 40872, 41004, 41056, 41158 Sharp 40675 Audiosonic 20072, 20278 Yamaha 40490, 40539, 40545, 40646 Sony 41033, 41431 Audiovox
CCE 20072, 20278 Elbe 20038, 20278 Go Video 20432 CGE 20000 Elcatech 20072 GoldHand 20072 Changhong 20048, 20081 Electrohome 20037 GoldStar Cimline 20072 Electrophonic 20037 Cineral 20278 Elin 20240 Citizen 20037, 20278, 21278 Elsay 20072 Clatronic 20000, 20072 Elta 20072, 20278 GPX Colt 20072 Emerex 20032 Gradiente 20000 Condor 20278 Emerson 20000, 20002, 20035, 20037, 20043, Graetz 20041, 20104, 20240 Craig 20037, 20047, 20072, 20240 20045, 20072, 20121, 201
Memorex 20000, 20035, 20037, 20039, 20046, Hypson 20000, 20037, 20072, 20209, 20278 Kolster 20209 iBUYPOWER 21972 Korpel 20072 Imperial 20000 Kuba Electronic 20047 Ingersoll 20209, 20240 Kyoto 20072 Memphis 20072 Inno Hit 20072, 20432 Lenco 20278 Metronic 20081 inotech 20278 Leyco 20072 Metz Interbuy 20072 LG 20037, 20038, 20042, 20045, 20209, Interfunk 20081, 20104 Internal 20278 Lifetec International 20037, 20278, 20642 Intervision 20000, 20209, 20278 IR 20047,
Nordmende 20041, 20067, 20320 Phoenix 20278 RFT 20072 Northgate 21972 Phonola 20081 Ricavision 21972 Novatronic 20209 Pilot 20037 Roadstar 20037, 20072, 20081, 20240, 20278 Nu-Tec 20209 Pioneer 20042, 20067, 20081, 20162, 21562 Royal 20072 Oceanic 20000, 20041, 20046, 20048, 20081, Polk Audio 20081 Runco 20039 20104 Portland 20278 Saba 20041, 20067, 20278, 20320 Okano 20072, 20209, 20278, 20315, 20348 Prinz 20000 Saisho 20209, 20348 Olympus 20035, 20226 Profitronic
Siera 20081 Tchibo 20348 Unitech 20240 Silva 20037 TCM 20348 United 20348 Silver 20278 Teac 20000, 20037, 20041, 20072, 20278, Universal 20209 Singer 20045, 20072, 20348 20642 Universum 20000, 20037, 20081, 20104, 20209, Sinudyne 20081, 20209 Tec Smaragd 20348 Tech Line 20072 Vector 20045 Sonic Blue 20614, 20616 Technics 20035, 20081, 20162, 20226 Vector Research 20038 Soniko 20072 TechniSat 20209 Victor 20041, 20067, 21283 Sonitron 20104 Teco 20035, 20037, 200
Alba 10009, 10036, 10037, 10163, 10216, Abex 10032 Accent 10009 10218, 10235, 10247, 10355, 10371, Acura 10009 10418, 10443, 10487, 10581, 10668, Aristona 10037, 10556 Addison 10092, 10108, 10653 10714, 11037 ART 11037 Admiral 10087, 10093, 10163, 10264, 10363, Albatron 10700, 10843 ASA 10070, 10087, 10104 10463 Albiral 10102 Asberg 10102 10761, 10783, 10815, 10817, 10842 Alfide 10672 Asora 10009 Adventura 10046 Alkos 10035 Astra 10037, 10264 Adyson 10032, 10216, 1021
Baysonic 10180 Britannia 10216, 10217 Changfeng 10264, 10412, 10696, 10753, 10817 Bazin 10217 Brockwood 10019 Changhai 10009, 10817 Beaumark 10178 Broksonic 10003, 10180, 10236, 10463 Changhong Beijing 10001, 10009, 10208, 10226, 10264, Bruns 10087 10767, 10783, 10817, 10820, 10821, 10374, 10412, 10482, 10661, 10812, BTC 10218 10848, 11156 10817, 10821 Bush Beko 10009, 10156, 10264, 10508, 10765, 10009, 10036, 10037, 10163, 10208, Chengdu 10009, 10817 10037, 10292, 10370, 10
10009, 10036, 10037, 10157, 10180, Daytron 10019, 10374 Dunai 10544 10185, 10216, 10264, 10698 Dayu 10374, 10661 Durabrand 10003, 10171, 10178, 10180, 10463, Continental Edison 10109, 10287, 10487 De Graaf 10208, 10363, 10548 Cosmel 10037, 10337 DEC 10418, 10556, 10698, 10785, 10795 DVX 10891 Craig 10180 Decca 10037, 10072, 10217, 10516, 10621 Dwin 10720, 10774 Crosley 10054, 10087, 10247 Deitron 10037, 10374 Dynatron 10012, 10037 Crown 10009, 10037, 10039, 10053, 10180, De
ESC 10037, 10217 Ether 10003, 10009, 10030 Fisher 10036, 10045, 10047, 10072, 10087, General 10186, 10590 10104, 10154, 10157, 10159, 10208, General Technic 10009 10217, 10370, 10544, 10555 Genesis 10009, 10037 10037, 10072, 10218, 10264, 10455, Genexxa 10009, 10163, 10218 10610 Gericom 10808, 10865 Etron 10001, 10009 Eurofeel 10217, 10264 EuroLine 10556 Euroman 10037, 10216, 10217, 10264, 10421 Forgestone 10193 Giant 10217 Europa 10037 Formenti 10037, 10087, 10216, 10320
Gronic 10163 Hemmermann 10544 Huanghe 10009, 10817 Grundig 10036, 10037, 10070, 10191, 10195, Hher 10714 Huanglong 10009 10370, 10443, 10487, 10535, 10556, Higashi 10216 Huangshan 10009, 10264, 10412, 10817 10587, 10630, 10672, 10706 Hikona 10218 Huanyu 10216, 10264, 10374, 10817, 10848 Grunpy 10179, 10180 Himitsu 10180, 10628, 10779 Huaqiang 10264, 10412 H&B 10808 Hinari Haaz 10706 Haier 10009, 10036, 10037, 10179, 10218, Huari 10145, 10264, 10412 10235, 10264, 10355 H
IR 10011, 10012, 10032, 10035, 10036, JNL 10698 Kloss 10024, 10046 10037, 10045, 10070, 10072, 10073, Jocel 10712 Kneissel 10037, 10238, 10259, 10292, 10362, 10087, 10093, 10102, 10104, 10105, Jubilee 10556 10374, 10411, 10435, 10499, 10556, 10108, 10109, 10146, 10157, 10163, Juhua 10264, 10412, 10817 10610 10191, 10193, 10194, 10195, 10200, JVC 10036, 10053, 10093, 10193, 10218, Kolin 10206, 10216, 10217, 10226, 10235, 10371, 10418, 10463, 10508, 10576, Kolster 10102, 10247 10238
LG Liesenk & Tter 10020, 10024, 10030, 10036, 10037, Meile 10264, 10412, 10817, 10848 10037, 10038, 10039, 10056, 10060, 10054, 10096, 10179, 10186, 10187, Melectronic 10009, 10037, 10104, 10105, 10163, 10108, 10178, 10442, 10556, 10606, 10386, 10706, 10729, 10780, 10802, 10191, 10195, 10216, 10217, 10247, 10644, 10698, 10700, 10714, 10715, 11254, 11454 10346, 10361, 10374, 10411, 10480, 10037, 10606, 10648, 10714, 10715 10492, 10512, 10634, 10661, 10714 10001, 10003, 10019, 10030, 10032,
Monaco 10009 Nesco 10179, 10247 Onimax 10714 Monivision 10700, 10843 Netsat 10037 Onking 10280 Morgan's 10037 NetTV 11755 Onwa Motorola 10055, 10093 Network 10032, 10337 MTC 10019, 10030, 10056, 10060, 10163, Neufunk 10037, 10218, 10556, 10610, 10714 Optimus 10185, 10216, 10361, 10370, 10512 New Tech 10217 Optoma 10887 10032 Newave 10009, 10092, 10093, 10178, 10721 Optonica 10093, 10165 MTlogic 10714 Nicam 10544 Orion Mudan 10009, 10051, 10208, 10226, 10264, Nicama
Panavision 10037, 10411 Pionier 10486 Quadral 10218, 10418 Panda 10009, 10051, 10208, 10226, 10264, Plantron 10009 Qualcraft 10039 10412, 10508, 10698, 10706, 10780, Playsonic 10037, 10217, 10339, 10714, 10715 Quasar 10817, 10821, 10826, 10848, 10891 Polaroid 10765, 10865 10163, 10216, 10238, 10320, 10370 Polytron 10282, 10697 Pausa 10009 Polyvision 10697 10361, 10512, 10535, 10544, 10668, Peng Sheng 10891 Portland 10019, 10039, 10092, 10374 11037 Pathe Cinema Penney Perdio
Ricoh 10037 10009, 10019, 10030, 10032, 10037, Seaway 10556, 10634 Rinex 10264, 10418, 10698, 10773 10039, 10056, 10060, 10072, 10090, Seelver 11037 SEG Samsung 10009, 10036, 10037, 10102, 10163, 10009, 10037, 10218, 10264, 10282, 10092, 10093, 10154, 10156, 10163, 10418, 10668, 10714, 11037 10178, 10179, 10195, 10208, 10216, 10216, 10217, 10218, 10264, 10362, 10087 10217, 10226, 10264, 10290, 10370, 10487, 10634, 10668, 11037, 11163, Rover 10036 10482, 10556, 10587, 10618, 10644, Ro
Siemens 10032, 10037, 10146, 10157, 10191, Sontec 10009, 10037, 10370 Supre-Macy 10046 10195, 10200, 10361, 10535 Sony 10000, 10011, 10036, 10037, 10053, Supreme 10000 Siera 10012 10080, 10093, 10102, 10111, 10145, Susumu 10218, 10287, 10335 Siesta 10370 10150, 10156, 10157, 10170, 10250, SVA 10587, 10698, 10748, 10768, 10865, Signature 10016 10353, 10650, 10834, 11100, 11505, Silva 10037, 10216, 10361, 10648 Silva Schneider 10037 Sound & Vision 11651 Svasa 10455 10102, 10374
Tec 10009, 10037, 10163, 10217, 10247, Teleview 10037 10259, 10337, 10361 Tempest 10009, 10037, 10264, 10455, 10556 10093, 10102, 10109, 10145, 10154, Tech Line 10037, 10668, 11437 Tennessee 10037 10156, 10191, 10195, 10217, 10264, Techica 10218 Tensai 10009, 10037, 10104, 10105, 10163, 10381, 10412, 10508, 10556, 10618, Technema 10320 10217, 10218, 10247, 10320, 10371, 10644, 10650, 10714, 10718, 10821, Technics 10051, 10250, 10556, 10650 10374, 10377, 10556, 10715, 11037 10832, 10
Universum 10009, 10011, 10032, 10036, 10037, 10000, 10016, 10017, 10018, 10019, Xinghai 10264 10070, 10104, 10105, 10146, 10157, Wards 10020, 10021, 10024, 10027, 10030, Xinrisong 10848 10163, 10170, 10177, 10191, 10200, 10047, 10051, 10054, 10055, 10056, XLogic 10698 10217, 10247, 10264, 10290, 10346, 10060, 10080, 10096, 10111, 10135, XMS 10698 10361, 10362, 10370, 10411, 10418, 10154, 10156, 10165, 10166, 10178, Xoceco 10779, 10785 10421, 10473, 10480, 10492, 10512, 10179, 10180, 1
Amstrad 01222 Freebox 01482 MS 00015 Antronix 00022 Fujitsu 01497 Multichoice 00019, 00443 Archer 00022, 00153, 00797 Funai 00019 Multitech 00883 Auna 00277, 01269 Galaxi 00008 MultiVision 00012 Austar 00012, 00276 Garrard 00153 Myrio 01602 Bell & Howell 00014 GE 00237 NEC 01496 Bell South 00899 Gehua 00476 Nokia 01569 Gemini 00015, 00797 Noos 00817 General Instrument 00003, 00011, 00014, 00015, 00276, NSC 00063 00476, 00810 NTL 00003, 00250, 00277, 01060,
Amstrad 00132, 00243, 00345, 00396, 00501, Salora 00000 United Artists 00007 Samsung 00000, 00040, 00144, 01060 United Cable 00003 00675, 00689, 00713, 00742, 00795, 00008, 00017, 00237, 00277, 00477, Universal 00022, 00153, 00191 00847, 00863, 00882, 00885, 01113, 00877, 01510, 01877 US Electronics 00276 01175 01602 V2 00883 Anglo Signal 00015, 00040 Videotron 00250 Ankaro 00369, 00692, 00713, 01279 Signature 00011 Videoway 00250 AntSat 01017, 01083 SL Marx 00040 Viewma
Axiel 00668, 00710 CNS 01367 Discoverer 00605 Axis 00369, 00834, 00880, 01111 CNT 00520 Discovery 00668, 00710, 01480 Beko 00455 Cobra 00396 Dish Network 00775 Bentley Walker 01017 Colombia 00132, 00668 Dish Network System Best 00369 Columbia 00132 Bestar 00243 Columbus 00668 Dishpro 00775, 01005, 01505, 01775 Black Diamond 01284 Comag 00132, 01232, 01412 Distratel 00084, 00885, 01205, 01283 Blaupunkt 00173 Condor 00369, 00607 Distrisat 00200 Blue Sky 00713, 008
Eurosat 00243 GF 00834, 01043 Hughes Eurosky 00114, 00115, 00132, 00243, 00299, GF Star 01043 Hughes Network Syst 00749 00369, 00501, 00607 Globo 01087, 01251 Eurostar 00115, 00607, 00818, 00880, 00898 GOD Digital 00200 Eutelsat 00713 GOI 00775, 01775 Exator 00421, 00515, 00613 Gold Box 00853 Expressvu 00775, 01775 Goldbox 00292, 00853 Humax Fagor 00592 Golden Interstar 01283 Huth Fenner 00157, 00369, 00605, 00668, 00713 Goldvision 01017 Ferguson 00455, 00711, 01291
Jolly 00592 JVC 00492, 00515, 00571, 00775, 01170, Lifesat 00132, 00157, 00299, 00369, 00605, Metronic 00084, 00132, 00136, 00243, 00421, 00713, 01043, 01122 00520, 00613, 00713, 00818, 00885, 01507, 01531, 01775 Lifetec 00587 01205, 01215, 01279, 01282, 01283, K-SAT 00713 Lodos 01284 01334 Kamm 00713, 00880 Loewe 00243 Metz 00173 Kaon 01300 Logix 01017, 01075 Micro 00501, 00607, 00613, 00713, 01294 KaTelco 01111 Lorenzen 00132, 00299, 00607, 00692, 00742, Micro electronic
Octagon 00421, 00613 00099, 00133, 00173, 00200, 00292, Radix 00285, 00396, 00882, 01113 OctalTV 01294, 01505 00455, 00571, 00613, 00668, 00710, Rainbow 00613 Okano 00243, 00331, 00442, 00668 00722, 00724, 00749, 00750, 00805, RCA Opentel 01232, 01412 00818, 00853, 00856, 00887, 00898, Optex 00114, 00136, 00417, 00592, 00834, 01076, 01114, 01118, 01142, 01442, Realistic 00052 01749 Rebox 01214 01273 Red Star 00369 Philips 01043, 01283 00143, *[00392], 00566, 00855, 01291, 01392
Schneider Schwaiger 00157, 00668, 00710, 00805, 00898, SL Marx 00692 Technomate 01283 01206, 01251 SM Electroni 00157, 00587, 00713, 01200, 01409 Technosat 01143, 01206 00132, 00157, 00587, 00605, 00607, Smart 00115, 00132, 00299, 00396, 00713, Technotrend 01429 00692, 00863, 00885, 01075, 01083, 00794, 00829, 00882, 01101, 01113, Technowelt 00132, 00607 01111, 01334, 01474 01232, 01273 Techsan 01017 SCS 00115, 00299 00275, 00282, 00292, 00294, 00486, Techwood 00114, 01284 Sede
TPS 00820, 01253, 01307 Wibo 00243 Audio-Technica 30170 Triad 00321, 00351, 00372 Wintel 00299, 01161 Audiolab 30157 Triasat 00501 Wisi 00173, 00299, 00321, 00351, 00372, Audiomeca 30157 Triax 00114, 00115, 00132, 00200, 00396, 00396, 00455, 00501, 00607, 00638, Audioton 30157 00501, 00713, 00853, 01099, 01113, 00690 Bestar 30164 01227, 01251, 01291, 01296 Woorisat 00520 BSR 30194, 30245 Trio 01075 Worldsat 00114, 00123, 00668, 00710, 01012, Burmester 30420 TT-micro 01
GoldStar 30417, 31208 Mitsubishi 30156 Goodmans 30245, 30280, 30305 MTC 30420 GPX 31296 Musical Fidelity 30393, 30437 Restek 30157 Grundig 30157 Myryad 30157 Revox 30157 Harman/Kardon 30157, 30173, 30426, 31202 NAD 30000, 31208 Roadstar 30461 Hitachi 30032, 30155, 30038 Nagaoka 30018 Roksan 30420 Inkel 30180, 30196, 30437 Naim 30157 Rotel 30157, 30420 Integra 30101 Nakamichi 30147 Royal 30164, 30420 Intersound 30245 NEC 30043, 30234 SAE 30157 IR 30000 Nikk
Tivoli Audio 31553 Arcam 20076 Sony 20170, 20234, 20243, 20291, 21313 Tokai 30164, 30420 Carver 20029 TaeKwang 20439 Toshiba 31693 Denon 20076, 20371, 21311, 21471 Tandberg 20109 Traxdata 30626 Fisher 20074 Teac 20280, 20283, 20289, 20308, 20309 Universum 30053, 30157, 30437 Garrard 20308, 20309, 20375, 20439 Technics 20229, 20353 Vector Research 30194, 30417 Genexxa 20439 Thorens 20029 Victor 30072 GoldStar 20353, 20375 Universum 20375, 20439 Wards Yamaha 30000,
Sonic Blue 20614, 20616 Bush 10698, 11037 Philco 20479 Sony 20636, 21972 Denver 10587 Quasar 20162, 21035 Stack 9 21972 Sylvania 10171 RadioShack 20000 Systemax 21972 RCA 20240, 20807, 21035, 21060 Tagar Systems 21972 Samsung 20432, 21014 These preset codes can be recorded in the TV mode.
01187 Grundig Freebox 01482 Hughes Network Systems 01150 General Instrument 00476, 00810 Jerrold 00476, 00810 Humax 01176, 01427, 01568 Motorola 00476, 00810, 01106, 01187, 01376 Hyundai 01159 01142, 01442, 01443, 01444 Nokia 01569 JVC 01170 Pace 00237, 01877 Kathrein 01221, 01561 Pioneer 00877, 01877 Maximum 01334 RCA 01256 Motorola 00869 Scientific Atlanta 00877, 01877 Nokia 01310, 01311 Sony 01006 Opentel 01412 Supercable 00276 Pace 01423, 01623 Thomson 01256
TOKYO, JAPAN www.denon.com Denon Brand Company, D&M Holdings Inc.