
Operating instructions


6
Getting Started
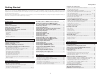
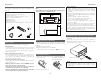
Speaker layout [Basic layout]
Example of basic layout with 8 speakers and a monitor.
Subwoofer Center speaker
Surround speaker
Surround back speaker
Front speaker
Set these at the sides of the monitor or
screen with their front surfaces as flush with
the front of the screen as possible.
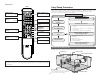
• This section contains the basic steps necessary to configure the AVR-987 according to your
listening room environment and the source equipment and loudspeakers you are using.
•To set the sound field manually, see pages 56 ~59.
Easy to setup flow
Easy Setup Procedure
Placing the speakers.
Connecting the
speakers.
Connecting a monitor
and a DVD player.
Starting the Auto
Setup.
Playing a DVD with
surround sound.
Auto setup flow
1) Speaker Configuration
2) Distance
3) Channel Level
4) Crossover Frequency
5) Room Equalizer
1) Measuring the background noise (noise in the
room)
2) Determining whether or not speakers are
connected
3) Checking the polarities of the speakers
Connecting a microphone.
Preliminary measurement.
Measurement of the speakers
in the listening position.
Speaker measurement check
and storage in memory.
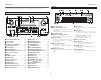
Rear
Tuner system/System
buttons·······················(35)
ZOOM2 buttons
···································(41)
ZOOM1 (MAIN) buttons
···································(41)
Surround buttons
···································(25)
Cursor buttons
···································(10)
Function/Number
buttons
·····························(23, 64)
TEST TONE/DISPLAY
button·························(56)
SURRONUD
PARAMETER/
AUDIO button ··········(23)
INPUT MODE/RETURN
button ·······················(23)
SYSTEM SETUP/SETUP
buttons······················(10)
ENTER button
·····························(10, 34)
NOTE:
• If buttons on the front or rear are pressed strongly, the button on the opposite side will be
activated too.