
Operating instructions


47
Press
FF GG
to set.
Advanced Setup – Part 1 Advanced Setup – Part 1
Audio Input Setup
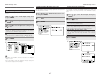
Setting the Digital In Assignment
Press
DD HH
to select “Audio Input Setup”, then
press ENTER.
Press
DD HH
to select “Digital In Assign”, then press
ENTER.
Press ENTER.
Press
DD HH
to select the input source, then press
FF
GG
to set.
• “PHONO” and “TUNER” cannot be selected on the “Digital In
Assign” screen.
• It is not possible to make the “Digital In Assign” settings for
the function assigned at “iPod Assign”.
3
2
1
COAX1, COAX2, OPT1, OPT2, OPT3, OPT4, OPT5:
Assign the different terminals according to the devices
connected to the AVR-987’s input terminals.
4
1
2
3
This assigns the digital input terminals for the different input
sources.
Setting the EXT. IN Subwoofer Level
Press
DD HH
to select “EXT. IN Subwoofer Level”,
then press ENTER.
Press
FF GG
to set.
Press ENTER.
1
2
3
1
2
Sets the playback level of the analog signal that was input to the
EXT. IN subwoofer terminal.
Setting the iPod Assignment
It is possible to assign the DENON original Dock’s audio and
video signals to any input terminals on the AVR-987 and play
them.
1
Press
DD HH
to select “iPod Assign”, then press
ENTER.
OFF:
This is the factory default setting.
CD, CD-R/TAPE:
When using a DENON original Dock, it is possible to connect
with the audio input terminal of the assigned function.
DVD, VDP, DBS, TV, VCR-1, VCR-2, V.Aux:
When using a DENON original Dock, it is possible to connect
with the audio and video input terminals of the assigned
function.
1
2
2
Press ENTER.
3
The HDMI input terminal is displayed when it is assigned to
the input source at “HDMI In Assign” ( page 49, 50).
(When “VDP” is selected)
hh