
Operating instructions


54
Advanced Setup – Part 1 Advanced Setup – Part 1
• “Base Curve Copy” is displayed after performing the Auto
Setup.
1
2
3
4
Press
DD HH
to select “Base Curve Copy”, then
press
FF
.
Press
FF
to select “Yes”, then press ENTER.
• The type of the copied correction curve is displayed in the
upper right of this screen.
2 Manually adjusting the room equalizer’s
“Flat” correction curve set with the auto
setup procedure
1
2
1
2
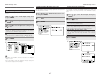
Setting the Power Amplifier Assignment
To suit your preference, a surround back channel’s power
amplifier can be assigned to the front channel (“Front A” or
“Front B”) for bi-amp playback, ZONE2.
Press
DD HH
to select “Option Setup”, then press
ENTER.
Option Setup
Press
DD HH
to select “Power Amp Assign”, then
press ENTER.
Press
FF GG
to set.
S. Back:
The surround back speakers are used in MAIN ZONE.
Front A, Front B:
This provides a bi-amp mode for the 2 main front speakers,
replicating the front A or front B amplifier channel’s outputs.
ZONE2:
This mode assigns the surround back amplifier channels to
provide ZONE2 speaker-level outputs from the surround back
speaker terminals.
Press ENTER.
Front Bi-Amp connections
Dynamic sound with a range wider than that of full range
systems can be played by connecting bi-amp compatible
speakers to the AVR-987. Be sure to consult the owner’s
manual of your bi-amp-capable speakers for further
information before proceeding.
NOTE:
• When making bi-amp connections, be sure to remove
the short-circuiting bar included with the speaker.
1
2
3
4
1
2
3
SPEAKER
[L]
AVR-987