CD RECORDER DN-C550R OPERATING INSTRUCTIONS MODE D’EMPLOI INSTRUCCIONES DE OPERACION CD CD-R _ DUBBING _ NORMAL HIGH A ! " RELAY MODE D # % 1 J ( G & ' 2 ) M ✽ 4 S .
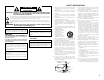
SAFETY INSTRUCTIONS CAUTION RISK OF ELECTRIC SHOCK DO NOT OPEN 1. Read Instructions – All the safety and operating instructions should be read before the appliance is operated. 11. Grounding or Polarization – Precautions should be taken so that the grounding or polarization means of an appliance is not defeated. 2. Retain Instructions – The safety and operating instructions should be retained for future reference. 3.
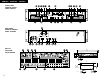
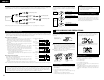
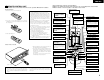
ENGLISH FRANCAIS ESPAÑOL FRONT PANEL PANNEAU AVANT PANEL FRONTAL !8 !9 t yu r @0 !2i !1 !5 !6 PROFESSIONAL CD RECORDER DN-C550R 9 8 DUBBING NORMAL HIGH TIME DISPLAY TITLE / SELECT CHARACTER TIME REMOTE SENSOR POWER PLAY STOP PAUSE 1 2 3 RELAY MODE OPEN / CLOSE ON PHONES PHONES LEVEL OPEN /CLOSE - INPUT MENU 5 MIN !0 q MAX w e 4 REC FINALIZE 8 9 PLAY STOP PAUSE 1 2 3 + 5 o CLEAR MULTI JOG OFF PUSH ENTER !4 !3 !7 #0 REAR PANEL PANNEAU ARRIERE PANEL TRASER
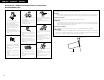
ENGLISH FRANCAIS ESPAÑOL NOTE ON USE / OBSERVATIONS RELATIVES A L’UTILISATION / NOTAS SOBRE EL USO Installing the Units Mount the units onto your console or rack with 19” EIA rack rails. CAUTION: ● This DN-C550R will work normally when the player unit is mounted with the front panel within 10 degrees of the vertical plane. If the unit is tilted excessively, discs may not load or unload properly. • Avoid high temperatures. Allow for sufficient heat dispersion when installed on a rack.
ENGLISH IMPORTANT TO SAFETY WARNING: TO PREVENT FIRE OR SHOCK HAZARD, DO NOT EXPOSE THIS APPLIANCE TO RAIN OR MOISTURE. NOTE: This CD recorder uses the semiconductor laser. To allow you to enjoy music at a stable operation, it is recommended to use this in a room of 10 °C (50 °F) ~ 30 °C (86 °F). • Place of installation To ensure sufficient ventilation, leave a space of at least 10 cm between the front, sides and back of the unit and walls or other objects which may obstruct ventilation. CAUTION: 1.
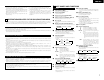
ENGLISH Digital Copies (SCMS) Finalization Processing of CD-R Discs A CD-R/RW disc onto which has been recorded using the digital input cannot be further digitally recorded (i.e., copied) onto a separate CD-R/RW disc or MD, etc.. This is a standard established by the SCMS (Serial Copy Management System). Unrecorded disc Recording is not possible. Digital Digital source Digital equipment CD player, etc.
ENGLISH 6 PART NAMES AND FUNCTIONS Precautions When Loading Discs • Only load one disc. Loading two or more discs in a layer will cause breakdown and may also scratch the discs. • Discs of the 8 cm size should be carefully aligned with the recessed disc guide area and loaded without the use of an adapter. If not properly loaded, the disc may fall out or the disc holder may cease to open. • Be careful not to get your finger caught when the disc holder is closing.
ENGLISH Rear Panel @1 Analog CD/CD-R output (UNBALANCED) jacks (ANALOG OUT CD/CD-R) q Analog input (UNBALANCED) jacks (ANALOG IN CD-R) • These are unbalanced inputs using RCA type jacks. • Connects to the unbalanced analog output of an amplifier (left and right). @3 Digital CD/CD-R output jack (DIGITAL OUT CD/CD-R COAXIAL) • Connects to the digital coaxial input of e.g. amplifier or recording device. • In the dual mode, only the CD-R side digital data is output.
ENGLISH 7 REMOTE CONTROL UNIT 2 The included remote control unit (RC-278) can be used to operate the DN-C550R from a distance. Names and Functions of Remote Control Unit Buttons 2 Buttons not explained here function in the same way as the corresponding buttons on the main unit. 2 Buttons marked “✽” function regardless of the function selector switch. Inserting the batteries ✽ q Remove the remote control unit’s back lid. Cautions on batteries • Use R6P (AA) batteries in the remote control unit.
ENGLISH 2 Inserting Disc q Press the OPEN/CLOSE button (5) to open the disc tray. w Insert a disc in the appropriate recess in the tray, label side up. e Press the OPEN/CLOSE button (5) to close the tray. • “Close” lights up, followed by “TOC Reading” and the display will show the type of disc you inserted. • If you insert a blank or partly-recorded CD-R or unfinalized CD-RW, the CD recorder will calibrate the disc for optimum recording.
ENGLISH (3) Setting the Synchro Recording Level ★ This sets the synchro recording start level when synchro recording is used. (See Page 18.) ★ When using synchro recording, recording will start when the level of the input signal exceeds a set value. Recording will stop when the signal continues to be at level that is lower than the set value for 10 seconds or longer. (5) Fade-in time setting ★ To perform fade-in recording, set the fade-in time. (See Page 19.
ENGLISH (7) Setting of the intro play time for scan recording ★ To perform scan recording, set the intro scan play time. (See Page 15.) (9) Setting the Skip Play Mode ★ This allows playback that skips over tracks to which you do not want to listen. (See “Registration of the tracks to which you do not wish to listen” on Page 29 for information on the setting of such tracks.
ENGLISH (11) Copy management ★ Serial copy management on/off selection. (See page 6 for a description of SCMS.) 9 COPYING PROCEDURE (Main unit) About copying ★ Copying can be performed easily from the set’s CD unit onto the CD-R unit. ★ There are two copying speeds (normal and high) and four copying modes. • The mode switches as described below each time the normal speed copying button (NORMAL) or the high speed copying button (HIGH) is pressed.
ENGLISH (1) Copying entire discs ★ If the program modes are set for the CD unit beforehand, copying is performed accordingly.
ENGLISH (3) Selecting tracks to be copied while scanning CDs and copying the selected tracks ★ The intro scan playing time can be set at the setup menu (Page 12).
ENGLISH 1. Manual recording (1) Starting analog recording (Main unit) (2) Starting digital recording • This set includes a sampling rate converter. When recording DATs or satellite broadcasts (32 kHz or 48 kHz) whose digital input signal sampling frequency is different from that of CD (44.1 kHz), the sampling frequency is automatically converted to 44.1 kHz. (Remote control unit) (Main unit) Select the CD-R side. (Remote control unit) CD CD-R CD CD-R _ DUBBING _ NORMAL HIGH Select the CD-R side.
ENGLISH (4) Adding track numbers during recording (3) Stopping recording (Main unit) (Remote control unit) (Main unit) (Remote control unit) Select the CD-R side. Select the CD-R side. CD CD-R _ DUBBING _ NORMAL HIGH A ! " D # % 1 J ( M ✽ 4 S 9 8 TIME DISPLAY TITLE / SELECT CHARACTER TIME REMOTE SENSOR POWER PLAY STOP PAUSE 1 2 3 RELAY MODE OPEN / CLOSE ON CLEAR INPUT 4 REC FINALIZE 8 9 PLAY STOP PAUSE 1 2 3 G & ' .
ENGLISH 2. Synchronized recording of the Disc (DISC SYNCHRO) ★ This mode is used when recording all the tracks of the CD or MD on the playback side. ★ Please also see “Setup Method (3) Setting the Synchro Recording Level” on Page 11. (Main unit) 3. Synchronized recording of the single track (1Tr SYNCHRO) ★ This mode is used to record only one track. ★ Please also see “Setup Method (3) Setting the Synchro Recording Level” on Page 11.
ENGLISH 4. Fade-in and fade-out recording ★ It is possible to record by gradually increasing the volume (fade-in) or decreasing it (fade-out). (1) Fade-in recording ✽ Also refer to “Setup Method (5) Fade-in time setting” (Page 11). 1 Perform the procedure at “Manual recording” step 1 to 8 (Page 16). 2 Start playing the selection you want to record on the CD player, cassette deck, etc. 11 NORMAL PLAYBACK 1. Starting playback First try playing the tracks in order. Select the deck to be operated.
ENGLISH (2) Searching backward 12 VARIOUS PLAYBACK FUNCTIONS Press and hold in the manual search In addition to normal playback, the DN-C550R also offers the playback functions described below. 1. Playing a certain track (remote control unit only) ………………………………………………………………… Direct Search (Remote control unit) 2 CD CD-R Select the deck to be operated. _ DUBBING _ NORMAL HIGH RELAY MODE During playback, press and hold in the manual search reverse reverse button (6). button (6).
ENGLISH (2) Moving back to the beginning of the current track 5. Playing tracks in a certain order …………………………………………………………………………… Programmed Playback (Remote control unit) • Use this function to select certain tracks from the disc and program them to play in a certain order. • Up to 30 tracks can be programmed. CD CD-R Select the deck to be operated.
ENGLISH 6. Playing in random order ………………………………………………………………………………………… Random Playback • Use this function to play all the tracks on the disc once in random order. 7. Playing repeatedly …………………………………………………………………………………………………… Repeat Playback (1) Playing a single track repeatedly [Single Track Repeat] Select the deck to be operated. Select the deck to be operated. (Remote control unit) (Remote control unit) CD CD-R _ DUBBING _ NORMAL HIGH A ! " D # % 1 (Main unit) J ( M ✽ 4 S .
ENGLISH (2) Playing all tracks repeatedly [All Track Repeat] (3) Playing a section between any two points repeatedly [A–B Repeat] ★ This function allows you to play a certain section within a track repeatedly. Select the deck to be operated.
ENGLISH 8. • • • Timer playback A separately sold audio timer can be used to start playback or recording at a specific time. Also refer to the operating instructions for the audio timer and amplifier. The program and relay modes can also be used. Timer playback 13 RELAY MODE Relay mode ★ ★ ★ • (Remote control unit) Select the deck to be operated. Various types of playback and recording can be performed through relay operation between the set’s CD and CD-R units. There are three relay modes.
ENGLISH 1. Relay play ★ With the relay play mode it is possible to play the disc in the CD side and the one in the CD-R side, relaying between them. ★ The programmed play and random play modes can be preset for the discs in the CD and CD-R units. Select the CD side. 2. Mix mode ★ In the mix mode, programmed play and random play of the disc in the CD unit and the one in the CD-R unit can be performed as if the two discs were a single disc.
ENGLISH 3. ★ ★ ★ (2) Mix random playback (Remote control unit) Dual mode In the dual mode, the CD unit and CD-R unit can be operated independently. Manual recording from the main unit’s CD section can be performed. It is possible to record from an external unit on the CD-R unit while playing a disc in the CD unit.
ENGLISH (2) Manual recording from the CD section 14 FINALIZING CD-R/RW DISC (Remote control unit) CD CD-R _ DUBBING _ NORMAL A ! " 1 (Main unit) 2 RELAY MODE HIGH D # % 1 J ( M ✽ 4 S 9 DUBBING NORMAL HIGH TIME DISPLAY TITLE / SELECT CHARACTER TIME REMOTE SENSOR POWER PLAY STOP PAUSE 1 2 3 RELAY MODE OPEN / CLOSE ON CLEAR INPUT 4 REC FINALIZE 8 9 PLAY STOP PAUSE 1 2 3 .
ENGLISH (2) Erasing the tracks ★ This operation is valid only for CD-RW discs. ★ Use this operation to cancel finalizing when adding further recording to a finalized CD-RW disc and when erasing recorded tracks. ★ Erasing is completed in several minutes. 15 EDITING ★ This operation is not possible in the relay or mix mode. Switch to the normal or dual mode to perform this operation. ★ Close the disc tray and set the stop mode for the CD section. 1.
ENGLISH (3) Erasing one or more tracks away from the last track ★ When erasing a finalized CD-RW disc, first unfinalize the disc. (4) Registration of the tracks to which you do not wish to listen ★ Tracks to which you do not wish to listen, such as those containing recording errors, can be set so that they will be skipped over during play. ★ When erasing a finalized CD-RW disc, first unfinalize the disc.
ENGLISH 2. Text editings (5) Cancelling the registration of tracks to which you do not wish to listen ★ When erasing a finalized CD-RW disc, first unfinalize the disc. 2 Up to 23 characters can be input for the track and disc titles.
ENGLISH (2) Adding track titles Input the title. • Either turn the jog dial on the main unit or use the automatic search buttons (8 and 9) on the remote control unit to select the desired character. • Some characters that can be input on the DN-C550R cannot be displayed on other models. (Remote control unit) CD CD-R _ DUBBING _ NORMAL HIGH • The shape of the cursor changes each time the CHARACTER button is pressed.
ENGLISH (3) Erasing disc titles ★ For finalized CD-RW discs, first unfinalize. (4) Erasing track titles ★ For finalized CD-RW discs, first unfinalize. (Remote control unit) (Remote control unit) CD CD-R _ DUBBING _ NORMAL HIGH 2,3,4 (Main unit) A ! " D # % ) M ✽ 4 S 9 DUBBING NORMAL HIGH TIME DISPLAY TITLE / SELECT CHARACTER TIME REMOTE SENSOR POWER PLAY STOP PAUSE 1 2 3 RELAY MODE OPEN / CLOSE ON CLEAR INPUT 4 REC FINALIZE 8 9 PLAY STOP PAUSE 1 2 3 .
ENGLISH (5) Erasing all the track titles and the disc title ★ For finalized CD-RW discs, first unfinalize. 16 MENU MODE • • • • (Remote control unit) CD CD-R _ DUBBING _ NORMAL HIGH A ! " 2,3,4,5 (Main unit) ) M ✽ 4 S 9 8 DUBBING NORMAL HIGH TIME DISPLAY TITLE / SELECT CHARACTER TIME REMOTE SENSOR POWER PLAY STOP PAUSE 1 2 3 RELAY MODE OPEN / CLOSE ON CLEAR INPUT 4 REC FINALIZE 8 .
ENGLISH 17 MESSAGES Messages may appear on the display while using the DN-C550R. The meanings of these messages are explained below. Message TOC Reading Reading disc information. Message Meaning Name Full 23 text characters have already been input or a total of 900 characters have already been input. Open During tray opening. Mecha Error Disc is not operating properly. Close During tray closing. All Skip Tr Skip is set for all tracks. No Disc Now PMA Rec Disc Full Copy Prohibit Finalize *.
ENGLISH 18 TROUBLESHOOTING 19 MAIN SPECIFICATIONS Check Again Before Assuming The Player Is Malfunctioning Audio: Frequency response: Dynamic range: S/N ratio: Harmonic distortion: Wow & flutter: Analog output (UNBALANCED) Transfer and connector: Output level: Headphone output: Analog input (UNBALANCED) Transfer and connector: Input level: Analog input (BALANCED) Transfer and connector: Input level: Digital output (COAXIAL) Transfer and connector: Signal format: Digital output (OPTICAL) Signal format: D