NETWORKED CD PLAYER DN-C640 OPERATING INSTRUCTIONS
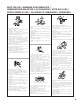
IMPORTANT TO SAFETY WARNING: To reduce the risk of fire and electric shock, this apparatus should not be exposed to rain or moisture and objects filled with liquids, such as vases, should not be placed on this apparatus CAUTION 1.Handle the power supply cord carefully Do not damage or deform the power supply cord. If it is damaged or deformed, it may cause electric shock or malfunction when used. When removing from wall outlet, be sure to remove by holding the plug attachment and not by pulling the cord.
IMPORTANT SAFETY INSTRUCTIONS READ BEFORE OPERATING EQUIPMENT This product was designed and manufactured to meet strict quality and safety standards. There are, however, some installation and operation precautions which you should be particularly aware of. 1. Read these instructions. 2. Keep these instructions. 3. Heed all warnings. 4. Follow all instructions. 5. Do not use this apparatus near water. 6. Clean only with dry cloth. 7. Do not block any ventilation openings.
CAUTION: PRECAUCIÓN: To completely disconnect this product from the mains, disconnect the plug from the wall socket outlet. The mains plug is used to completely interrupt the power supply to the unit and must be within easy access by the user. Para desconectar completamente este producto de la alimentación eléctrica, desconecte el enchufe del enchufe de la pared.
NOTE ON USE / HINWEISE ZUM GEBRAUCH / OBSERVATIONS RELATIVES A L’UTILISATION / NOTE SULL’USO / NOTAS SOBRE EL USO / ALVORENS TE GEBRUIKEN / OBSERVERA • Avoid high temperatures. Allow for sufficient heat dispersion when installed on a rack. • Vermeiden Sie hohe Temperaturen. Beachten Sie, daß eine ausreichend Luftzirkulation gewährleistet wird, wenn das Gerät auf ein Regal gestellt wird.
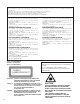
CAUTION • The ventilation should not be impeded by covering the ventilation openings with items, such as newspapers, tablecloths, curtains, etc. • No naked flame sources, such as lighted candles, should be placed on the apparatus. • Attention should be drawn to the environmental aspects of battery disposal. • The apparatus shall not be exposed to dripping or splashing for use. • No objects filled with liquids, such as vases, shall be placed on the apparatus.
• Use compact discs that include the mark. CD’s with special shapes (heart-shaped CD’s, octagonal CD’s etc.) cannot be played on this set. Attempting to do so may damage the set. Do not use such CD’s. Zeichen tragen. • Benutzen Sie Compact Discs, die das Speziell geformte CD’s (herzförmige CDs, achteckige CDs, usw.) können auf dieser Anlage nicht abgespielt werden. Der Versuch derartige CDs abzuspielen kann die Anlage beschädigen. Verzichten Sie auf die Benutzung solcher CDs. .
• This unit can display text information on the display when playing CD text discs which contain text information in English category. The CD text disc includes the mark shown above. NOTE: • This unit can provide a text display of the following types of characters. Other types of characters will result in “ ” being displayed.
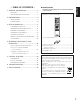
1. GENERAL INFORMATION .............................2 ■ ACCESSORIES ENGLISH – TABLE OF CONTENTS – Check that the following parts are included in addition to the main unit: FEATURES ..........................................................2 PART NAMES AND FUNCTIONS ......................3 q Remote Control Unit (RC-1061) .................................. 1 2. PREPARATIONS ..............................................9 INSTALLATION ...................................................9 CONNECTIONS ....
ENGLISH 1.
ENGLISH 1. GENERAL INFORMATION PART NAMES AND FUNCTIONS (1) Front panel 2 4 NETWORK CD PLAYER 0 6 DN-C640 10 -= ~!@ DISPLAY A-B PITCH LOCK END MON TEXT - INDEX/DIR + PUSH ENTER LEVEL EJECT NETWORK MENU/STORE CUE POWER ON/OFF UTILITY PHONES 1 35 7 8 SHIFT CANCEL 90 q POWER ON/OFF switch and indicator • Press this to turn the Power ON or OFF. • The indicator lights when the power is turned on. w LEVEL control • Use this to adjust the output level of the headphones.
ENGLISH 1. GENERAL INFORMATION !4 !5 5 6 / – INDEX/DIR + button • These buttons are used to accurately change the positions where playback will start or operate as FF or FR when held down. • In shift mode, use this button to select the index (Audio CDs) or directory (music file discs). !6 STOP/CANCEL button • Press this button to stop playback. • Press this to cancel a selection in program setting. • During preset setting operations, press to cancel all entries made and return to stop mode.
ENGLISH 1. GENERAL INFORMATION (2) Rear panel 1 GND R FIXED VARIABLE L 2 HOT(+) L SPDIF AES/EBU L 3 COLD(-) LEVEL LEVEL RS232C R SERIAL NO. R ANALOG OUTPUT x z PARALLEL DIGITAL OUTPUT cv bn z ANALOG (Balanced) OUTPUT • These are active balanced outputs using XLR type connections. The CD's or network's audio playback signals are output from these connectors. • Pin layout : 1. GND / 2. Hot / 3. Cold • Applicable connector : Cannon XLR-3-31 or equivalent.
ENGLISH 1. GENERAL INFORMATION (3) Display Specific Icons and Character displays inform you of the current operating status and menu items of the device. [Basic CD Operation] “TOTAL” illuminates to indicate that the time displayed is the TOTAL time of the track or file. “TOTAL” can also be lit with “TRACK” in stop mode to indicate the total number of tracks or files in the current disc or directory.
ENGLISH 1. GENERAL INFORMATION (4) Remote control unit (RC-1061) y A-B button Press this to set or cancel the A-B repeat function. q w e r t y u i o !0 !1 !2 !3 !4 !5 !6 !7 !8 !9 @0 @1 @2 @3 @4 u END MON button Press this to start the End Monitor funciton. i UTILITY button Press this to enter the Utility menu. o 3 / 4 / 1 / 2 buttons Use these for menu selection and 1 / 2 for track selection.
ENGLISH 1. GENERAL INFORMATION @3 VOL+/– buttons Press these to change the playback volume output through the unbalanced VARIABLE Output jacks. 2. Load the two new size “AAA” batteries inside the battery compartment while taking care to align their polarities correctly with the polarity markings ( with and with ). @4 ENTER button Press this to confirm selections in the menus. Size “AAA” (UU-4) batteries × 2 @5 PLAY/PAUSE button Press this to start playback or pause playback.
ENGLISH 2. PREPARATIONS INSTALLATION ■ Mounting in a rack • The DN-C640 is of 1U size, allowing it to be mounted in EIA standard 19-inch racks. When mounting the DN-C640 in a rack, use guide rails or shelf boards, etc., on the rack side to prevent weight from being applied to the front of the DN-C640. The fittings alone cannot support the weight of the DN-C640 (4.3 kg). Do not cover the top of the unit. Remember, heat is dispersed from the DN-C640’s upper surface.
ENGLISH 2. PREPARATIONS CONNECTIONS Leave your entire system (including the DN-C640) turned off until all connections between the DN-C640 and other components have been completed. ■ Connection precautions • Before proceeding with connections or disconnections of cables and power cords, be sure to turn all system components off. • Ensure that all cables are connected properly to the L (left) and R (right) jacks. • Insert plugs fully into the terminals.
SUPPORTED AUDIO CD INSERTING AND EJECTING A DISC In addition to standard CD-DA discs, the DN-C640 can read several other CD-DA formats. Please refer to page 17 for detail of reading and operation of data discs. Inserting and Ejecting a disc is only available when the unit is powered on. Compact Disc Digital Audio (CD-DA) ENGLISH 3. DEVICE OPERATION 1. If the unit is OFF, press the POWER ON/OFF switch to turn on the power. 2. Hold the disc by the edges and insert it in the DISC slot.
ENGLISH 3. DEVICE OPERATION NORMAL CD PLAYBACK (1) Before Starting Playback 1. Press the POWER ON/OFF switch to turn on the power. NETWORK CD PLAYER 0 (4) Returning to the position at which playback started Set the CUE mode to RECUE in the preset menu and press the CUE button during playback, the pickup returns to the position at which playback started and the pause mode is set.
(9) Index Skip (7) Returning to the beginning of the current track during playback 1. Turn the jog wheel counterclockwise or press the ∞ button during playback. DISPLAY A-B PITCH LOCK END MON TEXT - INDEX/DIR + PUSH ENTER CUE CANCEL SKIP BACK PLAY/PAUSE PITCH • The pickup will return to the beginning of the current track and playback will continue when the Start mode is set to “Play” in the preset menu.
ENGLISH 3. DEVICE OPERATION ADVANCED CD PLAYBACK (1) Repeating playback of a desired interval 3. Press the PLAY/PAUSE button. DISPLAY A-B PITCH LOCK END MON TEXT - INDEX/DIR + PUSH ENTER CUE (Single track repeat) CANCEL 1. In the Preset menu, set the finish mode to “Stop”, “Next” or “Recue”. (See page 22) 2. Press the REPEAT button on the remote control unit. • The “REPEAT 1” indicators light on the display and the single track repeat mode is set. 3.
(3) Playing specific tracks in a specific order (Program play) With this function, you can choose any of the tracks on the disc and program them to play in any order. Up to 99 tracks can be programmed. ENGLISH 3. DEVICE OPERATION 3. Press the ∞ or the § button on the remote control unit to select the track of the program number. 4. Press the CANCEL button on the remote control unit to delete a track in the program. Creating the program 1. Press the PROGRAM button on the remote control unit. 5.
ENGLISH 3. DEVICE OPERATION (4) Pitch Control (5) Skip Back Pitch Control allows the playback of audio at faster (+) or slower speeds(–). 1. Turning PITCH CONTROL On and OFF Press the PITCH button DISPLAY A-B PITCH LOCK END MON TEXT - INDEX/DIR + PUSH ENTER SKIP BACK is a feature that allows instant replay of the currently playing track.
ENGLISH 3. DEVICE OPERATION PLAYING AUDIO FILES In addition to standard CD-DA discs, the DN-C640 can read audio files from many different types of Data discs. For a list of compatible compressed and uncompressed audio files, see following section: Audio File Format Specifications.
ENGLISH 3. DEVICE OPERATION ■ Functions not supported by playing audio file The following functions are not supported when the DNC640 encounters discs recorded with these types of audio files. • Index skip function is not available. • While half-sample rate audio file, MPEG1-L2 (24kHz, 22.05kHz, 16kHz) and MPEG2-L3 (24kHz, 22.05kHz, 16kHz) are playable; signal to the digital outputs is not available if the Digital FS is set to "Auto" mode in the preset menu.
(1) Playing audio files on a disc 1. Load a disc containing audio files. ENGLISH 3. DEVICE OPERATION (2) Advanced music files playback The following "Advanced CD playback" functions are possible with audio files on a disc in the same way as a standard CDDA disc. See page 14-16 for detail of an operation. ■ Single track repeat • The display will change to “Loading.”. When the contents of the disc have been read, the total number of tracks will be displayed. ■ All track repeat ■ A-B repeat 2.
ENGLISH 3. DEVICE OPERATION PRESET FUNCTIONS AND OPERATIONS [ Using the remote control unit ] 1. With the unit in stop mode, press the MENU/STORE button. The last active preset item appears on the display. (1) Changing the PRESETS [ Using the front panel ] 1. With the unit in stop mode, press the MENU/STORE button. NETWORK CD PLAYER 0 DN-C640 2. Press the 3 button or the 4 button to select the preset item you wish to modify.
ENGLISH 3. DEVICE OPERATION (2) Table of Preset Items and Default settings No (Order) Display (Preset item) Selection Range Default Reference 1. Finish Mode Stop /Next /Recue /Continuous Continuous Page 22 2. Power On Play /Stop Stop Page 22 3. Start Mode Play /Stop /Cue CUE Page 22 4. Cue Mode Recue /Next Recue Page 22 5. Auto Cue Off /–48dB /–42dB /–36dB Off Page 22 6. Fade In Off /0.5sec - 10.0sec (0.5second steps) Off Page 23 7. Fade Out Off /0.5sec - 10.0sec (0.
ENGLISH 3. DEVICE OPERATION (3) Detailed description of the Preset items 1. Finish mode (Finish Mode) This feature allows you to decide what the DN-C640 will do after completing the playback of a track or file. Set value Description Stop Unit returns to stop mode after the track has played Next Unit advances to the next track and waits in Cue Mode Recue Continuous (default) Unit returns to the beginning of the current track and waits in Cue Mode.
ENGLISH 3. DEVICE OPERATION 6. Fade in time (Fade In) This feature allows you to adjust the length of time for the DN-C640’s Fade In feature Processing Set value Fade in Fade in time Off (default) Off --- 0.5sec – 10.0sec (0.5second step) On 0.5second – 10.0seconds 7. Fade out time (Fade Out) This feature allows you to adjust the length of time for the DN-C640’s Fade Out feature. Processing Set value Fade out Fade out time Off (default) Off --- 0.5sec – 10.0sec (0.5second step) On 0.
ENGLISH 3.
ENGLISH 3. DEVICE OPERATION 16. Auto sleep mode (Auto Sleep) You can select the behavior that the servo functions will automatically turn off if no operation is performed for set-up time while in stop, pause or cue. When in the sleep mode, if the PLAY/PAUSE button is pressed, playback will be started from the beginning of the track in which the sleep mode was set. If the CUE button is pressed, it will standby for the beginning of the track in which the auto sleep was set.
ENGLISH 3. DEVICE OPERATION UTILITY MENU When you use the front panel for operation, press the SHIFT button in stop mode to enter shift mode (SHIFT button will light Amber). Then press the MENU/STORE/UTILITY button to access the functions of the UTILITY MENU listed in the table below. When you use the remote control unit for operation, press the UTILITY button to access the functions of the UTILITY MENU listed in the table below.
3. Press the jog wheel. The Display switches to the track number flashing. 4. Turn the jog wheel until the track number you want to upload is flashing. 5. Press the jog wheel. “Executing” will be displayed until Upload Track is finished. Then “Completed” will be displayed. • Display returns to step 4 so you can upload another track. ENGLISH 3. DEVICE OPERATION (5) Procedure for Displaying the Unit’s Drive Version [ Using the front panel ] 1.
ENGLISH 4. NETWORK FUNCTIONALITY AND OPERATION Network functionality and Operation The network functionality of the Denon Professional DN-C640 allows you to play back compatible audio files from a shared network resource or drive as well as provide you with a simple web-based user interface to control the DN-C640 over your network. The DN-C640 has following functions. 1. Playing audio files from the network drive The DN-C640 can play the audio files stored in a shared folder on a network computer. 2.
ENGLISH 4. NETWORK FUNCTIONALITY AND OPERATION Setting up a Shared Folder on a Server or a Network Server The DN-C640 can read and play audio files in a shared folder of a server or a network server. 1. Create a shared folder on a server. 2. Bring up the Web Remote on any network computer. See page 30. 3. Click Network settings tab. 4. Type the share name, the accessing user account and password in the textboxes of Network Shared Drive. 5. Click the button. 6. The DN-C640 will reboot.
ENGLISH 5. CONTROL FEATURES WEB REMOTE The application “Web Remote” allows you to control the unit and configure settings from your computer. The DN-C640 supports common web browsing software applications. To connect to the DN-C640’s web remote, start up your web browser and specify the DN-C640’s IP address, for example, “http://192.168.0.1/” to open the web control screen. (1) Password screen Open the web control screen and then type the password in the password window to gain access to the web remote.
ENGLISH 5. CONTROL FEATURES (2) Control screen The Web remote screen contains four tabs; Control, Program, General Settings, and Network Settings. The Control window contains controls of the DN-C640. q w e r q Screen select tabs: Control tab: This screen allows you to control the DN-C640 in the same way as operating the front panel, and displays the track or audio file information of disc / shared network drive, and the status of the DN-C640.
ENGLISH 5. CONTROL FEATURES (3) Program screen The Program screen allows you to make a program play settings, turn the program mode on or off, and create a playlist.. It also allows you to download created playlists to your computer for future use as well as upload previously constructed playlists to the device. y i u o y Program switch: Select ON to enter program play mode. u Track List: Track number and file name are displayed in this area.
ENGLISH 5. CONTROL FEATURES (4) General settings screen The General settings screen allows you to modify many of the playback features found in the Preset Menu of the device. The function of all of the settings are the same as found in the Preset Menu. See Page 21. !0 !0 SAVE button, CANCEL button and DEFAULT buttons: button: Stores all changes made to items in this window. button: Cancels all changes made to items in this window and then displays the current settings.
ENGLISH 5. CONTROL FEATURES (5) Network settings screen The Network settings screen allows you to modify the network settings of the DN-C640 as well as designate the location and sign-in information of the desired network shared folder. The function of all of the settings are the same as found in the Preset Menu. See page 20 about an operation of a preset menu. About detailed explanation of each network setting item, see below.
ENGLISH 5. CONTROL FEATURES !6 Save and Restart, Cancel and Default buttons: button: If any changes have been made to the network settings screen and need to be saved, press the SAVE and RESTART button. This will store the changes made and forces the DN-C640 to reboot. If the SAVE and RESTART button is pressed, a confirmation screen will appear. If ok, click OK button and then the DN-C640 will shut down, and reboot. While rebooting, the following is displayed on the screen.
ENGLISH 5. CONTROL FEATURES RS-232C CONTROL Connect a male (D-Sub 9 Pin) to female (D-Sub 9 Pin) straight cable for RS-232C external control by host equipment. • The RS-232C host can control functions of the DN-C640 externally • The DN-C640 automatically transmits status data when status is changed.
ENGLISH 5.
ENGLISH 5.
ENGLISH 5. CONTROL FEATURES (5) Table of Status Request and Status information codes When a Status Request Command from the host is received by the DN-C640, the DN-C640 sends the Status Information to the host. When the DN-C640 changes status, the DN-C640 automatically sends Status Information to the host.
ENGLISH 5.
ENGLISH 5. CONTROL FEATURES GPIO (Parallel) CONTROL Use this to control the DN-C640 with dry contact circuit connections. (1) Interface Condition • Applicable connector: 25-pin D-sub (male) • Connecting signal layout Pin No.
ENGLISH 5. CONTROL FEATURES (2) Remote control circuit CUE 9 10 8 7 6 5 4 3 PAUSE 24 23 22 18 17 16 14 9 23 5 6 2 23 FADER SWITCH 15 TRACK (+) 1 TRACK (–) 23 • Remote control connections PLAY 2 14 22 23 3 15 17 22 INDEX2/INDEX3 24 22 EOM 22 23 4 16 22 23 7 23 8 23 1 SEARCH ¡ NOTE: • The rating of REMOTE connector pin 22 (TALLY POWER SUPPLY) is +5 VDC, 100 mA maximum. Avoid currents in excess of the rating, or it may cause a malfunction or a risk of fire.
ENGLISH 6. TROUBLESHOOTING Make sure of the followings before you consider as any malfunctions : 1. Are all the connections correct? 2. Are all system components being operated correctly in accordance with the operating instructions? 3. Are the speakers and amplifier/receiver functioning correctly? If the Unit still does not function properly, check the symptom against the list below. If the symptom does not correspond to the check list, please contact your dealer. Problem Disc is not ejected.
ENGLISH 7.
ENGLISH 7. SPECIFICATIONS ■ DIMENSIONS 325mm (12.8”) 347mm (13.7”) 44mm (1.7”) 52mm (2.0”) 434mm (17.1”) 482.6mm (19.0”) NETWORK CD PLAYER 0 DN-C640 10 DISPLAY A-B PITCH LOCK END MON TEXT - INDEX/DIR + PUSH ENTER LEVEL EJECT NETWORK MENU/STORE CUE POWER ON/OFF PHONES UTILITY SHIFT CANCEL SKIP BACK PLAY/PAUSE PITCH ✽ For improvement purposes, specifications and design are subject to change without notice.
D&M Holdings Inc.