DOUBLE CD/MP3 PLAYER DN-D6000 OPERATING INSTRUCTIONS MODE D’EMPLOI FOR ENGLISH READERS POUR LES LECTEURS FRANCAIS PAGE PAGE 116 ~ PAGE 23 ~ PAGE 122 39
CAUTION SAFETY INSTRUCTIONS 1. Read Instructions – All the safety and operating instructions should be read before the product is operated. 2. Retain Instructions – The safety and operating instructions should be retained for future reference. CAUTION: TO REDUCE THE RISK OF ELECTRIC SHOCK, DO NOT REMOVE COVER 3. Heed Warnings – All warnings on the product and in the operating instructions should be adhered to. (OR BACK). NO USER SERVICEABLE PARTS INSIDE.
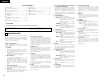
ENGLISH FRANÇAIS TOP PANEL DIAGRAM / SCHEMA DU PANNEAU SUPERIEUR !4 !6 !8 @0 !9 #1 @9 #4 #2 #5 #6 !3 !5 !5 !7 @22 @6 @1 #3 @8 #8 t @4 !1 @5 @3 !0 #9 3 #0 $0 !2 @7 #7
FRONT PANEL DIAGRAM / SCHEMA DU PANNEAU AVANT NOTE ON USE / HINWEISE ZUM GEBRAUCH / OBSERVATIONS RELATIVES A L’UTILISATION / NOTE SULL’USO NOTAS SOBRE EL USO / ALVORENS TE GEBRUIKEN / OBSERVERA 482 465 88 t 76.2 t 7 x 10 hole r Loch 7 x 10 Trou 7 x 10 e Orificio de 7 x 10 Opening 7 x 10 qw r Hål, 7 x 10 7 x 10 孔 • Avoid high temperatures. Allow for sufficient heat dispersion when installed on a rack. • Vermeiden Sie hohe Temperaturen.
• DECLARATION OF CONFORMITY We declare under our sole responsibility that this product, to which this declaration relates, is in conformity with the following standards: EN60065, EN55013, EN55020, EN61000-3-2 and EN610003-3. Following the provisions of 73/23/EEC, 89/336/EEC and 93/68/EEC Directive.
ENGLISH – TABLE OF CONTENTS – z x c v b n m , . ⁄0 Main features .....................................................6 Connections/Installation .....................................7 Part names and functions ..........................8 ~ 10 Compact discs ..................................................10 Basic operation .................................................11 Next Track ........................................................12 Scratch........................................................
ENGLISH 2 CONNECTIONS/INSTALLATION (1)CONNECTIONS 1. Turn off the POWER switch. 2. Connect the RCA pin cords to the inputs on your mixer. 3. Connect the control cord to the REMOTE connector on the RC-D60. CAUTION: • Be sure to use the supplied control cord. Using another type of cable may result in damage. • Be sure the power is off when connecting the control cord. Otherwise the units may not work properly. • Never connect any remote controllers other than the RC-D60. Doing so can damage the equipment.
ENGLISH 3 PART NAMES AND FUNCTIONS (1) Front panel q POWER button (¢ON £OFF) • Push this button to turn power on and off. CAUTION: • Do not turn off the power while a disc is loading or being ejected. Otherwise loading mechanism may be damaged. w POWER indicator • This lights when the power is on. e Disc loading slot • Load the disc slowly, and release it once the DN-D6000 starts grabbing the disc in. NOTE: Please clean the dirt of the label side of a disc and start loading of the disc.
ENGLISH @4 @5 TIME,/ CONT./SINGLE button • TIME: A short push will displays mode changes between ELAPSED TIME and REMAIN TIME. • 4-way TOTAL TIME display mode can be selected by ⁄5 PRESET ”(13) Time Mode”. • At this time, you can select display mode from four modes, TRACK ELAPSED, TRACK REMAIN, DISC ELAPSED and DISC REMAIN. • CONT./SINGLE: Long pushing play ending mode between CONT (continue: play more tracks) and SINGLE (stop playing and ReCUE’s back to your set point).
ENGLISH 4 COMPACT DISCS (5) Display q t y w u e i o q Track, minute, second and frame displays • These displays indicate current position information. w Time mode indicators • Lights when the BPM is displayed on the pitch display. t MP3 indicators • Lights when an MP3 disc is detected. 10 y !1 !2 • DN-D6000 has Loop mode indicators which consist of A , B and two arrows. A and B marks indicate A and B points have been set. • Two arrows indicate loop setting mode as follows.
ENGLISH 5 BASIC OPERATION Play and pause • Each push of the !0 PLAY/PAUSE (13) button switches between playback and pause. !0 PLAY/PAUSE (13) button illuminates solid green during playback and flashed in pause. • When the !0 PLAY/PAUSE (13) button is pushed during play, the DN-D6000 pauses playback at that point. Push !0 PLAY/PAUSE (13) button once again and playback resumes. • Playback will pause when SCRATCH(MAIN) is selected with the @7 DISC MODE button and the scratch disc is held with your hand.
ENGLISH Relay playback • Relay Play function is a playback mode to continue play tracks of CD1 and CD2 in DN-D6000. 6 NEXT TRACK • It's now possible to select the beginning of the next track to be played while continuing playback of the current track without interrupting playback. *Crossfade can also be used for a smooth transition. RELAY PLAY ON 1 q 3 r RELAY PLAY OFF w Stop playback and select “Relay. OFF” is selected for ⁄5 PRESET “(14) Relay Mode”.
ENGLISH 7 SCRATCH You can Scratch in CD or Sampler mode. Stop the Scratching e When the SCRATCH DISC is released, scratch play stops and normal play or pause mode is set. 3 w, e 1 Select Scratch source q Select the source to be scratched using the DISC MODE button. Each short push of the DISC MODE button switches between MAIN and SAMPLER. MAIN: The DISC MODE button light up in orange. SAMPLER: The SCRATCH MODE button light up in green.
ENGLISH 8 SEAMLESS LOOP/HOT START/STUTTER Seamless Loop/Hot Start/Stutter (A1, A2 buttons) q, w, y t, y Exit/Reloop r In Seamless Loop playback, you can force exit from or return to the loop. r e, y 5 EXIT: While the Seamless Loop playback, push the EXIT/RELOOP button to exit from loop. DN-D6000 continues playback after the B point. RELOOP: When the EXIT/RELOOP button is pushed after exit the loop, Seamless Loop playback resumes from the A point.
ENGLISH 9 B TRIM 10 AUTO BPM COUNTER / EFFECTOR • The Seamless Loop and Sampler B points can be fine-adjusted using the Scratch Disc. • Trim the points during loop playback as a rehearsal. AUTO BPM COUNTER r w, r q e q, w, e, t AUTO BPM COUNTER B Trim q When the NEXT TR./B TRIM button is pressed during seamless loop playback, the B TRIM mode is turned on. 1 When the NEXT TR./B TRIM is pressed during playback,the NEXT TRACK mode is set.
ENGLISH EFFECTOR ECHO/LOOP OFF One of the six effectors can be selected. o, !2 t, i q, r e, y, u, !0, !1 r When the ECHO/LOOP button is pressed, the echo/loop parameter selection mode is set. IF the 1-5 ECHO/LOOP button is pressed again, the echo/loop function is turned off. FLANGER FLANGER ON t When the FLANGER button is pressed, the flanger function is turned on and the parameter 2-1 selection mode is set.
ENGLISH 11 SAMPLER Select Sampler Loop mode DN-D6000 has Sampler of 15 seconds length. This Sampler can also be looped and scratching during playback. q, r, !0 i, !0 w, o y, u !1, !3, !4, !6 e, t !2, !5 5 You can select loop mode for Sampler when Sampler playback stop. Loop (default): Sampler playback continues with looping. (EXIT/RELOOP LED stays lit) Exit: Sampler playback continues over B point up to recording length. (EXIT/RELOOP LED flashes) Single: Sampler playback stops at B point.
ENGLISH 12 MP3 PLAYBACK Select the file The DN-D6000 can playback MP3 files via CD-R/RW media made according to the following conditions. * MP3 disc’s made by formats other than below settings cannot be played back on our system. * In most cases, you can find the below settings within the properties of your burners PC software. Please refer to your manual or contact your software vendor for assistance regarding these settings.
ENGLISH 13 PLATTER EFFECT *1 *2 *3 BRAKE mode off DRAG-S When the BRAKE buttons is pressed, the BRAKE time selection mode is set. If the BRAKE button is pressed again during this time, the BRAKE functions is turned off. w, t 1-5 DRAG-S (DRAG START): Simulates the dragging sound of a turntable starting up from a stop mode. 3-1 Set the DRAG-S mode r The DRAG-S function can be turned on by pushing the RVS/_DRAG-S button for more than 1 sec.
ENGLISH 14 MEMO (Custom Setting Memory) CD setting information can be stored in the non-volatile memory. The stored information can be called out of the memory later, making it easy to prepare for your mixing. NOTE: The MEMO cannot be used by MP3. 1. About TRACK MEMO • Up to 1000 memo points can be stored to internal memory for later recall. The number of tracks on a particular CD only limits the amount of memo points available per that disc.
ENGLISH 15 PRESET 1. Preset mode q The preset mode is available when @5 PRESET button is pushed for more than 1 sec while DN-D6000 is in Cue, pause or no disc mode. w Turn the #2 PARAMETERS knob to select the preset item. e After selecting an item, push the #2 PARAMETERS knob to select the preset data. r To change other Preset items, repeat these steps. t Push the @5 PRESET, !1 CUE or !0 PLAY / PAUSE (13) button to exit from the Preset mode. 2.
ENGLISH 16 SPECIFICATIONS GENERAL Type: Disc type: Dimensions: Installation: Mass: Power supply: Power consumption: Environmental conditions: AUDIO SECTION Main out, Monitor out Quantization: Sampling frequency: Oversampling rate: Total harmonic distortion: Signal to noise ratio: Channel separation: Frequency response: Analog output Output level: Load impedance: Digital output Signal format: Output level: 22 Compact disc player Standard compact discs (12 cm discs), CD-TEXT CD-R, CD-RW discs NOTE: Fin
FRANÇAIS – TABLE DES MATIERES – z x c v b n m , . ⁄0 Caracteristiques principales..............................40 Connexions/Installation.....................................41 Nomenclature et fonctions ......................42 ~ 44 Disques compacts ............................................44 Fonctionnement de base..................................45 Plage suivante ..................................................46 ⁄1 ⁄2 ⁄3 ⁄4 ⁄5 ⁄6 8. Sampler ......................................................
FRANÇAIS 2 CONNEXIONS/INSTALLATION (1) CONNEXIONS 1. Mettre l’interrupteur POWER hors circuit. 2. Connecter les cordons à broche RCA aux entrées du mixeur. 3. Connecter le cordon de commande au connecteur REMOTE du RC-D60. ATTENTION: • Veillez à utiliser le cordon de commande fourni. L'utilisation d'un autre type de câble peut provoquer des dégats. • Assurez-vous que l'alimentation est coupée lors de la connexion du cordon de commande. Sans quoi l'unité risque de ne pas fonctionner correctement.
FRANÇAIS 3 NOMENCLATURE ET FONCTIONS (1) Panneau avant q Touche POWER (¢ON £OFF) • Enfoncer cette touche pour allumer et éteindre le lecteur. ATTENTION: • Ne pas éteindre le lecteur pendant le chargement ou l’éjection d’un disque. A défaut d’une telle précaution, le mécanisme de chargement risque d’être endommagé. w Indicateur POWER • S'allume lorsque l'appareil est sous tension.
FRANÇAIS @4 Touche TIME, CONT./SINGLE • TIME: Une pression rapide affiche le changement de mode entre ELAPSED TIME (temps écoulé) et REMAIN TIME (temps restant). • Le mode TOTAL TIME à 4 voies peut être sélectionné à l’aide de la touche PRESET (13). • A ce moment-là, le mode d’affichage peut être sélectionné parmi quatre modes, TRACK ELAPSED, TRACK REMAIN, DISC ELAPSED et DISC REMAIN. • CONT./SINGLE: Mode de fin de lecture en enfonçant longuement entre CONT.
FRANÇAIS 4 DISQUES COMPACTS (5) Affichage q t y w u e i o q Affichages des plages, minutes, secondes et trames • Ces affichages indiquent la position actuelle. w Indicateurs de mode de temps • Lorsque la touche TIME est enfoncée, l’indicateur de mode de temps commute comme suit: ELAPSED: Le temps de lecture écoulé de la plage est affiché. REMAIN: Le temps restant de la plage est affiché. T. ELAPSED: Le temps total écoulé du disque est affiché. T.
FRANÇAIS 5 FONCTIONNEMENT DE BASE Lecture et Pause • Chaque fois que la touche !0 PLAY/PAUSE (13) est enfoncée, le lecteur commute entre le mode de lecture et de pause. La touche !0 PLAY/PAUSE (13) s’allume en vert pendant la lecture et clignote en mode de pause. • Lorsque la touche !0 PLAY/PAUSE (13 ) est enfoncée pendant la lecture, le DN-D6000 fait une pause de lecture à ce point. Enfoncer à nouveau la touche !0 PLAY/PAUSE (13) et la lecture reprend.
FRANÇAIS Lecture relayée • La fonction Relay Play est un mode de lecture pour continuer la lecture des plages de CD1 et de CD2 sur le DN-D6000. 6 PLAGE SUIVANTE • Il est maintenant possible de sélectionner le début de la plage suivante à lire tout en continuant la lecture de la plage actuelle sans interruption de la lecture. *Fondu croisé peut également être utilisé pour une transition uniforme. RELAY PLAY ON 1 q q Lorsque “Relay.
FRANÇAIS 7 SCRATCH On peut faire un scratch en mode CD ou sampler. Arrêter le Scratch e Lorsque SCRATCH DISC est relâché, la lecture avec scratch s’arrête et le mode de lecture normale ou de pause est réglé. 3 w, e 1 Sélection de la source Scratch q Sélectionner la source sur laquelle effectuer un effet de scratch à l'aide de la touche DISC MODE. Chaque courte pression de la touche DISC MODE permet de commuter entre MAIN et SAMPLER. MAIN: La touche DISC MODE s'allume en orange.
FRANÇAIS 8 SEAMLESS LOOP/HOT START/STUTTER Seamless Loop/Hot Start/Stutter (touches A1, A2) q, w, y t, y Exit/Reloop r En mode de lecture Seamless Loop, on peut forcer la sortie ou retourner à l’enchaînement. r e, y 5 EXIT: En mode de lecture Seamless Loop, enfoncer la touche EXIT/RELOOP pour quitter l’enchaînement. Le DN-D6000 continue la lecture après le point B.
FRANÇAIS 10 COMPTEUR DE TEMPO (BPM) AUTOMATIQUE/EFFECTEUR 9 B TRIM • Les points B d’enchaînement continu peuvent être ajustés avec précision à l’aide du disque Scratch. • Ajuster les points pendant la lecture enchaînée comme une répétition. COMPTEUR DE TEMPO (BPM) AUTOMATIQUE r w, r q e q, w, e, t B Trim q Lorsque la touche NEXT TR./B TRIM est enfoncée pendant la lecture à enchaînement continu, le mode B TRIM est activé. 1 Lorsque la touche NEXT TR.
FRANÇAIS EFFECTEUR Un des six effecteurs peut être sélectionné. o, !2 t, i q, r e, y, u, !0, !1 ECHO/LOOP OFF r Lorsque la touche ECHO/LOOP est enfoncée, le mode de sélection de paramètre est réglé. 1-5 écho/enchaînement Si la touche ECHO/LOOP est enfoncée de nouveau, la fonction écho/enchaînement est désactivée. FILTER 3-1 FILTER ON o Lorsque la touche FILTER est enfoncée, la fonction du filtre est activée et le mode de sélection de paramètre est réglé.
FRANÇAIS 11 SAMPLER Le DN-D6000 a un Sampler d'une durée de 15 secondes. Ce Sampler peut également être mis en boucle et recevoir un effet de scratch pendant la lecture. q, r, !0 i, !0 w, o y, u !1, !3, !4, !6 e, t !2, !5 5 Sélectionner le mode Sampler Loop On peut sélectionner le mode d’enchaînement pour Sampler lorsque la lecture sampler s’arrête. Loop (réglage par défaut): La lecture Sampler continue avec enchaînement.
FRANÇAIS 12 LECTURE MP3 Sélectionner le fichier Le DN-D6000 peut lire des fichiers MP3 à l’aide de supports CD-R/RW fait selon les conditions suivantes. * Les disques MP3 réalisés sur un format autre que ceux ayant les paramètres ci-dessous ne peuvent pas être lus sur notre système. * Dans la plupart des cas, vous pouvez trouvez les paramètres suivants dans les propriétés du logiciel brûleur de votre PC.
FRANÇAIS 13 PLATTER EFFECT *1 *2 *3 w, t Mode BRAKE désactivé Lorsque les touches BRAKE sont enfoncées, le mode de sélection de temps BRAKE est réglé. Si la touche BRAKE est enfoncée de nouveau 1-5 pendant ce temps, la fonction BRAKE est désactivée. DRAG-S DRAG-S (DRAG START) Simule le son d’accélération progressive d’une platine tourne-disque démarrant à partir du mode d’arrêt. 3-1 Régler le mode RVS e La fonction RVS peut être activée en appuyant sur la touche RVS/_DRAG-S.
FRANÇAIS 14 MEMO (Mémoire de réglage personnalisé) L’information sur le réglage CD peut être mémorisée dans la mémoire non-volatile. L’information mémorisée peut être rappelée ultérieurement, ce qui facilite la préparation de votre mixage. REMARQUE: La fonction MEMO ne peut pas être utilisée par les MP3. 1. A propos de MEMO • Jusqu’à 1000 points mémo peuvent être stockés dans la mémoire interne pour être rappelés plus tard.
FRANÇAIS 15 PRESET 1. Mode Preset q Le mode preset est disponible lorsque la touche @5 PRESET est enfoncée pendant plus de 1 sec pendant que le DN-D6000 est en mode Cue, pause ou sans disque. w Tourner le bouton #2 PARAMETERS pour sélectionner l’élément préréglé. e Après la sélection de l’élément, enfoncer le bouton #2 PARAMETERS pour sélectionner les données preset. r Pour modifier les données Preset, répéter ces étapes.
FRANÇAIS 16 SPECIFICATIONS SECTION GENERALE Type: Type de disque: Dimensions: Installation: Poids: Alimentation: Consommation: Conditions environnantes: Lecteur de disques compacts Disques compacts standard (12 cm), CD-TEXT disques CD-R, CD-RW REMARQUE: Des disques CD-R ou CD-RW finalisés peuvent être lus avec cet appareil. Toutefois, selon la qualité d’enregistrement, certains disques CD-R/RW ne peuvent pas être lus.
PROFESSIONAL BUSINESS COMPANY 7-35-1 Sagamiono, Sagamihara-shi, Kanagawa 228-8505, JAPAN Printed in Japan 00D 511 4227 004