
Operation Manual


8
ENGLISH
!3
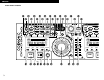
OPEN/CLOSE button
• Open or close disc holder with these buttons
while button illuminations light. Note that if
illumination is off, you cannot open disc holder.
(Eject lock function)
!4
PLAY/PAUSE button (13)
• This button will start or pause playback.
• Push once to start playback, once again to
pause playback, and once more to resume
playback.
!5
CUE/STUTTER button
• CUE:
Pushing this button in Play mode will force the
track back to the position which playback
started. While in search mode, it makes new
Cue point.
• STUTTER:
In Cue mode, by pushing the CUE button
makes a Stutter sound from the Cue point. This
is called STUTTER PLAY.
!6
CONT/SINGLE, RELAY button
• CONT./SINGLE:
Short pushing play ending mode between
CONT (continue: play more tracks) and SINGLE
(stop playing at current track played).
• RELAY:
You can turn on and off RELAY PLAY mode. In
RELAY PLAY mode, playback continues to the
other drive if all tracks are played.
!7
TIME, TOTAL TIME button
• TIME:
A quick push will display mode changes
between ELAPSED TIME and REMAIN TIME.
• TOTAL:
A long push, will display mode changes
between TRACK TIME and DISC TIME.
• So, you can select display mode from four
modes, TRACK ELAPSED, TRACK REMAIN,
DISC ELAPSED and DISC REMAIN.
!8
MEMO, PRESET button
• MEMO:
The memo mode starts when this button is
pushed once in the Cue mode.
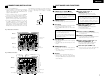
(3) RC-D90 Front panel
CAUTION:
• Note that there are many buttons working two
different functions s selected by short time
pushing or long pushing (1second or more). The
mark indicates short time push function and
mark indicates long time push function.
• PRESET:
When this button is pushed for more than 1
sec, the PRESET mode starts.
!9
PROGRAM, RANDOM button
• PROGRAM:
With a short push in Cue mode, you can make
list of program play and turn on/off Program
play mode using PARAMETERS knob.
• RANDOM:
With a long push in Cue mode, Random play
mode can be turned on/off with
PARAMETERS knob.
@0
PLATTER MODE, ALL OFF
button
• PLATTER MODE:
When pushing this button, you can select a
Platter Effect type from DRAG S, BRAKE,
ECHO, DUMP and RVS, and can turn each one
on/off individually.
• ALL OFF:
When this button is pushed for more than 1
sec, all the Platter Effect settings are
cancelled.
@1
TRACK/PARAMETERS knob
• TRACK:
When PARAMETERS LED is off, turn this knob
to select tracks.
By pushing this knob down while turning, the
tracks will change 10 at a time.
• PARAMETERS:
When the PARAMETER LED is flashing, turn
this knob to select and change the parameter
for items found in the Effector, Program,
Memo, and Preset data, etc.
• Push this knob down during Effect mode to
change the status to on/off.
@2
Jog Wheel
• Use this for the Manual Search, Scan, Pitch
Bend and Scratch operations, or to also select
the effect parameter, etc.
@3
SCRATCH, DIR button
• SCRATCH:
Push this button quickly to turn Scratch mode
on and off. When Scratch mode is on,
SCRATCH LED is flashing.
• DIR:
Push this button for more than 1 sec to select
playback direction of scratch.
@4
FX SELECT, FX SOURCE
button
• SELECT:
Push this button a short time to select the
effect function from DELAY, FLANGER, XFM.,
FILTER. Sound of selected effector can be
adjusted with PARAMETERS knob and Jog
Wheel.
• SOURCE:
If pushed for more than 1 sec, you can select
source for Effector functions.
@5
FX BYPASS, FX ALL OFF
button
• BYPASS:
Push this button to bypass Effector
temporarily and BYPASS LED starts flashing.
The Effects are returned by pushing the
BYPASS button once again.
• ALL OFF:
When pushed for more than 1 sec, all the
Effects are turned off.
@6
BEND/SCRATCH button
• Push this to switch the Jog Wheel mode
between Pitch Bend and Manual Search.
BEND mode:
Either Pitch Bend or Platter Hold function can
be conducted with the Jog Wheel. Pitch Bend
function works when Jog Wheel is turned
slowly, Platter Hold works with Jog Wheel is
turned quickly. In this mode, BEND LED is
flashing.
Manual Search:
Manual Search and Scan can be conducted
with Jog Wheel. While turn Jog Wheel slowly,
Manual Search works and you can move point
by one frame (1/75 second) with sound. If
turned fast, SCAN will work and point moves
long distance with sound. In this mode,
SEARCH LED is flashing.
• When playback is started from Manual Search,
Pitch Bend mode is set instead of Manual
Search mode automatically.
• When Cue is set while in the Pitch Bend
mode, Manual Search mode is set
automatically.
@7
TAP, AUTO button
• TAP:
When you push this button repeatedly, the
Auto mode turns off and starts measuring your
Beats Per Minute (BPM) by tapping.
NOTE: If you select a new track, AUTO BPM
mode turns on automatically.
• AUTO:
When pushing the TAP button for 1 second,
activates AUTO BPM mode.
• The measured BPM is displayed in the
character section of the display.
@8
Pitch Slider
• Use this slider to adjust playing speed.
• The playing speed decreases when slide
upwards and increases downwards.
@9
PITCH/KEY, RANGE button
• With this button you can select PITCH and
KEY ADJUST mode. Mode changes Pitch on,
Key Adjust on and both off cyclically. PITCH
LED indicates in Pitch mode and KEY ADJUST
indicator lights up in Key Adjust mode.
• RANGE:
Push this button for more than 1 sec to select
the pitch range.
#0
PITCH BEND – button
#1
PITCH BEND + button
• Pushing these buttons will change playing
speed temporary.
• While pushing PITCH BEND + button playing
speed increases and speed decreases while
pushing PITCH BEND – button.
• When release button, playing speed returns to
the previous speed.
#2
FLIP/CLR button
• Use this to select operating mode of A1 and
A2 buttons, from Hot Start mode and Stutter
mode. FLIP LED lights up in Hot Start mode.
• If the FLIP button is pushed while pushing the
A1 or A2 button, you can clear the selected A
point.
By holding down just the FLIP button for more
than 1 sec, you can clear A1 and A2 points all
at once.
#3
A1 button
#4
A2 button
• Using these buttons you can create starting
points for Hot Start, Seamless Loop, Stutter
and Splice playback.
• The button illumination changes its color to
inform different modes.
Orange ..Hot Start mode
Green ....Alpha-Track Hot Start mode
Yellow....Splice mode
#5
B button
• Use this to set the B point for A1 and A2
seamless loop and splice playback end.
• The B LED indicates conditions about B point.
B LED lit:
Already B point was set.
B LED flashing:
In Splice point setting mode