
User's Manual


4
Features
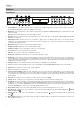
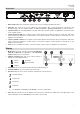
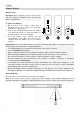
Front Panel
1. Power Button: Press this button to turn the unit on or off. Make sure the AC In is properly connected to a power outlet. Do not turn the
unit off during media playback—doing so could damage your media.
2. Mic/Line In: Connect a microphone or line-level device to this input. See Operation > Additional Functions
to set the input for mic-level
or line-level signals.
Note: The Mic/Line input signal is not sent to the headphone output.
3. Aux Input: Connect an optional device to this input using a 1/8” (3.5mm) TRS cable. See Operation > Playing Audio from the Aux
Input for more information.
4. 48V Phantom Power: Set this switch to the ON position to apply +48V to the XLR+1/4 input. Please note that most dynamic
microphones do not require phantom power, while most condenser microphones do. Consult your microphone’s documentation to find
out whether it needs phantom power.
5. Mic Volume: Adjusts the volume for the microphone/line input signal.
6. Headphone Volume: Adjusts the volume for the headphone output.
7. Headphone Output: Connect your headphone to this 1/4” (6.35 mm) output.
8. SD Card Slot: Insert your SD card here to play music files.
9. USB Port: Connect a mass-storage-class USB device to this port.
10. Pitch/Tempo Selection: Press this button to access the Pitch and Tempo controls.
11. Pitch/Tempo -/+: In Tempo mode, turn the dial to adjust the tempo of the audio playback in a range from -15% to +15. In Pitch mode,
turn this dial to raise or lower the pitch of the audio playback in a range from -15% to +15%. If the pitch is adjusted first and then the
tempo is adjusted, the pitch will remain at the previously set value. If the tempo is adjusted first and then the pitch is changed, the tempo
will remain at the previously set value.
12. Display Screen: This screen indicates the unit’s current operation. See Display for more information.
13. Source: Press this to enter the Media Selection screen. See Operation > Selecting Media Playback Source for more information.
14. Play/Pause: Press this button to start, resume, or pause playback.
15. Stop: Press this button to stop playback.
16. Track Select/Search Buttons: With SD, USB, or Bluetooth sources, press and release the <</|<< button to go to the previous track.
Press and release the >>/>>| button to go to the next track. With SD or USB sources, press and hold the
<</|<< button to rewind through
a track at 5 times the normal playback speed. Press and hold the >>/>>| button to fast-forward through a track at 5 times the normal
playback speed.
17. Time: With SD or USB sources, press this button to switch the Time mode on the display.
18. Display: With SD or USB sources, press this button to switch the display between the track name and artist name.
19. Pitch Bend −/+: Press these buttons to temporarily bend the pitch or speed (depending on the Pitch/Tempo Selection switch setting) for
the Mic/Line, SD, AUX, USB, or Bluetooth audio. While the Pitch Bend + button is pressed, the playback pitch or speed is increased,
gradually up to +15%. While the Pitch Bend − button is pressed, the playback pitch or speed is decreased, gradually down to -15%.
Release the Pitch Bend +/ or − button to go to the original playback pitch or speed.
20. Bluetooth Disconnect: To disconnect from a paired Bluetooth device, press and hold this button for 1.5 seconds.
21. Repeat: With SD or USB sources, press this button to switch between Repeat Playback modes: Normal Mode, Repeat One
, Repeat
Folder, and Repeat All
.
22. Random: With SD or USB sources, press this button to cycle through Single Play
, Normal mode, Random Folder, and Random All
mode
.
23. Master Volume: Adjusts the overall volume going to the XLR+1/4 and RCA outputs for the Mic/Line and Aux inputs as well as the SD,
USB, and Bluetooth sources.
1
2
2
3
3
4
4
5
5
6
6
7
7
8
8
9
9
10
10
11
11
12
12
13
13
14
14
15
15
16
16
17
17
18
18
19
19
20
20
21
21
22
22
23
23