DJ MIXER DN-X300 OPERATING INSTRUCTIONS INSTRUCCIONES DE OPERACION FOR ENGLISH READERS PAGE 5 ~ PAGE PARA LECTORES DE ESPAÑOL PAGINA 11 10 ~ PAGINA 16
SAFETY INSTRUCTIONS CAUTION 1. Read Instructions – All the safety and operating instructions should be read before the product is operated. 2. Retain Instructions – The safety and operating instructions should be retained for future reference. 3. Heed Warnings – All warnings on the product and in the operating instructions should be adhered to. 4. Follow Instructions – All operating and use instructions should be followed. 5. Cleaning – Unplug this product from the wall outlet before cleaning.
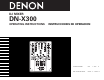
ENGLISH ESPAÑOL TOP PANEL DIAGRAM / DIAGRAMA DEL PANEL SUPERIOR REAR PANEL DIAGRAM / DIAGRAMA DEL PANEL POSTERIOR t yu i o !0!0 o i !1 y t r !2 e !3 @4 @5 @6 @7 @8 !4 w !5 q !6 !7 !7 !8 !9 !9 @0 @1 #7 #6 #5 #4 #3 #2 #1 #0 #3 #2 #1 #0 @9 FRONT PANEL DIAGRAM / DIAGRAMA DEL PANEL FRONTAL #8 #9 $2 $1 $4 #9 #8 @1 @2 @3 3 $3 $2 $1 $0
NOTE ON USE / HINWEISE ZUM GEBRAUCH / OBSERVATIONS RELATIVES A L’UTILISATION / NOTE SULL’USO NOTAS SOBRE EL USO / ALVORENS TE GEBRUIKEN / OBSERVERA • Avoid high temperatures. Allow for sufficient heat dispersion when installed on a rack. • Vermeiden Sie hohe Temperaturen. Beachten Sie, daß eine ausreichend Luftzirkulation gewährleistet wird, wenn das Gerät auf ein Regal gestellt wird.
ENGLISH 2 INTRODUCTION 2 PART NAMES AND FUNCTIONS Thank you very much for purchasing the DENON DN-X300 DJ MIXER. DENON proudly presents this advanced DJ MIXER to audiophiles and music lovers as a further proof of DENON’s non-compromising pursuit of the ultimate in sound quality. The high quality performance and easy operation are certain to provide you with many hours of outstanding listening pleasure. (1) Top panel – TABLE OF CONTENTS – z x c MAIN FEATURES ............................................
ENGLISH !7 Input select switch • Switches between the PHONO/LINE and LINE inputs. • When the lever of switch is vertical position, the LINE2 or LINE4 input is selected. • When the lever of switch is slope, the PHONO1/LINE1 or PHONO2/lINE3 input is selected. • You can perform 8 direction placement. See page 10. !8 SPLIT CUE button • In the STEREO mode, the stereo sound of MASTER and CUE are fed to both ear cups.
ENGLISH Main balanced power amplifier Balanced microphone Effects processor Effects processor IN OUT R 1/4” TRS mono jack L 1/4” TS jack.
ENGLISH 4 SPECIFICATIONS • Phono Inputs: Input Impedance Level 2 Stereo 50 kΩ/kohms –50 dBV (3 mV) Unbalanced RCA jacks • Line Inputs: Input Impedance Level 2 Stereo 20 kΩ/kohms –14 dBV (200 mV) Unbalanced RCA jacks • Return Inputs: Input Impedance Level Stereo 20 kΩ/kohms –14 dBV (200 mV) Unbalanced 1/4” TS jack • Aux Inputs Input Impedance Level Stereo 20 kΩ/kohms –14 dBV (200 mV) Unbalanced RCA jacks • Mic Inputs: Input Impedance Level Frequency Response S/N 1 Mono 2 kΩ/kohms –54 dBV (2 mV)
ENGLISH 5 FADER START Channel Fader Start If the separately sold DN-S5000, DN-S3000, DN-S1000 and etc. players are connected to LINE1, 2, 3 or 4, they can be started using the source input fader (Ch. Fader) or Crossfader, as long as the 3.5 mm stereo mini cords have been connected. Crossfader Start Turn the CH 1/2 FADER START switches #8. 1 Turn the CROSSFADER START A, B switches #9. 1 Slide the Crossfader @3 all the way in direction opposite the source you want to start.
ENGLISH 6 ROTATING INPUT SELECT SWITCHES About the Cables 1. Disconnect the power. (For RCA in/out jack) 2. Remove knobs from the top panel. RCA pin plug 3. Remove the 6 screws attaching the top panel. Cable 1 Unbalanced 4. Remove the 2 screws attaching the switch unit. 5. Rotate the switch unit to the desired location. 6. Reinstall the 2 screws holding the switch unit. 7. Reinstall the top panel and reattach knobs. NOTE: • Only the knob for CUE SELECT is different.
ESPAÑOL 2 INTRODUCCIÓN 2 NOMBRES Y FUNCIONES DE PARTES Gracias por haber adquirido el reproductor de DENON DN-X300 DJ MIXER. DENON se siente orgulloso de presentar este avanzado DJ MIXER para los aficionados y amantes de la música como una prueba más de la búsqueda sin obligaciones de DENON de lo último en calidad de sonido. El rendimiento de alta calidad y la fácil operación sin duda le proporcionarán muchas horas de deleite con una escucha excepcional. – CONTENDIO – z x c v FUNCIONES PRINCIPALES.....
ESPAÑOL !8 Botón SPLIT CUE • En el modo STEREO, el sonido estéreo de MASTER y CUE se enviará a ambos auriculares. En el modo SPLIT CUE, el circuito del auricular suministrará sonido monoaural CUE al lado izquierdo y sonido monoaural MASTER al derecho. • Cuando el interruptor selector del modo del medidor de nivel está en la posición MASTERen el modo STEREO, el medidor indicará el nivel estéreo en la salida principal izquierda y derecha.
ESPAÑOL Amplificador de potencia balanceado Principal Micrófono balanceados Procesador de efectos Procesador de efectos IN OUT R Terminal mono de 1/4” TRS L Terminal de 1/4” TS R Terminal de 1/4” TS L L Terminal de 1/4” TS R Terminal de 1/4” TS R Terminal de 1/4” TRS DN-X300 Terminal de 1/4” TRS Send (Punta) L Return (Anillo) Terminal de 1/4” TRS AA-26 : Para 120V de CA AA-27 : Para 230V de CA AA-26 o L R R L R L R R L L R L A la toma de red eléctrica 3 3 4 4 1 3
ESPAÑOL 4 ESPECIFICACIONES • Entradas Phono: Impedancia de entrada Nivel 2 entradas estéreo 50 kΩ/kohmios –50 dBV (3 mV) Conexiones RCA no equilibradas • Entradas de línea: Impedancia de entrada Nivel 2 entradas estéreo 20 kΩ/kohmios –14 dBV (200 mV) Conexiones RCA no equilibradas 3 bandas HI : –30 dB hasta +10 dB (a 16 kHz), –38 dB hasta +10 dB (a 20 kHz) MID : –38 dB hasta +10 dB (a 01 kHz) LOW : –38 dB hasta +06 dB (a 060 Hz) • Entradas de retorno: Impedancia de entrada Nivel Entradas estéreo 20
ESPAÑOL 5 FADER START Comienzo de Fader de Canal Si los reproductores DN-S5000, DN-S3000, DN-S1000, etc., que se venden por separado, están conectados a la LÍNEA 1, 2, 3 ó 4, pueden encenderse mediante el atenuador de entrada de fuente (Atenuador de canal) o mediante el Crossfader, siempre y cuando se hayan conectado los minicables estéreo de 3,5 mm.
ESPAÑOL 6 INTERRUPTORES SELECTORES GIRATORIOS DE LAS Acerca de los cables ENTRADAS 1. Desconecte la corriente. (Para entrada RCA dentro/fuera) 2. Retire los botones del panel superior. RCA pin plug Cable 1 3. Retire los 6 tornillos que sujetan el panel superior. No compensada 4. Retire los 2 tornillos que sujetan la unidad del interruptor. (Para SEND/RETURN) 5. Haga girar la unidad del interruptor hasta la posición deseada. No compensada 6.
PROFESSIONAL BUSINESS COMPANY 7-35-1 Sagamiono, Sagamihara-shi, Kanagawa 228-8505, JAPAN