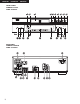
DVD AUDIO-VIDEO/SUPER AUDIO CD PLAYER DVD-3910 OPERATING INSTRUCTIONS POWER OFF POWER ON HDMI/DVI SELECT FORMAT OPEN/ CLOSE NTSC/PAL CD/STEREO /MULTI PROG/DIR CLEAR BACK LIGHT ANGLE SEARCH MODE CALL SUBTITLE AUDIO TOP MENU DISPLAY MENU OPEN/CLOSE PLAY RETURN STOP STOP STILL/PAUSE SKIP PLAY SLOW/SEARCH REPEAT A-B RANDOM MARKER PAGE STILL / PAUSE ON / STANDBY SETUP VIDEO MODE SUPER AUDIO CD SETUP HDMI / DVI SELECT FORMAT DENON LINK PICT ADJ.
IMPORTANT TO SAFETY WARNING: TO PREVENT FIRE OR SHOCK HAZARD, DO NOT EXPOSE THIS APPLIANCE TO RAIN OR MOISTURE. NOTE: This DVD audio-video/Super audio CD player uses the semiconductor laser. To allow you to enjoy music at a stable operation, it is recommended to use this in a room of 5 °C (41 °F) ~ 35 °C (95 °F). CAUTION: USE OF CONTROLS OR ADJUSTMENTS OR REFORMANCE OF PROCEDURES OTHER THAN THOSE SPECIFIED HEREIN MAY RESULT IN HAZARDOUS RADIATION EXPOSURE. CAUTION: 1.
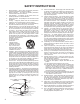
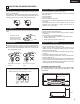
ENGLISH FRANCAIS ESPAÑOL FRONT PANEL PANNEAU AVANT PANEL FRONTAL !3 !4 !5 !6!7 !8 !9 @0 @1 @2 OPEN/CLOSE PLAY STOP STILL / PAUSE ON / STANDBY VIDEO MODE SUPER AUDIO CD SETUP HDMI / DVI SELECT FORMAT DENON LINK PURE DIRECT SELECT AL 24 PLUS PUSH ENTER DVD AUDIO-VIDEO / SUPER AUDIO CD PLAYER qw e t r y u o !1 i !0 !2 REAR PANEL PANNEAU ARRIERE PANEL TRASERO @3 @4 @7 @9 #1 @6 @8 #0 #2 3 @5 #3 #4 #5 #6 #7 DVD-3910
SAFETY INSTRUCTIONS 1. 2. 3. 4. 5. 6. 7. 8. 9. 10. 11. 12. Read Instructions – All the safety and operating instructions should be read before the product is operated. Retain Instructions – The safety and operating instructions should be retained for future reference. Heed Warnings – All warnings on the product and in the operating instructions should be adhered to. Follow Instructions – All operating and use instructions should be followed.
ESPAÑOL FRANCAIS ENGLISH NOTE ON USE / OBSERVATIONS RELATIVES A L’UTILISATION / NOTAS SOBRE EL USO • Avoid high temperatures. Allow for sufficient heat dispersion when installed on a rack. • Eviter des températures élevées. Tenir compte d’une dispersion de chaleur suffisante lors de l’installation sur une étagère. • Evite altas temperaturas. Permite la suficiente dispersión del calor cuando está instalado en la consola. • Keep the set free from moisture, water, and dust.
ENGLISH — TABLE OF CONTENTS — z Features...................................................................................6, 7 x Discs ............................................................................................8 c Cautions on Handling Discs.........................................................9 v Connections ......................................................................10 ~ 20 b Part Names and Functions ..................................................
ENGLISH 2. Super Audio CD multi-channel playback compatibility In addition to playing DVD audio and video discs, the DVD3910 can play multi-channel Super Audio CDs with a playback frequency range covering 100 kHz and a dynamic range of 120 dB or greater within the audible frequency range, and a maximum of 5.1 channels can be output. 10. Thorough vibration-resistant design (1) Mechanism using a hybrid loader. (2) The pickup mechanism is positioned at the center to reduce the effects of external vibrations.
ENGLISH 2 DISCS • The types of discs listed on the table below can be used on the DVD-3910. The marks are indicated on the disc labels or jackets.
ENGLISH 3 CAUTIONS ON HANDLING DISCS Discs Cautions on Handling Discs Only the discs including the marks shown on page 8 can be played on the DVD-3910. Note, however, that discs with special shapes (heart-shaped discs, hexagonal discs, etc.) cannot be played on the DVD-3910. Do not attempt to play such discs, as they may damage the player. Holding Discs Cautions on Storing Discs Avoid touching the surface of discs when loading and unloading them.
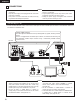
ENGLISH 4 CONNECTIONS NOTES: • Read the manuals of all the components when making • connections. • Keep the power supply cord unplugged until all connections • have been completed. • If the power is on when connections are made, noise may • be generated and damage the speakers. Be sure to connect the left and right channels properly, L (left) to L, R (right) to R. Plug the power supply cord securely into the power outlet. Incomplete connection may result in noise.
ENGLISH (2) Connecting to a TV or Monitor Equipped with Color Component Input Connectors Color component output connectors (PR/CR, PB/CB and Y) The red (PR/CR), blue (PB/CB) and brightness (Y) signals are output independently, achieving more faithful reproduction of the colors. • The color component input connectors may be marked differently on some TVs or monitors (PR, PB and Y/RY, B-Y and Y/CR, CB and Y, etc.). For details, refer to the TV’s operating instructions.
ENGLISH (3) Connecting to a AV amplifier with a built-in decoder When DVDs recorded in Dolby Digital or DTS are played, Dolby Digital or DTS bitstream signals are output from the DVD player’s digital audio output connectors. If a Dolby Digital or DTS decoder is connected, you can achieve sound with the power and sense of presence of a movie theater or concert hall.
ENGLISH 2 Sound output from the DVD-3910’s digital audio output connectors In the case of bitstream output Settings DIGITAL OUT Audio recording format NORMAL PCM Dolby Digital Dolby Digital bitstream 2 channels PCM (48 kHz / 16 bit) DTS DTS bitstream 2 channels PCM (48 kHz / 16 bit) DVD video In the case of PCM output Settings LPCM SELECT OFF ON Audio recording format DVD video DVD audio Copy protection ON Copy protection OFF 48 kHz / 16 ~ 24 bit No output data (*1) 48 kHz / 16 ~ 24 bit PC
ENGLISH (4) Connecting a basic 5.1-channel surround system Analog 5.1-channel audio signals can be output from the DVD-3910. The multichannel audio signals recorded in packed PCM and the multichannel Super audio CDs can be played when an AV amplifier equipped with analog 5.1-channel audio inputs is connected.
ENGLISH (5) Connecting to a Digital Recorder (MD Recorder, DAT Deck, etc.) ✽ Set the “AUDIO SETUP” default setting as shown below. (See pages 38 ~ 41.) • “DIGITAL OUT” → “PCM” “LPCM (44.1kHz/48kHz)” → “ON” Playing DVDs with incorrect settings may result noise that could damage your ears or the speakers.
ENGLISH (7) Denon Link connections High quality digital sound with reduced digital signal transfer loss can be enjoyed by connecting a separately sold Denon Link compatible AV amplifier.
ENGLISH NOTES: • When DENON LINK is set, the down-mixed audio signals are output only from the left and right terminals and front left and front right terminals. If you want to use the analog terminals, set to “DENON LINK” to “OFF”. • When using the DENON LINK connector, the “AUDIO CHANNEL”, “DIGITAL OUTPUT”, “LPCM (44.
ENGLISH NOTES: • Please use the included IEEE 1394 cable. When using a cable other than the included IEEE 1394 cable, please use a 4-pin IEEE 1394 cable with a length of 3.5 m or less for S400 or higher. • The “IEEE 1394 audio signal (A&M protocol)” output from the DVD-3910’s IEEE 1394 connector not out video signals, please connecting to a TV or Monitor with “component video output” or “S-video output” or “Video output”. (See pages 10, 11.).
ENGLISH (9) HDMI connections A simple 1-cable connection (using a commercially available cable) with a device having an HDMI (High-Definition Multimedia Interface) connector allows digital transfer of the digital images of DVD video and other sources, DVD video, and the multi-channel sound of DVD audio. Setting of HDMI DVD-3910 Audio recording format Dolby digital DVD video DTS LPCM or P.PCM (with CPPM) DVD Audio LPCM or P.
ENGLISH (10) DVI connections Connection with equipment that has a DVI (Digital Visual Interface)-D connector permits the transfer of digital images. ✽ When using display equipment that is not supported by the HDCP (content protection function), the image will not be output properly. (See the compatibility table.) ✽ Make an audio connection also because an audio signal will not be output from the DVI-D connector. ✽ Commercially-available DVI cables are available in 24-pin and 29-pin types.
ENGLISH 5 PART NAMES AND FUNCTIONS (1) Front Panel !1 See page 3. q Power ON/STANDBY button w Power indicator e • This indicator lights when the power is on and when the power is in the standby mode. Light green : Power is on Light red : Power is in the standby mode • Press once to turn the power on. • Press again to set to the “OFF” position and turn the power off.
ENGLISH (2) Rear Panel @3 Audio output connectors (5.1ch AUDIO OUT) @4 Audio output connectors (2ch AUDIO OUT) @5 • Connect using an audio cord. Connect a commercially available pin-plug cord. • Connect using the included audio video cord. Multi-channel sound is down-mixed and output. • Connect to AC power supply using the included power supply cord.
ENGLISH 6 REMOTE CONTROL UNIT 2 The DVD-3910 can be controlled from a distance using the included remote control unit (RC-972). (1) Inserting Batteries q Remove the remote control unit’s rear cover. w Place two R6P/AA batteries in the battery compartment in the direction indicated by the marks. e Close the rear cover. Cautions On Batteries • Use R6P/AA batteries in this remote control unit.
ENGLISH (3) Names and Functions of Remote Control Unit Buttons 2 Button not explained here function in the same way as the corresponding buttons on the main unit.
ENGLISH 7 LOADING DISCS 2 Set discs in the disc tray with the labeled (printed) side facing up. Outer disc guide (12 cm disc) Inner disc guide (8 cm disc) Disc tray NOTE: • Do not move the DVD-3910 while a disc is playing. Doing so may scratch the disc. (2) Loading Discs • Pick up the disc carefully so as not to touch the signal surface and hold it with the labeled side facing up. • With the disc tray fully open, set the disc in the disc tray.
ENGLISH 8 CHANGING THE DEFAULT SETTINGS ER W PO 2 Make the initial settings to suit your usage conditions before starting playback. The initial settings are retained until they are next changed, even if the power is turned off.
ENGLISH Setup items for use Bold characters indicate factory defaults. LANGUAGE SETUP DIALOG SUBTITLE DISC MENUS OSD LANGUAGE ENGLISH FRENCH SPANISH GERMAN JAPANESE OTHERS OFF ENGLISH FRENCH SPANISH GERMAN JAPANESE OTHERS The display depends on the connected device.
ENGLISH Bold characters indicate factory defaults.
ENGLISH When “LANGUAGE SETUP” is selected ER W PO F OF AT VI RM I/D O M F HD CT LE SE ER W PO ON AL /P SC NT / EN E OP LOS C DIO AU P R TU PE SE SU CD M RA T OG EC PR /DIR CK BA LL CA LE IT BT SU DIO AU AY PL DIS OP ST 1 RN TU RE SE AU /P ILL ST IP SK AY PL AT PE RE R KE AR M P TU SE H RC EA /S OW SL A-B OM ND RA GE PA OM ZO E UR ST PICDJU A ER M DIM T CT EC ELE DIR S RE PU RY O EM M RC -9 72 1 R EA CL E OD M E GL AN U EN M CH AR SE HT LIG P TO U EN M 1 1, 2, 3 See page 26.
ENGLISH 3 w When “SUBTITLE” is selected: OFF (Factory default) Select this if you do not want to display the subtitles. (For some discs it is not possible to turn off the subtitle display.) ENGLISH Select this when you want to play the DVD with the subtitles in English. FRENCH Select this when you want to play the DVD with the subtitles in French. SPANISH Select this when you want to play the DVD with the subtitles in Spanish. GERMAN Select this when you want to play the DVD with the subtitles in German.
ENGLISH Language code list Code Language Code Language Code Language Code Language 6565 Afar 7079 Faroese 7678 Lingala 8375 Slovak 6566 Abkhazian 7082 French 7679 Laothian 8376 Slovenian 6570 Afrikaans 7089 Frisian 7684 Lithuanian 8377 Samoan 6577 Ameharic 7165 Irish 7686 Latvian, Lettish 8378 Shona 6582 Arabic 7168 Scots Gaelic 7771 Malagasy 8379 Somali 6583 Assamese 7176 Galician 7773 Maori 8381 Albanian 6588 Aymara 7178 Guarani 7775 Macedonish
ENGLISH When “DIGITAL INTERFACE” is selected ER W PO F OF AT VI RM I/D O M F HD CT LE SE ER W PO ON AL /P SC NT / EN E OP LOS C DIO AU P R TU PE SE SU CD M RA T OG EC PR /DIR CK BA E OD M LL CA LE IT BT SU DIO AU AY PL DIS OP ST 1 RN TU RE SE AU /P ILL ST IP SK R KE AR M P TU SE H RC EA /S OW SL A-B OM ND RA AY PL AT PE RE GE PA OM ZO E UR ST PICDJU A ER M DIM T CT EC ELE DIR S RE PU RY O EM M RC -9 72 1 R EA CL E GL AN U EN M CH AR SE HT LIG P TO U EN M 1 1, 2, 3 See page 2
ENGLISH w When “HDMI AUDIO SETUP” is selected: 2CH (Channel) (Factory default) The audio signals are output from the HDMI terminal with a downmixed to 2 channel. MULTI(NORMAL) The multi-channel audio signals are output from the HDMI terminal with a bit-stream. MULTI(LPCM) The multi-channel audio signals are output from the HDMI terminal with a linear PCM. B When “MULTI (LPCM)” is selected, use the • and ª cursor buttons to select the item to be set, then press the ENTER button.
ENGLISH B When “DELAY TIME” is selected: With 5.1-channel surround sound, ideally the distance between the listening position and all the speakers aside from the subwoofer should be the same. The delay time setting can be used to make the sound from the different speakers reach the listening position at the same time. Use the • and ª cursor buttons to select the setting item, then press the ENTER button.
ENGLISH e When “DENON LINK” is selected: OFF (Factory default) Digital audio signals are not output from the DENON LINK terminal. 2nd Set this when the amplifier to be connected by DENON LINK 2nd. If you connect the DENON LINK, set to 2nd. When the DENON LINK 2nd connection, Super audio CD’s signals are not output from the DENON LINK connector. Please use the analog output terminals or the IEEE1394 connection.
ENGLISH When “VIDEO SETUP” is selected ER W PO F OF AT VI RM I/D O M F HD CT LE SE ER W PO ON AL /P SC NT / EN E OP LOS C DIO AU P R TU PE SE SU CD M RA T OG EC PR /DIR CK BA LL CA LE IT BT SU DIO AU AY PL DIS OP ST 1 RN TU RE SE AU /P ILL ST IP SK AY PL AT PE RE R KE AR M P TU SE H RC EA /S OW SL A-B OM ND RA GE PA OM ZO E UR ST PICDJU A ER M DIM T CT EC ELE DIR S RE PU RY O EM M RC -9 72 1 R EA CL E OD M E GL AN U EN M CH AR SE HT LIG P TO U EN M 1 1, 2, 3 See page 26.
ENGLISH w When “TV TYPE” is selected: NTSC Select this when your TV’s video format is NTSC. If NTSC is selected, output format is fixed to NTSC. PAL Select this when your TV’s video format is PAL. If PAL is selected, output format is fixed to PAL. MULTI (Factory default) Select this when your TV is compatible with both the NTSC and PAL formats.
ENGLISH When “AUDIO SETUP” is selected ER W PO F OF AT VI RM I/D O M F HD CT LE SE ER W PO ON AL /P SC NT / EN E OP LOS C DIO AU P R TU PE SE SU CD M RA T OG EC PR /DIR CK BA LL CA LE IT BT SU DIO AU AY PL DIS 1 OP ST RN TU RE SE AU /P ILL ST IP SK AY PL AT PE RE R KE AR M P TU SE H RC EA /S OW SL A-B OM ND RA GE PA OM ZO E UR ST PICDJU A ER M DIM T CT EC ELE DIR S RE PU RY O EM M RC -9 72 1 R EA CL E OD M E GL AN U EN M CH AR SE HT LIG P TO U EN M 1 1, 2, 3 See page 26.
ENGLISH B When “MULTI CHANNEL” is selected, use the • and ª cursor buttons to select the item to be set, then press the ENTER button. SPEAKER CONFIGURATION Use this to select the types of the different speakers. CHANNEL LEVEL Use this to adjust the output level of the different speakers. DELAY TIME Use this to set the distance from the different speakers to the listening position.
ENGLISH B When “DELAY TIME” is selected: With 5.1-channel surround sound, ideally the distance between the listening position and all the speakers aside from the subwoofer should be the same. The delay time setting can be used to make the sound from the different speakers reach the listening position at the same time. Use the • and ª cursor buttons to select the setting item, then press the ENTER button.
ENGLISH w When “DIGITAL OUT” is selected: NORMAL (Factory default) When playing DVDs recorded in Dolby Digital or DTS, bitstream signals are output from the digital audio output terminals. When playing DVDs recorded in linear PCM or packed PCM, linear PCM signals are output. Select “NORMAL” when making digital connections to an AV amplifier with built-in Dolby Digital and DTS decoder.
ENGLISH y When “COMPRESSION” is selected: OFF (Factory default) Select this for the standard range. ON Select this to achieve powerful sound even when the volume is low. This setting is suited for watching DVDs late at night with the volume low.(This setting is only valid for DVDs recorder in Dolby Digital.) Remote control unit Remote control unit AUD I O SE TUP AUD I O CHANNE L D I G I TAL OUTPUT L PCM (4 4 .
ENGLISH When “RATINGS” is selected ER W PO F OF AT VI RM I/D O M F HD CT LE SE ER W PO ON AL /P SC NT / EN E OP LOS C DIO AU P R TU PE SE SU CD M RA T OG EC PR /DIR CK BA LL CA LE IT BT SU DIO AU AY PL DIS OP ST AY PL H RC EA /S OW SL A-B R KE AR M P TU SE GE PA OM ZO E UR ST PICDJU A ER M DIM T CT EC ELE DIR S RE PU RY O EM M -9 72 1, 2, 3 See page 26. Use the • and ª cursor buttons to select the desired setting, then press the ENTER button.
ENGLISH Use the number buttons to input a 4-digit password, then press the ENTER button. ✽ The default password is “0000”. ✽ Do not forget the password. ✽ The setting cannot be changed without inputting the correct password. RAT I NGS RAT I NG L EVE L PASSWORD CURRENT PASSWORD ---- PL E ASE ENT E R PASSWORD Remote control unit SE L EC T : w When “PASSWORD” is selected: Use the 1 cursor button to select the “CHANGE”, then press the ENTER button.
ENGLISH When “OTHER SETUP” is selected ER W PO F OF AT VI RM I/D O M F HD CT LE SE ER W PO ON AL /P SC NT / EN E OP LOS C DIO AU P R TU PE SE SU CD M RA T OG EC PR /DIR CK BA LL CA LE IT BT SU DIO AU AY PL DIS OP ST 1 RN TU RE SE AU /P ILL ST IP SK AY PL AT PE RE R KE AR M P TU SE H RC EA /S OW SL A-B OM ND RA GE PA OM ZO E UR ST PICDJU A ER M DIM T CT EC ELE DIR S RE PU RY O EM M RC -9 72 1 R EA CL E OD M E GL AN U EN M CH AR SE HT LIG P TO U EN M 1 1, 2, 3 See page 26.
ENGLISH w When “CAPTIONS” is selected: OFF (Factory default) Select this when you do not want to display the captions on the screen when playing DVDs containing English captions ON Select this to display the captions on the screen when playing DVDs containing English captions.
ENGLISH NOTES: • An English caption decoder is required to display English captions. • DVDs with caption signals are indicated by the , , mark. English captions cannot be displayed when playing DVDs which do not contain caption signals. • The characters in which the captions are displayed (capital letters, small letters, italics, etc.) depend on the DVD and cannot be selected with the DVD-3910.
ENGLISH 4 Press the PURE DIRECT SELECT button on the main unit. The modes described below will appear on the display. NORMAL : All signals are output normally. MODE 1 : The settings stored for MODE 1 are used. The factory default settings are: “DIGITAL OUT”: “ON” “VIDEO OUT”: “ON” “DISPLAY”: “ON” MODE 2 : The settings stored for MODE 2 are used.
ENGLISH 11 ADJUSTING THE PICTURE QUALITY ER W PO F OF AT VI RM I/D O M F HD CT LE SE ER W PO ON AL /P SC NT / EN E OP LOS C DIO AU P R TU PE SE SU CD M RA T OG EC PR /DIR CK BA LL CA LE IT BT SU DIO AU AY PL DIS OP ST RN TU RE SE AU /P ILL ST IP SK AY PL AT PE RE R KE AR M P TU SE H RC EA /S OW SL A-B OM ND RA GE PA OM ZO E UR ST PICDJU A ER M DIM T CT EC ELE DIR S RE PU RY O EM M RC -9 72 1 R EA CL E OD M E GL AN U EN M CH AR SE HT LIG P TO U EN M 1 Press the PICTURE ADJUST bu
ENGLISH SHARPNESS (MID) (–6 to +6) (Factory default: 0) • This adjusts the sharpness of the image for the intermediate frequencies. SHARPNESS (HIGH) (–6 to +6) (Factory default: 0) 3 • This adjusts the sharpness of the image for the high frequencies. (Only effective for progressive images.) HUE (–6 to +6) (Factory default: 0) • This adjusts the balance between green and red. (Not effective for progressive scan output nor component output.
ENGLISH When Gamma Correction is Selected and Adjusted: Two kinds of displays are prepared for adjustment of Gamma Correction. • When use the Numerical table of Gamma Correction. (Figure 1) :Pressing the cursor button (ª) • When use the Graph of Gamma Correction. (Figure 2) :Pressing the enter button 6 Remote control unit Select the adjust point with cursor buttons (0, 1), set the adjustment brightness level with cursor buttons (•, ª), and press the ENTER button.
ENGLISH P I CT URE MODE STD 7 When the Display Position is Selected and Adjusted: • Press the cursor button (ª), then select the horizontal/vertical direction with the cursor buttons (0, 1), set the adjustment value with the (•, ª) cursor buttons, and press the ENTER button. SETUP LEVEL (0 IRE, 7.5 IRE) • This corrects floating black. H. POSITION (–7 to +7) (Factory default: 0) • A 15-step portion of position adjustment is permitted left and right. V.
ENGLISH 12 USING THE VIDEO SETUP 2 The video output setting of the HDMI and the DVI-D connectors can be changed. 2 The video output setting of the PICTURE MODE, PROGRESSIVE MODE and ADJUST MODE also can be changed.
ENGLISH 3 4 Turning the VIDEO MODE knob. • The modes described below will appear on the display. Select the item you wish to set and press the select knob to define it. PICTURE MODE It is possible to select between five modes at which picture quality settings are stored (M1 to M5) as well as the standard settings set upon shipment from the factory. (See pages 49 to 52.) PROGRE. MODE (PROGRESSIVE MODE) The optimum progressive video output for the images stored on the DVD can be set.
ENGLISH When “TV TYPE” is selected: • The modes described below will appear on the display. Select the item you wish to set and press the VIDEO MODE knob to define it. MULTI Select this when your TV is compatible with both the NTSC and PAL formats. NTSC Select this when your TV’s video format is NTSC. PAL Select this when your TV’s video format is PAL. 4 When “SQUEEZE MODE” is selected: • The modes described below will appear on the display.
ENGLISH 13 PLAYBACK (1) Playback ER W PO F OF 5 ON AL /P SC NT ER W PO 2, 4 AT VI RM I/D O M F HD CT LE SE 3 / EN E OP LOS C DIO AU P R TU PE SE SU CD M RA T OG EC PR /DIR CK BA E OD M LL CA LE IT BT SU STOP R EA CL E GL AN U EN M PLAY CH AR SE HT LIG P TO OPEN/CLOSE DIO AU U EN M AY PL DIS OP ST AY PL 2,4 1 H RC EA /S OW SL GE PA ER M DIM T CT EC ELE DIR S RE PU RY O EM M AL 24 PLUS RN TU RE SE AU /P ILL ST OM ZO E UR ST PICDJU A PURE DIRECT SELECT R KE AR M P TU SE SUPE
ENGLISH PLAY PLAY 5 Press the PLAY button. • For many interactive DVDs and video CDs with playback control, a menu screen appears. In this case use the procedure in step 6 to select the desired item. ✽ Interactive DVDs are DVDs including multiple angles, stories, etc. Main unit Example: For DVDs with menu screens TOP MENU Apple Banana Orange Strawberry Peach Pineapple Remote control unit Example: For video CDs with playback control 1. Opening 2. 1st movement 3.
ENGLISH Number buttons F OF SKIP buttons ER W PO STOP button AT VI RM I/D O M F HD CT LE SE STILL/PAUSE button / EN E OP LOS C DIO AU P R TU PE SE SU CD M RA T OG EC PR /DIR CK BA SKIP buttons R EA CL E OD M E GL AN CH AR SE HT LIG U EN M STOP P TO PLAY ON AL /P SC NT STOP button OPEN/CLOSE ER W PO STILL/PAUSE button LL CA LE IT BT SU DIO AU U EN M AY PL DIS OP ST RN TU RE AY PL GE PA SEARCH MODE button ER M DIM PUSH ENTER H RC EA /S OW SL T CT EC ELE DIR S RE PU RY O EM M
ENGLISH (5) Skipping to the Beginning of Chapters or Tracks Cueing using the SKIP buttons During playback, press one of the SKIP buttons on the main unit or the remote control unit. 8 : Reverse direction (PREVIOUS) 9 : Forward direction (NEXT) • A number of chapters or tracks equal to the number of times the button is pressed is skipped. • When the SKIP 8 button is pressed once, the pickup returns to the beginning of the currently playing chapter or track.
ENGLISH (8) Selecting the still image (only for DVD-audios) During playback, press the PAGE + or PAGE – button on the remote control unit. • For DVD audio discs with still images, the desired image can be selected. • On some discs the image cannot be selected due to the intentions of the discs’ producers. PAGE Remote control unit (9) Playing bonus groups (only for DVD-audios) SEARCH MODE 1 In the stop mode, press the SEARCH MODE button on the remote control unit to set the search mode to “GROUP”.
ENGLISH 14 PLAYING REPEATEDLY 2 Use this function to play your favourite audio or video sections repeatedly.
ENGLISH Playing a Certain Section Repeatedly (A-B Repeat Playback) ER W PO F OF AT VI RM I/D O M F HD CT LE SE ER W PO ON AL /P SC NT / EN E OP LOS C DIO AU P R TU PE SE SU CD M RA T OG EC PR /DIR CK BA E OD M R EA CL E GL AN U EN M CH AR SE HT LIG P TO 1, 2 LL CA LE IT BT SU DIO AU U EN M AY PL DIS OP ST RN TU RE SE AU /P ILL ST IP SK R KE AR M P TU SE H RC EA /S OW SL A-B OM ND RA AY PL AT PE RE GE PA OM ZO E UR ST PICDJU A ER M DIM T CT EC ELE DIR S RE PU RY O EM M RC -9 72
ENGLISH 15 PLAYING TRACKS IN THE DESIRED ORDER 2 Use this function with DVD-AUDIO discs, video CDs, Super audio CDs and music CDs to play the tracks in the desired order. 2 This function does not affect with DVD-VIDEO discs.
ENGLISH 16 PLAYING TRACKS IN THE RANDOM ORDER 2 Use this function with video CDs, Super audio CDs and music CDs to play the tracks in random order. With DVD-AUDIO discs, random playback is performed within the selected group. 2 This function does not affect with DVD-VIDEO discs.
ENGLISH 17 USING THE ON-SCREEN DISPLAY ER W PO 3 F OF AT VI RM I/D O M F HD CT LE SE ER W PO ON AL /P SC NT 2 / EN E OP LOS C DIO AU P R TU PE SE SU CD 2 Use this function to display and change information on the disc (titles, chapters, time, etc.
ENGLISH 18 USING THE MULTIPLE AUDIO, SUBTITLE AND ANGLE FUNCTIONS Switching the Audio Language (Multiple Audio Function) 2 With DVDs containing multiple audio language signals, the audio language can be switched during playback.
ENGLISH Switching the Subtitle Language (Multiple Subtitle Function) 2 With DVDs containing multiple subtitle language signals, the subtitle language can be switched during playback.
ENGLISH Switching the Angle (Multiple Angle Function) 2 With DVDs containing multiple angle signals, the angle can be switched during playback.
ENGLISH 19 USING THE MENUS Using the Top Menu 2 For DVDs containing multiple titles, the desired title can be selected and played from the top menu.
ENGLISH Using the DVD Menu 2 Some DVDs include special menus called DVD menus. For example, DVDs with complex contents may contain guide menus, and DVDs with multiple languages may contain audio and subtitle language menus. These menus are called “DVD menus”. Here we describe the general procedure for using DVD menus.
ENGLISH 20 MARKING SCENES YOU WANT TO SEE AGAIN 2 Set marks at scenes you want to see again so that you can start playback from the marked position whenever you want.
ENGLISH 21 PLAYING IN THE ZOOM MODE ER W PO F OF AT VI RM I/D O M F HD CT LE SE ER W PO ON AL /P SC NT / EN E OP LOS C DIO AU P R TU PE SE SU CD M RA T OG EC PR /DIR CK BA R EA CL E OD M E GL AN U EN M CH AR SE HT LIG P TO 1 LL CA LE IT BT SU DIO AU U EN M AY PL DIS OP ST RN TU RE SE AU /P ILL ST IP SK AY PL AT PE RE R KE AR M P TU SE H RC EA /S OW SL A-B OM ND RA GE PA OM ZO E UR ST PICDJU A ER M DIM T CT EC ELE DIR S RE PU RY O EM M RC -9 72 1 2 In the play or pause mode, p
ENGLISH 22 PLAYING MP3 Listening to MP3 CD, CD-Rs and CD-RWs 2 There are many music distribution sites on the internet from which music files in MP3 format can be downloaded. Music downloaded as instructed on the site and written onto a CD-R/RW disc can be played on the DVD-3910. If music recorded on commercially available music CDs is converted on a computer into MP3 files using an MP3 encoder (conversion software), the data on a 12 cm CD is reduced into about 1/10 the amount of the original data.
ENGLISH Use the • and ª cursor buttons to select the MP3 file you want to play, then press the PLAY button or ENTER button. • Playback starts. ✽ The display can be switched between the single elapsed time and the single remaining time and the track name by pressing the DISPLAY button. ✽ Programmed playback is not possible with MP3 discs. 3 ✽ To change the MP3 file Press the STOP button, then use the • and ª cursor buttons to reselect the desired MP3 file.
ENGLISH 23 PLAYING WMA 2 Listening to WMA (Windows Media Audio) CD-R/CD-RW • This unit can play CD-R/RW music files that have been recorded in the WMA (Windows Media Audio)* audio compression format. Windows Media and the Windows logo are trademarks, or registered trademarks of Microsoft Corporation in the United States and/or other countries. ✽ WMA (Windows Media Audio): New audio coding of Microsoft Corporation.
ENGLISH 24 PLAYING STILL PICTURE FILES (JPEG FORMAT) 2 JPEG files stored on Kodak picture CDs, Fujicolor CDs, CD-Rs and CD-RWs can be played as a slide show and enjoyed on the DVD-3910. Playing still picture 2 Kodak picture CDs and Fujifilm Fujicolor CDs can be played on the DVD-3910. When a CD (recording still picture) is played, the photographs on the CD can be displayed on a TV.
ENGLISH Use the • and ª cursor buttons to select the folder containing the file(s) you want to play, then press the ENTER button. 2 D I SC I NF ORMATI ON ✽ To change the folder Use the cursor button to select “ROOT”, then press the ENTER button. The screen in step 1 reappears. Select the desired folder.
ENGLISH Special play modes for WMA and MP3 and JPEG files Use the 0 and 1 cursor buttons to select the play mode, the • and ª cursor buttons to select the special play mode.
ENGLISH 25 TROUBLESHOOTING Check again before assuming the player is malfunctioning 2 Are all the connections correct ? 2 Are you following the instructions in the manual ? 2 Are the amplifier and speakers operating properly ? If the DVD-3910 does not seem to be functioning properly, check the table below. If this does not solve the problem, the DVD-3910 may be damaged. Turn off the power, unplug the power cord from the power outlet, and contact your store of purchase or nearest Denon sales office.
ENGLISH Symptom An image is not projected with an HDMI/DVI connection. Remote control unit does not operate. 80 Check Page • Check the HDMI/DVI connection.(Check the status of the HDMI/DVI-related indicators.) • Check whether the connected monitor equipment or other equipment supports HDCP. (The DVD-3910 will not output a video signal unless the other equipment supports HDCP.) • Check the settings of “HDMI/DVI SELECT”.
ENGLISH 26 MAIN SPECIFICATIONS Signal system: Applicable discs: S-Video output: Video output: Component output: HDMI output: DVI output: Audio output: Audio output properties: Digital audio output: Power supply: Power consumption: Maximum external dimensions: Mass: 2 Remote control unit: Type: Power supply: NTSC/PAL (1) DVD-Audio/DVD-Video discs 1-layer 12 cm single-sided discs, 2-layer 12 cm single-sided discs, 2-layer 12 cm double-sided discs (1 layer per side) 1-layer 8 cm single-sided discs, 2-la
TOKYO, JAPAN www.denon.