PERSONAL AUDIO SYSTEM S-81 OPERATING INSTRUCTIONS
ENGLISH SAFETY INSTRUCTIONS 2 SAFETY PRECAUTIONS CAUTION RISK OF ELECTRIC SHOCK DO NOT OPEN CAUTION: TO REDUCE THE RISK OF ELECTRIC SHOCK, DO NOT REMOVE COVER (OR BACK). NO USER-SERVICEABLE PARTS INSIDE. REFER SERVICING TO QUALIFIED SERVICE PERSONNEL.
ENGLISH FCC INFORMATION (For US customers) 1. PRODUCT This product complies with Part 15 of the FCC Rules. Operation is subject to the following two conditions: (1) this product may not cause harmful interference, and (2) this product must accept any interference received, including interference that may cause undesired operation. 2. IMPORTANT NOTICE: DO NOT MODIFY THIS PRODUCT This product, when installed as indicated in the instructions contained in this manual, meets FCC requirements.
ENGLISH 2 NOTE ON USE • Do not let foreign objects into the apparatus. • Keep the apparatus free from moisture, water, and dust. • Avoid high temperatures. Allow for sufficient heat dispersion when installed in a rack. • Do not let insecticides, benzene, and thinner come in contact with the apparatus. • Unplug the power cord when not using the apparatus for long periods of time. • Handle the power cord carefully. Hold the plug when unplugging the cord.
ENGLISH Thank you for purchasing this DENON Personal Audio System. Please read the operation instructions thoroughly in order to acquaint yourself with the Personal Audio System and achieve maximum satisfaction from it.
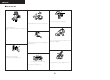
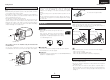
ENGLISH Getting Started Accessories Before using Check that the following parts are attached in addition to the main unit: q Operating instructions .............................................................1 w Warranty (for North America model only )...............................1 e Service station list....................................................................1 r Screw.......................................................................................4 t Remote control unit (RC-1035) ..
ENGLISH Getting Started Getting Started Speaker system (SC-S81) When installing the speakers, pay attention to the points described below. • Note that placing the speaker system on the same stand or shelf as a record player may result in howling. • If a magnet or a piece of furniture or equipment using magnets is placed near the speakers, note that interaction with the S-81 could cause color blotching on the TV. • The speakers can also be placed sideways.
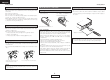
ENGLISH Getting Started Getting Started About the remote control unit Cautions on handling • Do not get fingerprints, oil or dirt on discs. • Take special care not to scratch discs when removing them from their cases. • Do not bend or heat discs. • Do not enlarge the hole at the center. • Do not write on the labeled (printed) surface with ball-point pens, pencils, etc., or stick new labels on discs.
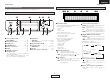
ENGLISH Getting Started Getting Started Part names and functions Display For buttons not explained here, see the page indicated in parentheses ( ). qw e Front panel !3 !2 !1 !0 r Various types of information are displayed here. • General operational indications: • Function • Time • Volume level • Tone adjustment level, etc.
ENGLISH Getting Started Getting Started Rear panel o Remote control unit i u NOTE: • If buttons on the front or rear are pressed strongly, the button on the opposite side will be activated too.
ENGLISH Getting Started [Front] Connections CD player operating buttons iPod controls OPEN/CLOSE button ·········································(13) iPod REMOTE button ·········································(27) Play button (1) ···································(22) iPod PLAY/PAUSE button (iPod 1/3) Play / Pause PAUSE button (3) ····································(22) MENU/SET button Menu call Stop button (2) ····································(22) Cursor buttons (D, H) Cursor movement (up
ENGLISH Connections Connections Speaker connections Changing the speaker cable The speaker cable can be replaced with another one of your choice. A CD receiver (RCD-S81) and speaker systems (SC-S81) can be easily connected to the S-81 using the speaker cables included with the S-81. Here we describe how to connect the “+” side cable to the connector. Connect the “–” side cable in the same way.
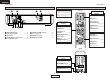
ENGLISH Connections Connections Antenna connections Connecting an outdoor antenna In some cases better reception can be achieved by using an outdoor antenna. Connecting the included antennas FM outdoor antenna Assembling the AM loop antenna FM indoor antenna (Included) AM loop antenna (Included) 300Ω/ohms feeder cable AM loop antenna (Included) 1. Remove. Black White 2. Bend. Black White 75Ω/ohms coaxial cable 3. Insert in holes.
ENGLISH Connections Connections Connecting to an iPod® Connecting the XM terminal • S-81 Personal Audio System is an XM Ready® receiver. You can receive XM® Satellite Radio by connecting to the XM Passport System (sold separately) and subscribing to the XM service. • Plug the XM Passport System into XM terminal on the rear panel. • Position the XM Passport System near a south-facing window to receive the best signal. For details, see “XM Satellite Radio” ( page 16, 17).
ENGLISH Connections Connections When using an exclusive control Dock for iPod When using an Apple iPod Dock ASD-1R (Sold separately) iPod Dock (Sold separately) Included with Control Dock for iPod iPod L L L R R R • Switch iPod CONTROL on the rear panel to “DOCK CONTROL”. • Switch iPod CONTROL on the rear panel to “AUX1 CONTROL”. • When using an Control Dock for iPod, we recommend using the exclusive Control Dock for iPod (ASD1R (sold separately)).
ENGLISH Connections Connections Connecting a CD recorder Connecting the power supply cord CD recorder AC outlet (wall) AUDIO OUT A L L L R R R AC 120 V, 60 Hz Power supply cord C OPTICAL IN 12 ENGLISH
ENGLISH Basic Operation <5> ON/STANDBY 8 9 Turning the power on Adjusting the volume Press ON/STANDBY. Turn or press [VOLUME]. When the power is turned on, the function that was being used when the power was last turned off is selected (selector function). ¢ Turning the power off (to the standby mode): Press ON/STANDBY again. [OPEN/CLOSE] [SDB/TONE] Adjusting the tone ON/STANDBY 8 9 • Information on the power indicator • Power on ..................................
ENGLISH Listening to radio broadcasts <1/3> 8 9 ¢ Manual tuning Selecting a radio station 1 Use or [TUNER] (FUNCTION) to select “TUNER”. The reception frequency changes one step each time one of [6], [7] is pressed. • The reception frequency is displayed. 1 TUNING BAND CD AUX2 8 [6 ] [SEARCH] [ENTER/MEMO] 9 [7 ] 2 Use BAND to select the reception band. FM AUTO [MENU/SET] [D, H, G, F] (iPod) 2 (Front.
ENGLISH Listening to radio broadcasts ¢ To change the name of a preset station: q Call out the station whose name you want to change, then press [ENTER/MEMO] twice. w Perform step 3 under “Giving a name to the currently tuned in broadcast station and presetting it”. Listening to radio broadcasts Listening to preset broadcast stations Example: To listen to the FM station preset at preset number 3. Press [3] (NUMBER).
ENGLISH Listening to radio broadcasts Listening to radio broadcasts RDS search RT (Radio Text) 1 Use BAND to select “FM AUTO”. 2 Press [RDS]. 3 Press [SEARCH]. Press [TIME/DISPLAY] until “Radio Text” scrolls on the display. When the station currently tuned in is offering a radio text message service, the message scrolls on the display. • Automatically begin the RDS search operation. BAND If no RDS station is found, “NO PROGRAM” is displayed.
ENGLISH Listening to radio broadcasts ¢ A Warning Against Reverse Engineering It is prohibited to copy, decompile, disassemble, reverse engineer, or manipulate any technology incorporated in receivers compatible with the XM Satellite Radio system. Furthermore, the AMBE® voice compression software included in this product is protected by intellectual property rights including patent rights, copyrights, and trade secrets of Digital Voice Systems, Inc.
ENGLISH Using the timer function 8 9 Setting the current time ON/STANDBY BAND TUNING The S-81’s clock displays the time in the 12-hour mode. ¢ Types of timers Example: To set the current time to “PM 7:30” The S-81 has three timer functions. q Everyday timer: Use this to play at the set time every day. w Once timer: Use this to play once only at the set time. e Sleep timer: Use this to turn off the power after up to 90 minutes, set in intervals of 10 minutes. 1 Press [CLOCK].
ENGLISH Using the timer function Using the timer function Setting the everyday or once timer Be sure to set the current time first ( page 18). Example 1: Listening to preset number “3” with the everyday timer • To use the timer function to listen to AM or FM broadcasts, be sure to preset the desired station first ( page 14). 1 Press [MENU/SET] once. ¢ If you make a mistake while setting the timer: q Press BAND at any step from 3 ~ 6.
ENGLISH Using the timer function Using the timer function Operation of the everyday and once timers 8 9 Setting the sleep timer After setting the timer at “Setting the everyday or once timer” ( page 19), select the timer(s) you want to operate. 1 Example: Setting so that the power turns off in 80 minutes. 1 Press [SLEEP] during playback. Press [MENU/SET] twice. • The “SLEEP” indicator flashes. • The current settings are displayed. 8 or 9 to select the timer(s) you want to 2 Use operate.
ENGLISH Using other functions Making the room damping setting Using other functions Set this according to the level of the reverberations in the room. Setting the low-power standby mode Making the speaker settings Setting the time display time in the standby mode 1 Use [MENU/SET] to select “TIME DISPLAY”. Use 8 or 9 to select “10SEC” 2 “CONTINUE”, then press [MENU/SET]. Setting the speakers low bass sound Set this according to the speakers being used.
ENGLISH Playing discs 8 <1/3> 9 Starting playback Fast-forwarding (Search) or [CD] (FUNCTION) to select 1 Use “CD”. 1 CD 2 [CD] [ 1] 2 8 [3 ] 9 [6 ] [7 ] AUX2 TUNER 3 AUX1 (/iPod) 1 Can be selected when iPod CONTROL on the rear panel is switched to “iPod (FRONT)” and the included iPod cable is used. 2 Front IN can only be selected when a portable player is connected.
ENGLISH Playing discs Playing discs Playing the desired track (Direct play) Use [NUMBER] (1 ~ 9, 0/10, +10) to select the track. For track numbers 1 to 10, press the corresponding ([1] to [0/10]). For track numbers 11 and on, first press [+10] then press [1] to [0/10]. Example: Track 4 : [4] Example: Track 12 : [+10] [2] Example: Track 20 : [+10] [0/10] ¢ To change a programmed track: In the stop mode, use [PROG/DIR.] to turn off the programmed track number display, then perform steps 1 and 2 over.
ENGLISH Playing MP3 or WMA (Windows Media® Audio) files Before playing MP3 or WMA files There are many music distribution sites on the Internet allowing you to download music files in MP3 or WMA (Windows Media® Audio) format. The music (files) downloaded from such sites can be stored on CD-R or CD-RW discs and played on the S-81. “Windows Media” and “Windows” are registered trademarks or trademarks in the United States and other countries of the Microsoft Corporation of the United States.
ENGLISH Playing MP3 or WMA files Playing MP3 or WMA files Playing MP3 or WMA files <1/3> Listening to MP3 or WMA files in random order (Random folder/disc play) a CD-R or CD-RW disc containing music files 1 Load in MP3 or WMA (Windows Media Audio) format into the disc tray ( page 3). steps 2 1 Perform WMA files”. -1 or 2-2 under “Playing MP3 or in the folder mode: Press [RANDOM]. 2 When Use [FOLDER MODE] to turn on the “FLD” indicator, 2 -1 D H] to select the folder to be played.
ENGLISH Playing MP3 or WMA files Playing MP3 or WMA files Listening to MP3 or WMA files repeatedly (Repeat folder/disc play) <1/3> steps 2 or 2 1 Perform WMA files” ( page 25). -1 -2 under “Playing MP3 or 2 Use [REP 1/ALL] to select the repeat mode. When in the folder mode: 8 9 1 FLD FLD (Repeat off) FLD About the disc mode: 1 ALL (Repeat off) [AUX] • Either the files in the selected folder or all the files on the disc are played repeatedly. [1 ] 8 3 Press <1/3> or [1].
ENGLISH Playing a portable player Other types of playback For instructions on connections, see page 10. Playing an iPod® Using an exclusive control Dock for iPod NOTE: • The iPod may be used to copy or play contents that are not copyrighted or contents for which copying or playback is legally permitted for your private use as an individual. It is illegal to violate copyrights.
ENGLISH Others ¢ Receiver section Others Symptom Troubleshooting If a problem should arise, first check the following. 1. Are all connections proper? 2. Is the set being operated as described in the operating instructions? 3. Are the speakers and other components operating properly? If this unit is not operating properly, check the items listed in the table below. Should the problem persist, there may be a malfunction. Disconnect the power immediately and contact your store of purchase.
ENGLISH Others ¢ CD player section Symptom Cause Measures Page “00 Tr 00 : 00” is shown • The disc is not properly loaded. on the display even though a CD is loaded. • Reload the disc. 3 Disc is not played when • The disc is dirty or scratched. play button is pressed. • Wipe the dirt off the disc or replace the disc. 4 No sound is produced or • Incomplete connections with the • Check the connections. sound is distorted. various devices.
ENGLISH Others Specifications ¢ Receiver section Rated output: Output terminals: Audio input/output terminals: Reception frequency range: Reception sensitivity: FM stereo isolation: 50 W + 50 W (4 Ω/ohms, 1 kHz, T.H.D. 10 %) Speaker: 4 Ω/ohms AUX 1 input terminal, AUX 2 input terminal, DIGITAL OPTICAL OUT terminal, iPod terminal, MONO output terminal Portable input jack, Headphone jack FM: 87.5 MHz ~ 107.9 MHz AM: 520 kHz ~ 1710 kHz FM: 1.
TOKYO, JAPAN www.denon.com Denon Brand Company, D&M Holdings Inc.