Operator's Guide This guide has been prepared expressly for the hands-on user. Always keep it nearby for speedy reference.
Related Publications BHT-100QF/100BF User’s Manual (Contained in the Manual Pack CD) Instructions for using the handy terminal (BHT-100QF/100BF) and optical communication unit (CU-7000). BHT-BASIC Programmer’s Manual (BHT-100 series) (Contained in the BHT-BASIC Compiler CD and Manual Pack CD) Description for developing application programs of the handy terminal in BHT-BASIC.
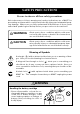
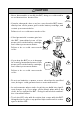
SAFETY PRECAUTIONS Be sure to observe all these safety precautions. Strict observance of these warning and caution indications are a MUST for preventing accidents which could result in bodily injury and substantial property damage. Make sure you fully understand all definitions of these terms and related symbols given below, before you proceed on to the text itself. WARNING Alerts you to those conditions which could cause serious bodily injury or death if the instructions are not followed correctly.
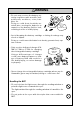
WARNING • Do not carry or store the battery cartridge together with metallic ballpoint pens, necklaces, coins, hairpins, etc. Doing so could short-circuit the terminal pins, causing the batteries to rupture or the battery fluid to leak, resulting in a fire or bodily injury. Do not shortcircuit me! • Avoid dropping the battery cartridge or letting it undergo any shock or impact. Doing so could cause the batteries to break, generate heat, rupture or burn.
CAUTION Handling the rechargeable battery cartridge • Never charge a wet or damp rechargeable battery cartridge. Doing so could cause the batteries to break, generate heat, rupture or burn. Handling the BHT • Never put the BHT in places where there are excessively high temperatures, such as inside closed-up automobiles, or in places exposed to direct sunlight. I'm burning up! Doing so could affect the housing or parts, resulting in a fire.
CAUTION • Never disassemble or modify the BHT; doing so could result in an accident such as break or fire. Never disassemble • If smoke, abnormal odors or noises come from the BHT, immediately turn off the power, pull out the battery cartridge, and contact your nearest dealer. Failure to do so could cause smoke or fire. Keep me away from water! • If foreign material or water gets into the BHT, immediately turn off the power, pull out the battery cartridge, and contact your nearest dealer.
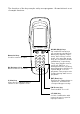
Components and Functions Indicator LED Illuminates in green when the BHT has successfully read a 2D code or bar code. Touch screen LCD (liquid crystal display) Shows the characters and graphic patterns. You may directly touch the screen with the stylus for data entry. Trigger switch (M4 key) Press this switch to start code reading. Trigger switch (M3 key) Press this switch to start code reading.
The functions of the keys may be set by user programs. Shown below is a set of sample functions. Numerical keys Used for numerical input. 7 ABC 8 DEF 9 GHI 4 5 6 PQR JKL 1STU 0 BS (Backspace) key Moves back one character. C (Clear) key Clears the last inputted data or returns to the original screen. 2 VWX ,/ -% $ BS MNO SP C SF 3 YZ + ENT PW M1/M2 (Magic) keys Up- and down-arrow keys are assigned to the M1 and M2 keys by default, respectively.
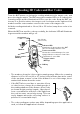
Reading 2D Codes and Bar Codes Turn the BHT power on, bring the reading window to the target code, and press the trigger switch. The BHT turns three marker LEDs on to indicate the scanning range and the illumination LED to scan the code. Keep the BHT stationary in a position where the target code lies between the right and left markers and the center marker comes to the center of the target code. Hold the reading window 4 to 14 cm (1.6 to 5.5 inches) away from codes to be scanned.
• Before reading 2D codes or bar codes, clean those labels if stained. • Avoid using the BHT in direct sunlight. The BHT might fail to read correctly. • To read 2D codes or bar codes on curved surfaces, apply the BHT to the target code so that the code comes to the center of the scanning range indicated by the markers. • Depending upon the code size or cell pitch, the proper scanning distance from 2D codes or bar codes will differ. At the scanning time, the marker LEDs and illumination LED will come on.
Using Radio Link • If there are too many communications errors, first make sure that the BHT points directly at an access point because the 2.4-GHz band requires a more or less straight line path. Note also that the low-power radio waves have trouble passing through human bodies and other obstacles along that path. • This link will not operate properly in the vicinity of microwave ovens, industrial heaters, high-frequency medical equipment, and other sources of radio waves in the 2.4-GHz band.
Using Infrared Link ■ CU-7000 Make sure that the BHT is securely in the CU-7000. Shield the optical interface from direct sunlight, ambient intense lighting (inverter-driven fluorescent lighting, in particular), and other potential sources of infrared radiation. Sources to watch out for include remote control units for television sets and the like.
Setting the Backlight Pressing the right-hand trigger switch (M4 key) while holding down the SF (Shift) key activates or deactivates the backlight function. Backlight OFF (The backlight function is OFF when you turn the BHT power on.) Press the right-hand trigger switch while holding down SF. Right-hand trigger switch (M4) M1 7 ABC 8 DEF 9 GHI 4 JKL 5MNO 6 PQR 1 2 3 YZ + STU 0 VWX ,/ -% $ BS Backlight ON M2 ENT SP C SF PW Press the righthand trigger switch while holding down SF.
Adjusting the LCD Contrast, Beeper Volume and Touch Screen, and Switching the Beeper & Vibrator While holding down the M1 key or right-hand trigger switch (M4), press the PW key. The main adjustment screen appears which differs depending upon the current state as shown below. After adjustment, press the ENT key or no keys for five seconds. The new settings will be registered and the main adjustment screen will disappear.
Adjusting the LCD contrast You can adjust the LCD contrast to eight levels. (1) Use the 1 key (or M1 or M2 key) to select the LCD CONTRAST line. (2) To make the contrast low, press the M1 key with the SF key held down; to make it high, press the M2 key with the SF key held down. Switching the beeper & vibrator You may choose any of three ways—beeping only, vibrating only, or beeping & vibrating as a confirmation of completion of code reading.
Adjusting the touch screen At the first use of the touch screen or if the touch areas seem to deviate from the normal positions when in use, adjust the touch screen according to the steps given below. Use the 5 key (or M1 or M2 key) to select the CALIBRATION line, then press the ENT key. The screen shown at left will appear. Touch the center of the "+" with the stylus. The screen will switch to the following one. To cancel adjustment and return to the main adjustment screen, press the C key.
Touch the center of the 4th "+." The adjustment will complete and the display will return to the main adjustment screen. If the adjustment is not completed normally, the screen shown at left will appear where you may choose retry or not. If you select "1:Yes" and press the ENT key, the display will return to the top screen of the touch screen adjustment sequence. If you select "2:No" and press the ENT, or press the C key, the display will return to the main adjustment screen.
About Status Indicators Battery voltage level Shows the current battery voltage level. Displays when the voltage level is high. Displays when the voltage level is low. Keypad shift state Displays when the keypad is shifted. Alphabet and touch screen input states Status Indicators Displays when the alphabet input function is activated. Displays when the touch screen is ready to accept entry. Synchronization state Displays when the BHT is synchronized with an access point.
Loading the Battery Cartridge Before the first use of the BHT, be sure to load the battery cartridge as shown below. The battery cartridge is not loaded in the BHT when shipped from the factory. (1) Charge the rechargeable battery cartridge. (2) Turn the BHT upside down. (3) As shown below, slide the battery cartridge into the BHT until it clicks into place. (To remove it, press the release button after making sure that the BHT power is off.
BHT Turning-off Notes When the BHT is turned off by pressing the PW key or by the auto power-off feature, it displays the following message and starts preparation for shutdown. When the above message is displayed, do not remove the battery cartridge. If you do so and leave the BHT without a battery cartridge loaded for one hour or more, then the error message “Contact your administrator. Note the error number. (2XXX)” may appear when you reload the battery cartridge and turn the BHT on.
Battery Replacement Notes ■ When is battery replacement needed? If the "Charge the battery!" appears on the LCD, replace the rechargeable battery cartridge with a fully charged one, respectively. If you leave the BHT without replacing the rechargeable battery cartridge, the integrated calendar clock or data will no longer be backed up so that the calendar clock will stop or the message "Contact your administrator. Note the error number. (XXXX)" will appear on the LCD.
(2) When turning the BHT on after storage with no battery cartridge loaded: Even after removal of the battery cartridge, the calendar clock will work with the backup power source for a while. If the calendar clock backup has stopped, loading the battery cartridge and turning the BHT on will display the following message, prompting you to set the current date and time. For details about the setting procedure, contact your system administrator.
Error Messages If some error occurs when the power is turned on or during program execution, one of the following error messages will appear on the LCD. System Program error ■ Problem A System Program error has occurred. If this error occurs, the BHT beeps five times (for 0.1 second per beep) and then turns itself off. ■ Solution Contact your system administrator.
Low battery indication—Level 2 ■ Problem When the power is turned on or off or during execution of programs (System Mode or applications), the battery output level has lowered to the extent the BHT can no longer operate. If lower battery is detected, the BHT beeps five times (for 0.1 second per beep) and then turns itself off. Depending upon the battery level, the beeper may not sound five times. ■ Solution Replace or recharge the battery cartridge.
Abnormally turned off last ■ Problem After turned off abnormally*, the BHT had been left with no battery cartridge loaded or with a discharged battery cartridge loaded, so unsaved data was lost. (*"Normally turned off" refers to turned-off with the PW key or by the auto power-off feature.) ■ Solution Contact your system administrator. System Program malfunction ■ Problem During execution of System Program, the System Program has attempted to write onto the write-protected area of the memory.
Execution program not selected ■ Problem No user program has been selected as an execution program to be run when the power is turned on. If this error occurs, the BHT beeps five times (for 0.1 second per beep) and then turns itself off. ■ Solution Contact your system administrator.
System down error ■ Problem Reload the An error has occurred during execution of System Program. battery to restart! type:xxxxxxxx ercd:xxxxxxxx inf1:xxxxxxxx inf2:XXXXXXXX SR :XXXXXXXX PC :XXXXXXXX PR :XXXXXXXX R15 :XXXXXXXX If this error occurs, the BHT beeps five times (for 0.1 second per beep). ■ Solution Unload and reload the battery cartridge, then turn on the power. If this error occurs frequently, contact your system administrator.
Proper Care of the BHT Clean the housing and the rechargeable battery cartridge terminals with a dry, soft cloth. Before cleaning, be sure to turn the BHT off. • Never use benzene, alcohol, or other organic solvents. The housing may be marred or the paint may come off. • Never rub or strike the liquid crystal display (LCD) with anything hard. The LCD surface will be easily scratched or broken. • When cleaning the keypad, do not scrub the surface too hard, and do not pull on the keys.
Handling Notes • An early upload of gathered data is recommended, since the data stored in the RAM might be affected by the so-called "soft error" or other environmental phenomena. In some cases, the "Contact your administrator." will appear on the LCD. • Do not use the BHT near a personal or amateur radio device. Doing so may cause the BHT to malfunction. • Avoid storing the rechargeable battery cartridge in a hot place. The battery capacity may be decreased.
US and Canada Regulations This Device complies with Part 15 of the FCC Rules, Canadian ICES-003 and RSS-210 Rules. Operation is subject to the following two conditions: (1) this device may not cause harmful interference, and (2) this device must accept any interference received, including interference that may cause undesired operation. NOTE: This equipment has been tested and found to comply with the limits for a Class A digital device, pursuant to Part 15 of the FCC Rules.
LABELING:
Declaration of Conformity (For European Union) The Radio frequency module that comlies with the Directive 99/5/EC(R&TTE) is mounted on this device (BHT-100QF).
■ DENSO WAVE INCORPORATED does not assume any product liability arising out of, or in connection with, the application or use of any product, circuit, or application described herein.
DENSO WAVE INCORPORATED 4-2-12, Toranomon, Minato-ku, Tokyo, Japan 105-0001 http://www.denso-wave.