Supported Equipment Manual For the BHT-7500 and BHT-103 Devices Manufactured by Denso Corporation
Copyright © 1996 - 2006 by Connect, Inc. All rights reserved. This document may not be reproduced in full or in part, in any form, without prior written permission of Connect Inc., 1701 Quincy Avenue, Suites 5 & 6, Naperville, IL 60540. Connect, Inc. makes no representation or warranties with respect to the contents of this document and specifically disclaims any implied warranties of merchantability or fitness for any particular purpose. Further, Connect, Inc.
Table of Contents Chapter 1 • Introduction............................................................................................. 1-1 Release Notes…………….............................................................................................1-1 Descriptions………………. ...........................................................................................1-1 Pictures…………………….. ..........................................................................................1-2 Setup Requirements…….. .....
This page is intentionally blank.
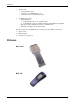
Chapter 1 • Introduction Release Notes 1. For the 7500W terminal only (not 7500S) in all emulations, setting the backlight timer in the Timers tab to 5 seconds or more enables the backlight when the trigger (or any key) is pressed. 2. For the 7500W terminal only (not 7500S) in all emulations, choosing Spec 1 in the Mode scrolling list box under the Alarm tab enables vibrate only, and choosing Spec 2 enables vibrate and beep. 3. Denso 103: firmware version E001 is required.
Introduction • Scanner Unit o laser scanning system o scanning area of 520mm max. (*2) o resolution of 0.127 mm (PCS=0.9 min.) • Communications Unit o Optical interface Communication speed of 115.2 kbps max. Communication system of Infrared interface (IrDA-SIR 1.0 compliant) o Wireless interface utilizing SS wireless communications o RS-232C 115.2 kbps max. Cable interface The new features for the BHT-103 (above and beyond the 7500) are as follows.
Setup Requirements Setup Requirements Installation of PowerNet Twin Client requires, at a minimum, the following: • A Pentium-class processor • 32 MB of RAM • 10 MB of free hard disk space available • Microsoft Windows 95, 98, ME, XP, or NT/2000 operating system Accessories The following accessories are available: • • • • IrDA communication unit CU-7001 Battery charger C-700 4-slot battery charger C-750 Software (see http://www.denso-id.com/Default.
Introduction This page is intentionally blank.
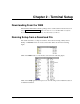
Chapter 2 • Terminal Setup Downloading From the WEB The PowerNet Twin Client software package can be downloaded from the Connect web site at http://www.connectrf.com. Click on Partner Services and then click on Software Downloads. Select the file named PowerNet Twin Client for Denso. Running Setup from a Download File The downloaded file is a compressed archive. After extraction using a utility such as WinZip or PKWARE, folders are created on the hard disk as shown in the following figure.
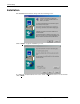
Terminal Setup Installation The InstallShield wizard runs and presents the following screen. Click on Next to begin the installation process. To change the default Destination Location, click on Browse and select a location. Then click on Next.
Installation The default folder is PowerNet. This default may be changed either by selecting an existing program group or by typing in a new name at the prompt. Then click on Next. When the installation is complete, reboot the system to initialize the Twin Client software. a. To reboot the system immediately, click on Finish. b. To reboot later, click on the option to restart the computer later, and then click on Finish.
Terminal Setup Running the Manager The PowerNet Twin Client Manager is the utility that manages the terminal software and configurations. Select Start, Programs, PowerNet, and Twin Client Manager. The PowerNet Twin Client Manager screen appears as shown in the following figure. This is the administrator's main screen, and all functions are accessed from its menu bar, tool bar, and tabs. Menu Bar The menu bar provides access to the functions used to configure the terminals and manage their software.
Quick Start Quick Start Quick Start describes how to prepare the Twin Client Manager and the Denso terminal for a Telnet session with the host. Following an initial serial download, the terminal software and configuration is managed automatically, over the wireless network. Note: Denso terminals are normally delivered with Denso files pre-installed.
Terminal Setup To set these addresses from the Settings menu, click on Servers and then click on Add. Enter the name of each server, its IP Address and IP port (normally 23 for Telnet servers), and emulation type. Then click on OK. Repeat this step for each Telnet server the terminals are required to access. If an error is made in the name, IP Address, IP Port number, or Terminal emulation type, click on the line that is in error and then click on the Edit button to make the corrections.
Quick Start Saving the Configuration Click File and Save As. Enter a name for this configuration. For the purposes of this example, the name is vt220.
Terminal Setup Configuring the Terminal for Download The terminal is prepared for the addition of Twin Client by booting to command mode, selecting the program loader on the terminal, erasing the EEPROM, and setting the serial port parameters as described in this section. This simple procedure is described in the following sections, and requires only a few minutes to complete. Connecting the Cradle The terminal download requires a serial connection between the terminal and the PC through a cradle.
Quick Start SYSTEM MENU 1: EXECUTE PROGRAM 2: DOWNLOAD 3: UPLOAD 4: SET SYSTEM 5: TEST 6: VERSION 7: FTP 8: RF In the Set System menu, there are eight settings. Cursor down or press 5: Communication and press Enter. SET SYSTEM 1: EXECUTE PROGRAM 2: DISPLAY 3: DATE /TIME 4: BARCODE 5: COMMUNCATION 6: KEY 7: RESUME 8: TCP/IP There are four settings in the Set Communication menu. Select number 1: Optical and press Enter.
Terminal Setup SET PROTOCOLS 1: SERIAL NO. ON OFF 2: H. PARITY ON OFF 3: LINKUP TIME NONE 30 60 90 120 4: FIELD SPACE IGNORE DATA When the settings have been recorded, press Enter. This will return the terminal to the Set Communication Menu. SET COMMUNICATION 1: PARAMETER 2: PROTCOL Press 1 and Enter, and cursor to 115,200. SET PARAMETER 1: TRANSMIT SPEED 2400 9600 19200 38400 57600 115200 Press to return to the Set Communication Menu. Press 2: and Enter.
Quick Start Press to return to the Set Communication Menu. Press 3: and Enter. SET COMMUNICATION 1: OPTICAL 2: CONNECTOR 3: COM PORT 4: PROTOCOL TYPE Press 1 for Basic Mode settings, and cursor to Optical. Press 2 for System Mode settings, and cursor to Optical. SET COM DEFAULT PORT 1: BASIC OPTICAL CONNECTOR 2. SYSTEM MODE OPTICAL CONNECTOR Press to return to the Set Communication Menu. Press 4: and Enter.
Terminal Setup At the prompt, choose Yes or No to download configurations. Choosing Yes is needed to run in Telnet mode. The following screen will appear. Choose OK at the prompt above. Note: The screen above is for the BHT 103 terminal. The BHT 7500W terminal requires special firmware version SB06, and the BHT 7500S terminal requires latest firmware version 1.12. At the same time, press 1 and Enter to start file download. YMODEM MENU 1: DOWNLOAD 2: UPLOAD The terminal will start downloading files.
Quick Start The terminal then associates with an access point, contacts the Twin Client Manager, and then downloads the program, configuration, and IP address of the terminal. During the download, progress messages are displayed on the terminal. Pauses in activity of up to 10 seconds will be observed as the terminal writes to EEPROM. The download requires approximately 2 minutes to complete.
Terminal Setup • Problem You attempted to select “ONE FILE” or “ALL FILES” for uploading in the UPLOAD menu, but no data files had been stored in the memory. EXECUTE PROGRAM NO FILES EXIST • Solution Press the C key to return to the SYSTEM MENU screen. • Problem You have deleted all of the files stored in the memory in the DELETE FILE menu. EXECUTE PROGRAM NO FILES EXIST • Solution Press the C key to return to the SYSTEM MENU screen.
Quick Start DOWNLOAD TOO MANY FILES RETRY? 1. YES 2. NO • Solution Check file you attempted to download and download file in appropriate menu (DOWNLOAD, SYSTEM PARAMETER transfer, or SYSTEM MESSAGE transfer menu). • Problem The current download will exceed the maximum of 80 files in the memory. DOWNLOAD TOO MANY FILES RETRY? 1. YES 2.
Terminal Setup DOWNLOAD FILE xxxxxxxx.xxx PROGRAM FILE ERROR RETRY? 1. YES 2. NO • Solution Check whether the program file you attempted to download is available to your BHT model. If it is not available, download the appropriate program. A successful wireless connection/download is indicated by the Twin Client main menu. Twin Client © 1991-2006, Connect, Inc. Keypress to Continue Note: The date of 2006 is updated on the terminal at the time of a new release.
Quick Start Starting a Telnet Session Press <1> Execute Program. SYSTEM MENU 1: EXECUTE PROGRAM 2: DOWNLOAD 3: UPLOAD 4: SET SYSTEM 5: TEST 6: VERSION 7: FTP 8: RF Select an emulation and press Enter. After a Telnet session has been successfully established, the terminal will remain in session for a maximum of 30 minutes at a time until it has been authorized. Once authorized, there is no software restriction on the session time.
Terminal Setup Standard Setup The default terminal setup is sufficient for most installations. However, to meet sitespecific requirements, it may be necessary to customize terminal operation. The standard setup options simplify this process and can be modified by the following methods: • Using the Twin Client Manager. • Using the Twin Client terminal menu system. Standard Setup describes how to use the Twin Client Manager and the terminal menu systems to set up the terminal.
Standard Setup Quadrant Mode This scrolling list option defines the rules by which the terminal display is positioned in the larger host display. As defined by Twin Client, quadrants are fixed position "windows" in the host display, and the terminal display is located on whatever quadrant contains the current cursor position. Off disables quadrant processing and Twin Client simply centers the current host input field in the terminal display. On enables quadrant processing.
Terminal Setup Printer Type This scrolling list selects the attached printer type. The default value is none, indicating that no printer is attached. 5250 Settings Select the 5250 emulation setup by clicking on the Settings menu and then the Emulation menu, as shown below. Then click on the 5250 selection, as shown below. Click on OK after the selection is made, and return to the main Twin Client Manager menu.
Standard Setup Quadrant Mode This scrolling list option defines the rules by which the terminal display is positioned in the larger host display. As defined by Twin Client, quadrants are fixed position "windows" in the host display, and the terminal display is located on whatever quadrant contains the current cursor position. Off disables quadrant processing and Twin Client simply centers the current host input field in the terminal display. On enables quadrant processing.
Terminal Setup Printer Type This scrolling list selects the attached printer type. The default value is none, indicating that no printer is attached. 3270 Settings Select the 3270 emulation setup by clicking on the Settings menu and then the Emulation menu, as shown below. Then click on the 3270 selection, as shown below. Click on OK after the selection is made, and return to the main Twin Client Manager menu.
Standard Setup Quadrant Mode This scrolling list option defines the rules by which the terminal display is positioned in the larger host display. As defined by Twin Client, quadrants are fixed position "windows" in the host display, and the terminal display is located on whatever quadrant contains the current cursor position. Off disables quadrant processing and Twin Client simply centers the current host input field in the terminal display. On enables quadrant processing.
Terminal Setup Printer Type This scrolling list selects the attached printer type. The default value is none, indicating that no printer is attached. Terminal Setup Using Twin Client Menus The Twin Client terminal software provides an internal menu system for configuring certain parameters on the terminal and for switching between Server and Telnet modes of operation. To access this menu system for the BHT 7500 terminal, press uppercase C at the startup screen as shown in the following figure.
Standard Setup Host 0 IP 206.183.67.155 Port 23__ Save Quit Press F3 to save the configurations. Edit License Key The client software can be authorized automatically, as described in the next section, Authorizing PowerNet. This menu option permits authorization of each terminal manually. Select this option to obtain the terminal's Identification Code, which is used to obtain the Authorization code from the Connect web site, as described in the next section.
Terminal Setup SYSTEM MENU 1: EXECUTE PROGRAM 2: DOWNLOAD 3: UPLOAD 4: SET SYSTEM 5: TEST 6: VERSION 7: FTP 8: RF From the Edit Options Menu, • Press 1 for Edit Mobile Unit IP (edit IP for terminal). • Press 2 for Edit Server/Host list (Edit IP and port for server). • Press 3 for Edit License Key (to authorize the terminal. • Press 4 for Switch Client Modes (switches to server/thin mode). • Press 5 for Run Client Emulator (runs emulation program). • Press 6 for Exit to OS (shuts down the terminal).
Standard Setup Go to http://www.connectrf.com. Click on Partner Services. Click on the Generate Authorization icon at the top of the page. Follow the directions on the web site. Authorized Terminals The number of terminals authorized, the number of terminals in use, and the number of terminals remaining is provided in the Authorized Terminals box on the lower left side of the screen. Click on the Details button to number the options in the screen below in the order of your priority.
Terminal Setup Click on an option and move it using the Up and Down buttons. Click on OK when finished. The Manual Authorization button is an alternate method of obtaining an authorization code for a terminal. This method does not utilize Airloader, as does the other method. Click on this button, manually enter your MAC address in the screen that appears, and click on OK. This enables you to generate individual authorization codes.
Standard Setup A pop-up box appears with the machine ID and a space for the additional license’s authorization code. Enter the additional license’s authorization code and click on OK. Use the machine ID in the pop-up box instead of the original machine ID to get your authorization code. If adding users, click on the Add Licenses button before generating the authorization code to get the most current machine ID.
Terminal Setup Transfer Authorization The Transfer Authorization feature is used when moving a site license from one PC to another. After Twin Client Manager is installed on a new PC, you will need the system/machine ID for it. This ID appears in the first box of the authorization screen. From Twin Client Manager, select Authorization from under the Tools menu. Click on the Transfer Authorization button on the old PC. You will be asked for the new system ID. Enter this new system ID.
Standard Setup Listing Click on the Listing button to view authorization codes issued. The authorization codes used along with their corresponding serial numbers will appear. Click on OK when finished. Click on the Close button when finished.
Terminal Setup Codabar Start/Stop Number The Codabar start and stop characters (ABCD and ? for a wildcard) are selected by selecting the “General” symbology entry from the Decoder Control window under Object Editors in Twin Client. You can select any number from 0 to 24. Each number represents a combination of codabar start and stop characters as shown in the table below. For example, the start/stop number “7” selects a start character of “B” and stop character of “C”.
Chapter 3 • Keypad Configuration The following describes the default key assignments applied to Denso terminals used in Twin Client advanced mode. The figures and tables identify the key assignments by terminal model and emulation. Adhesive decals that reflect the configurations described in this chapter are available for Denso terminals in each of the emulations (3270, 5250, and VT). The keypad figures in this section are designed to be of use without color.
Keypad Configuration BHT-7500 Keypad Figures The keypad figures begin on the following page.
BHT-7500 VT Keyboard De bsp PW C A B ▲ ▼ ◄ ► b vw↓ F F19 c vw← G F20 H attn a vw↑ E F9 e f g ; + J j h < 9 [ ` * & ] f q | p { R : S , ENT .
Keypad Configuration 3270 Keyboard bsp PW C A B ▲ ▼ M1 fm f g ; O eof 9 [ j bklite M / ` * m ^ $ F22 P & ] f pa3 q pa2 p { R : S , ENT .
BHT-7500 5250 Keyboard bsp PW C ALP A B ▲ ▼ SF D tab C bktab ► ◄ attn a vw↑ bot b vw↓ dchar c vw← roll↓ d vw→ E F F19 H G F20 M1 F9 fexit e I fm f F10 g ; + end F21 O * N % fld- m ^ print n ] $ F22 P & F23 Q f 2 3 q | fld+ p { R : S , ENT .
Keypad Configuration Keypad Table The keypad table in this section is organized by terminal model, keypad configuration, and emulation. The key values represent the default keypad assignments applied to the terminal in Twin Client advanced mode. Table entries that are blank indicate the key is not assigned, or not relevant to the emulation.
BHT-7500 KEY F13 F14 F15 F16 F17 F18 F19 F20 P21 P22 P23 P24 0 1 2 3 4 5 6 7 8 9 A B C D E F G H I J K L M N O P Q R S T U V W X Y Z a b c d e f g h i j k l m n 5250 <1> <2> <3> <4> <0> <1> <2> <3> <4> <5> <6> <7> <8> <9>
Keypad Configuration KEY o p q r s t u v w x y z ! exclamation @ at sign f pound $ dollar % percent ^ carat & ampersand ( left parenthesis ) right parenthesis dash + plus ' apostrophe * asterisk , comma .
BHT-103 BHT-103 Keypad Figures M1 M2 7 8 9 4 5 6 1 2 3 0 .
Keypad Configuration 1 2 3 4 5 6 7 8 9 0 Q W E R T Y U I O P A S D F G H J K L ; Z X C V B N M . BS CLR FNC1 / ENT EXIT uppercase character screen Note: This is accessed by pressing M1. # $ % & @ - = + q w e r t y u i o p a s d f g h j k l : z x c v b n m , BS CLR FNC2 ENT * EXIT lowercase character screen Note: This is accessed by pressing M1 + FNC1. Note: To close these touchscreens, press M1 again.
BHT-103 F9 F10 F11 F12 F13 F14 F15 F16 F9-F16 screen Note: This is accessed by pressing M2 + SF. Note: To close this touchscreen, press M2 again.
Keypad Configuration F1 F2 F3 F4 TAB FEX ATN RES 5250 emulation Note: This is accessed by pressing M2. Note: The 8 keys above are specific to 5250 emulation. F1 F2 F3 F4 TAB STA HLP BKT 3270 emulation Note: This is accessed by pressing M2. F1 F2 F3 F4 TAB ESC DEL BKT VT emulation Note: This is accessed by pressing M2. Note: To close these touchscreens, press M2 again.
BHT-103 Keypad Table Key a b c d e f g h i j k l m n o p q r s t u v w x y z A B C E D F G H I J K L M N O P Q R S T U V W X Y Z ATN BKT (Backtab) BS Clear DEL DUP END ENT FEX VT
Keypad Configuration FM Help Home INS RES (Reset) Roll up Roll down STA (Stat) Sysreq TAB View down View left View up View right F1 F2 F3 F4 F9 F10 F11 F12 F13 F14 F15 F16 F17 F18 F19 F20 1 2 3 4 5 6 7 8 9 0 # (pound) $ (dollar) % (percent) & (ampersand) @ (at sign) - (hyphen) = (equal) + (plus) : (colon) ; (semicolon) , (comma) * (asterisk) ; (semicolon) .
BHT-103 Down Left Up Right <5> <7> <8> <9> Supported Equipment Manual • March, 2006 <5> <7> <8> <9> <5> <7> <8> <9> 3-15
Keypad Configuration This page is intentionally blank.
Chapter 4 • Error Message Resolution Guide Twin Client Error Message Resolution Guide Message Reason ENTRY TOO LONG; Trying to key beyond the field size. Ensure that you are entering input into the correct field. --- ALPHABETIC ONLY; Trying to key a character that is not Ensure that you are entering input into the alphabetic. correct field. --- MINUS NOT VALID; Trying to key a Minus sign. Ensure that you are entering input into the correct field.
Error Message Resolution Guide Message Reason Solution Reference Tech Note INVALID KEY; The key pressed is not valid. Ensure that you are entering input into the correct field. --- MUST CLEAR FIELD; Trying to enter data in a field that must be cleared first. Ensure that you are entering input into the correct field. --- SCAN NOT ALLOWED; Trying to scan into a key only field. Ensure that you are entering input into the correct field. --- KEY NOT ALLOWED; Trying to key into a scan only field.
Error Message Resolution Guide Message Reason Solution Reference Tech Note Connection ERROR.\nREBOOT MOBILE UNIT; Could not Connect. Verify that your Network settings are correct and you are in the correct mode using the correct Port. T1113, T1114, T1161, T1171, T1187 and T1194 Disconnect ERROR.\nREBOOT MOBILE UNIT; Could not Disconnect. Verify that your Network settings are correct and you are in the correct mode using the correct Port.
Error Message Resolution Guide Message Reason Solution Reference Tech Note TIMEOUT\n\nSending Data; Mobile Unit out of the coverage area. Most likely a range, access point, radio, host or network issue. Troubleshoot the customer’s environment. T1113, T1114, T1161, T1171, T1187 and T1194 TIMEOUT\n\nReceiving Data; Mobile Unit out of the coverage area. Most likely a range, access point, radio, host or network issue. Troubleshoot the customer’s environment.
Error Message Resolution Guide Message Reason Solution Error receiving host\nlist from Server; Bad Protocol detected. --- Unexpected Server\ndata received; Bad Protocol detected. Error starting\nhost application; Connected to the server but can not connect to the distant end. Usually a result of bad cabling, power or faulty transceiver. Also, will receive this if the Mobile Unit is in the wrong mode for server operation. Usually a result of bad cabling, power or faulty transceiver.
Error Message Resolution Guide Message Reason Solution Reference Tech Note User Count Exceeded.\n Session Ended; Possible authorization issue. Verify that you have the correct number of licenses for the number of Mobile Units you are using. --- Primary Unavailable\nTrying Alternate; First Host IP address not available Verify the host address. trying the remaining addresses in the Host list. --- APMAC.
Error Message Resolution Guide Message Reason Solution Reference Tech Note Font Loading Error; Could not load the font. Ensure that the font is available to load. --- Printer Not Ready\nPress R to Retry\nC to Cancel Print; Can not print. Check cable, battery, communication settings and paper in the printer. --- Mobile Unit in\nDemonstration Mode\nfor TwinClient; Running in demo mode. Purchase a license from Connect.
Error Message Resolution Guide Message Reason Solution TwinClient Telnet; Prompt. Advisory message. --- TwinClient Server; Prompt. Advisory message. --- TwinClient TN3270; Prompt. Advisory message. --- TwinClient TN5250; Prompt. Advisory message. --- TwinClient TNVT; Prompt. Advisory message. --- (c) 1991-2006 Connect; Prompt. Advisory message. --- Edit Menu Options; Menu Title. Advisory message. --- Edit Mobile Unit IP; Menu Option. Advisory message.
Error Message Resolution Guide Message Reason Solution Edit License Key; Menu Option. Advisory message. --- Run Site Survey; Menu Option. Advisory message. --- Switch Client Modes; Menu Option. Advisory message. --- Run TwinClient; Menu Option. Advisory message. --- Exit to OS; Menu Option. Advisory message. --- Printer may not be\nplugged in or\nturned on!; Can not print. Check cable, battery, communication settings and paper in the printer.
Error Message Resolution Guide Message Reason Solution REMOVE FROM CRADLE; Remove Mobile Unit from the cradle. Advisory message. --- ACQUIRING CRADLE BUS; Attempting to access the cradle through the serial port you have configured. Advisory message. --- Printer Out\nOf Range; Printer out of the coverage area. Most likely a range, access point or radio issue. Troubleshoot the customer’s environment. Connection Refused\nBy Host; You connected to the target host but the host disconnected you.
Error Message Resolution Guide Message Reason Solution Printer Not\nResponding; Can not print. Check cable, battery, communication settings and paper in the printer. Printer Out\nOf Range; Printer out of the coverage area. Most likely a range, access point or radio issue. Troubleshoot the customer’s environment. Print Complete; Prompt. Advisory message. --- Reprint (Y/N)?; Yes or No prompt for a reprint. Advisory message. --- WARNING; Prompt. Advisory message.
Error Message Resolution Guide Message Solution Reference Tech Note Domain Name Server\nQuery Sending Mobile Unit out of the coverage Error; area. Most likely a range, access point, radio, host or network issue. Troubleshoot the customer’s environment. T1113, T1114, T1161, T1171, T1187 and T1194 Domain Name Server\nQuery Receive Mobile Unit out of the coverage Error; area. Most likely a range, access point, radio, host or network issue. Troubleshoot the customer’s environment.
Error Message Resolution Guide Message Reason Solution Reference Tech Note Host/App/Network\nclosed the session; Customer’s environment disconnected the Mobile Unit session. Most likely a range, access point, radio, host or network issue. Troubleshoot the customer’s environment. T1113, T1114, T1161, T1171, T1187 and T1194 Disconnecting...; Prompt. Advisory message. --- Scan Barcode; Bar code scanning test. Advisory message. --- Enter Setup\nPassword; Prompt. Advisory message.
Error Message Resolution Guide Message Reason Solution Continue (Y/N)?; Prompt. Advisory message. --- HOST ENTRY; Prompt. Advisory message. --- VT(100/220) Setup; Prompt. Advisory message. --- Mobile Unit Info; Prompt. Advisory message. --- Emulation Setup; Prompt. Advisory message. --- ANSI Setup; Prompt. Advisory message. --- Miscellaneous Setup; Prompt. Advisory message. --- Mobile Unit Type; Prompt. Advisory message. --- Control Codes; Prompt. Advisory message.
Error Message Resolution Guide Message Reason Solution Sends; Prompt. Advisory message. --- New Line Mode; Prompt. Advisory message. --- Insert Mode; Prompt. Advisory message. --- Autowrap Mode; Prompt. Advisory message. --- Cursor; Prompt. Advisory message. --- EMULATION SETUP; Prompt. Advisory message. --- Mobile Unit Type; Prompt. Advisory message. --- Local Echo; Prompt. Advisory message. --- Map Underline; Prompt. Advisory message. --- Break Key; Prompt.
Error Message Resolution Guide Message Reason Solution ANSI Setup; Prompt. Advisory message. --- Control Codes; Prompt. Advisory message. --- Backspace Key; Prompt. Advisory message. --- MISCELLANEOUS SETUP; Prompt. Advisory message. --- Test Options; Prompt. Advisory message. --- Login Options; Prompt. Advisory message. --- TEST OPTIONS; Prompt. Advisory message. --- Printer Test; Prompt. Advisory message. --- Scan Code Test; Prompt. Advisory message.
Error Message Resolution Guide Message Reason Solution User Name; Prompt. Advisory message. --- User Password; Prompt. Advisory message. --- ON; Prompt. Advisory message. --- OFF; Prompt. Advisory message. --- Map; Prompt. Advisory message. --- Don't Map; Prompt. Advisory message. --- Enable Break; Prompt. Advisory message. --- Disable Break; Prompt. Advisory message. --- 7 bit; Prompt. Advisory message. --- 8 bit; Prompt. Advisory message.
Error Message Resolution Guide Message Reason Solution Send Delete; Prompt. Advisory message. --- Send Backspace; Prompt. Advisory message. --- Mobile Unit Setup; Prompt. Advisory message. --- Scanner Options; Prompt. Advisory message. --- Program Options; Prompt. Advisory message. --- Special Options; Prompt. Advisory message. --- Beeper Options; Prompt. Advisory message. --- Exit to DOS; Prompt. Advisory message. --- Backlight Time; Prompt. Advisory message.
Error Message Resolution Guide Message Reason Solution Reset Options; Prompt. Advisory message. --- Font Size; Prompt. Advisory message. --- Portable Printer; Prompt. Advisory message. --- Reprint Option; Prompt. Advisory message. --- Data IDs; Prompt. Advisory message. --- Internal/External; Prompt. Advisory message. --- Modify Beeps; Prompt. Advisory message. --- Message Beeps; Prompt. Advisory message. --- Scan Identifier; Prompt. Advisory message.
Error Message Resolution Guide Message Reason Solution Long Scans; Prompt. Advisory message. --- Scan Send; Prompt. Advisory message. --- Yes; Prompt. Advisory message. --- No; Prompt. Advisory message. --- Normal; Prompt. Advisory message. --- Double Wide; Prompt. Advisory message. --- Double High; Prompt. Advisory message. --- Double High and Wide; Prompt. Advisory message. --- Errors Only; Prompt. Advisory message. --- Automatic; Prompt. Advisory message.
Error Message Resolution Guide Message Reason Solution All Messages; Prompt. Advisory message. --- Reject; Prompt. Advisory message. --- Truncate; Prompt. Advisory message. --- Split; Prompt. Advisory message. --- Do Not Send; Prompt. Advisory message. --- Always Send; Prompt. Advisory message. --- Last Field Only; Prompt. Advisory message. --- Internal; Prompt. Advisory message. --- External; Prompt. Advisory message. --- none; Prompt. Advisory message.
Error Message Resolution Guide Message Reason Solution monarch; Prompt. Advisory message. --- pddumb; Prompt. Advisory message. --- comtec; Prompt. Advisory message. --- rascal; Prompt. Advisory message. --- codewriter; Prompt. Advisory message. --- comtec(S); Prompt. Advisory message. --- User Name; Prompt. Advisory message. --- Password; Prompt. Advisory message. --- Prompt. Advisory message. --- Prompt. Advisory message.
Error Message Resolution Guide Message Reason Solution ms; Prompt. Advisory message. --- Select Scanner; Prompt. Advisory message. --- Setup Scanner; Prompt. Advisory message. --- Scan Test; Prompt. Advisory message. --- Scan Operation; Prompt. Advisory message. --- Laser; Prompt. Advisory message. --- Contact/Pulse; Prompt. Advisory message. --- Contact/No Pulse; Prompt. Advisory message. --- Auto/Pulse; Prompt. Advisory message. --- Auto/No Pulse; Prompt.
Error Message Resolution Guide Message Reason Solution Wand Simulation; Prompt. Advisory message. --- VT100; Prompt. Advisory message. --- VT220; Prompt. Advisory message. --- SETUP; Prompt. Advisory message. --- Mobile Unit IP/Radio; Prompt. Advisory message. --- Host List; Prompt. Advisory message. --- NULL; Prompt. Advisory message.