
User`s manual


7
Barcode Handy Terminal
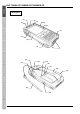
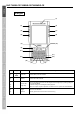
No. Name Function and Description
(1) Beeper
(2) Charge LED Illuminates in red during charging and turns green upon completion of charging.
(3) Indicator LED Indicates the barcode read status.
Illuminates in blue when the BHT has successfully read a barcode.
(4) Receiver
(5) IEEE802.11a/b/g
built-in antenna
Used to communicate with the wireless LAN access point.
Do not cover this antenna section with metal-evaporated tape or by hand. Doing so may result in
communication failures.
(6) Touch screen display (LCD) Displays the characters and graphic patterns. Data may be entered by tapping the screen
directly with the stylus.
(7) Microphone
(8) Interface port USB and RS-232C interface port
(9) Bluetooth
®
built-in antenna Used to communicate with other Bluetooth
®
-enabled devices.
Do not cover this antenna section with metal-evaporated tape or by hand. Doing so may result in
communication failures.
(10) GPRS built-in antenna Used to communicate with a wireless base station.
Do not cover this antenna section with metal-evaporated tape or by hand. Doing so may result in
communication failures.
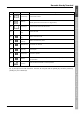
(11)
(12)
Trigger switch Press when scanning a barcode.
(This key performs the same function as the Scan key.)
(13) Headset jack plug Connect the optional headset jack.
(14) Reading window Align the reading window with barcodes to perform barcode scanning.
(15) Reset button Refer to “Chapter 2 BHT Preparation” – “2.6 Resetting and Full Resetting”
(16)
(17)
Battery lock switch Lock after inserting the battery cartridge.
(18) Hand belt Always put your hand through this belt to prevent the BHT from being dropped accidentally.
(19) Rechargeable battery
cartridge
Main BHT power source
* The battery cartridge shown in the drawing is the BT-700LL.
(20) IrDA interface port Used to exchange data/programs with the host computer or another BHT.
(21) Stylus Used to operate the touch screen.