
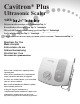
User Manual


9
7.2 Electrical Requirements
• Incoming power to the system must be 100 volts AC to
240 volts AC, single phase 50/60 Hz capable of
supplying 1.0 amps.
• The system power should be supplied through the AC
power cord provided with your system.
• WARNING: To avoid risk of electric shock, this equipment
must only be connected to a supply mains with protective
earth.
7.3 Unpacking the System
Carefully unpack your Cavitron Plus Ultrasonic Scaler and
verify that all components and accessories are included:
1. Cavitron
®
Plus
™
System with Handpiece Cable
Assembly with swivel
2. Water Line Assembly (Blue) with Filter and Quick
Disconnect
3. Additional Water Line Filter
4. Detachable AC Power Cord
5. Cavitron
®
Tap-On
TM
Wireless Foot Pedal
6. “AA” Batteries (4-Pack)
7. Auxiliary Cable for Tap-On
TM
Foot Pedal
8. Steri-Mate
®
Grip (not shown)
9. Steri-Mate
®
Detachable Sterilizable Handpiece
10. Cavitron
®
Ultrasonic Inserts (quantity optional)
11. Efficiency Indicator for Cavitron Inserts
12. Literature Packet
7.4 System Installation
• The Cavitron Plus System is designed to rest on a level
surface. Be sure unit is stable and resting on four feet.
• The Cavitron Plus System should not be positioned such
that access to the power input and AC power cord are
limited.
• Placing unit in direct sunlight may discolor plastic
housing.
• The system has been equipped with a Tap-On
TM
Wireless
Foot Pedal which was factory synchronized to operate
with the system’s base unit. If your office has more than
one Cavitron system with Tap-On
TM
Technology, it is
recommended that you mark the Tap-On
TM
Foot Pedal
and base unit for easy reference as to which Tap-On
TM
Foot Pedal operates with which base unit. Should
resynchronization be necessary, follow the instructions in
section 7.10.
7.5 Power Cord Connection
• Verify the Main Power ON/OFF switch, located at the
center front underside of the System, is set to the OFF
(O) position before proceeding.
• Insert the AC power cord into the power input on the
back of the System.
• Insert the pronged plug into an AC wall outlet.
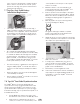
7.6 Water Supply Line Connection
• Grasp the Water Supply Line (blue hose) by the end
opposite the quick-disconnect and insert it into the water
inlet connector until fully seated.
• Connect the quick-disconnect to the dental office water
supply or a Cavitron DualSelect Dispensing System.
• Inspect all connections to make certain there are no
leaks.
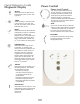
• To remove the water line from the Cavitron Plus System,
turn off the dental office water supply. Disconnect the
water supply line from the dental office water supply. If
a quick-disconnect connector is attached to the end of
the hose, relieve the water pressure by pressing the tip
Press ring to release
water supply tube.