CUT-301 1 2 8 7 9 16 5 4 12 10 11 15 23 INSTRUCTION MANUAL 17 Car Stereo MP3/WMA/MPEG4 Player with PLL FM Stereo Radio Radio Data System 18 14 6 19 20 13 3 Inch TFT-LCD Display 3 (4-6) 3 (1-3) USB / SD/MMC Card Input Front AUX IN Touch Screen Control Flip Down/Detachable Front Panel RESET AUX IN 24
INSTALLATION PRECAUTIONS • Choose the mounting location carefully so that the unit will not interfere with the normal driving functions of the driver. • Avoid installing the unit where it would be subject to high temperatures, such as from direct sunlight or hot air from the heater, or where it would be subject to dust, dirt or excessive vibration. • Use only the supplied mounting hardware for a safe and secure installation. • Be sure to remove the front panel before installing the unit.
TO SUPPORT THE UNIT 3 Dashboard 4 4 6 5 8 10 7 5 1 9 WIRE CONNECTION IN / OUT CONNECTOR 4 1. UNIT 2. RELEASE CASE 3. DASH BOARD 4. HEX NUT 5. LOCK WASHER 6. PLAIN WASHER 7. CAR BODY 8. REAR SUPPORT STRAP 9. TAPPING SCREW 10.
DRIVING WITH VIDEO DISPLAY By following the installation below, video will always be shown on LCD screen no matter the car is in motion or not. Steps: Connect the GRAY wire to the WHITE wire. INSTALLING REAR CAMERA FOR PARKING/REVERSE MOTION You can install an separate camera at the car rear end so when doing parking or reverse motion, the unit will automatically switch the video to the rear camera to guide the driver.
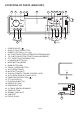
Locations of Parts (Main unit) 1 2 8 7 9 16 5 4 12 10 11 15 1 17 18 14 3 (1-3) 1 2 8 7 6 9 1. POWER ON/OFF ( ) 2. SELECT FUNCTION BUTTON 3. PRESET STATIONS (1,2,3,4,5,6) 4. ‘AF’ function BUTTON (ALTERNATIVE FREQUENCIES) 5. ‘TA’ function BUTTON (TRAFFIC ANNOUNCEMENT) 6. ‘PTY’ function (PROGRAM TYPE) 7. LOUDNESS BUTTON (LD) 8. MODE BUTTON (MODE) 22 9. BAND BUTTON (BD) 21 10. TRACK / SEARCH BUTTON 11. AUTO SEEK TUNING 17 18 12. MUTE BUTTON (MUT) 13.
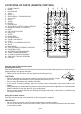
Locations of Parts (Remote Control) 1. 2. 3. 4. 5. 6. 7. 8. 9. 10. 11. 12. 13. 14. 15. 16. 17. 18. 19. 20. 21. 22. 23. 24. 25. 26. 27. 28. 29. 30. 31.
OPERATIONS Turning the unit ON/OFF ( ) Press “ ” button to turn on unit. To turn off, press the button again. MAIN MENU This is the root of the screen hierarchy and you can simply access all features by tapping on the touch screen buttons. Start Radio USB port SD/MMC mode External device connected AUX IN Utility Settings Selecting a source (MODE) Press MODE repeatedly to switch between TUNER, AUX IN, USB or SD/MMC mode.
Storing and Recalling Frequencies If you press any of the NUMBER (1-6) you can easily store up to six broadcast frequencies for later recall with the touch of a button. 1. Choose a desired BAND. 2. When you find a frequency that you want to store in memory, press a NUMBER(1-6) and hold until the preset number shows and lit in the display. 3. The selected radio station frequency has been stored in memory. The next time you press the same NUMBER (1-6) the radio station frequency is recalled from memory.
3. Let the movie play on until you have reached the end of the section you wish to watch on continuous loop. Once you have reached this point, press and hold A-B button again. “Rep-A-B” will appear on your screen. Playback will now start from Point A –B. 4. To stop A-B repeat playback, press and hold A-B button once more until “A-B CANCEL” disappears and normal playback resumes. Displaying information (OSD) During playback, you can see all information and current play settings.
Slow motion playback This feature lets you slow down playback. 1. Press Slow on the remote control during playback. 2. Pressing it repeatedly will switch you to the following steps: 1/2 - 1/ 3 - 1/4 - 1/5 - 1/6 - 1/7. Note: • To resume normal playback, press PLAY/PAUSE ( ). • There is no sound during slow motion playback. Zooming in During Playback You can zoom in into the picture during playback. 1. Press ZOOM on the remote control during playback. 2.
SETTING THE MPEG4 PLAYER You can flexibly customize the unit to suit your preference. You can set the language and other video and audio settings so when playback starts it will always use your preferred settings. Important: 1. Play any video file before you can access the setup. 2. Press Setup on the remote control. 3. Use ( / ) to return / enter category.
TECHNICAL SPECIFICATIONS MP3/WMA PLAYER SECTION Signal to Noise Ratio > 60 dB Channel Separation > 50 dB (1kHz) Frequency Response 20 Hz - 20 kHz TUNER (FM) Frequency Range 87.5-108 MHz Channel Step 50 kHz Sensitivity 2.8 µV Stereo Separation 30 dB Signal to Noise Ratio 50 dB LINE-OUT Output Impedance 750 mV 10k Ohm AUX-IN Frequency Response 20 Hz - 20 kHz Sensitivity 775 mV Impedance 20k Ohm GENERAL Power Supply Speaker Impedance Output power Fuse 12V DC (10.8-15.