DAB+/FM radio Operating Instructions BEFORE OPERATING THIS PRODUCT, READ, UNDERSTAND, AND FOLLOW THESE INSTRUCTIONS. Be sure to save this booklet for future reference.
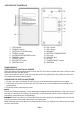
LOCATION OF CONTROLS 1. 2. 3. 4. 5. 6. 7. 8. 9. LCD Display TUNING+ button ENTER AUTO-SCAN button TUNING- button ALARM/SLEEP/SNOOZE button STANDBY button PRESET button INFO/SETUP button DAB/FM button 10. VOL- button 11. VOL+ button 12. SPEAKER 13. BATTERY COMPARTMENT 14. AUX Jack 15. PHONES Jack 16. DC jack 17. POWER ON/OFF button 18.
BATTERY SAFETY PRECAUTIONS: Keep batteries away from children and pets. Insert the batteries observing the proper polarity (+/-). Failure to properly align the battery polarity can cause personal injury and/or property damage. Remove old or discharged batteries from the product.
HEADPHONES A 3.5mm socket for connecting a set of stereo headphones (not included). The internal loudspeaker is muted when headphones are plugged-in. Avoid listening to headphones at high volume levels to prevent possible hearing damage. AUX LINE INPUT This 3.5mm socket is for connecting an external source such as an MP3 player, CD player, TV or computer. DC 6V JACK Connect to the UNIT power adapter STANDBY MODE 1. Press POWER (ON/OFF) switch to ÓONÓ position. 2.
2. Press and hold one of the Preset button until the display shows 'Preset empty x' (where x is the preset number) 3. Press ENTER/AUTO-SCAN to store the current chosen frequency. TO RECALL A PRESET STATION 1. Short press the PRESET button The unit can store 10 stations for DAB & 10 stations for FM To use memory 5~8 function, you shall press the shift key first and then press the PRESET1~4 buttons together.
SELECTING A STATION Short press the TUNING+ or TUNING- BUTTON to change the tuning frequency. note: Wait for a second or so between each press for the UNIT to re-tune. PRESETS 1. Select an FM or DAB station as described above. 2. Press and hold one of the Preset keys (for approximately 3s) until the display shows ÓPreset 1 storedÓ TO RECALL A STATION PRESET 1. Short press the required preset key.
SETTING AND USING THE ALARM With the UNIT switched on, or in Standby, short press the ALARM/SLEEP button. The display shows the current ALARM settings for 5s and then returns to the previous screen. From Standby, the display will light, show the settings for about 5s and then go back to Standby. SET THE ALARM 1 1. With the UNIT switched ON, or in Standby mode, press the ALARM/SLEEP button until the Alarm1 menu is shown. 2.
ALARM CANCEL To cancel the Alarm when it has activated. Press ALARM/SLEEP button or STANDBY button to stop the alarm sound. The Alarm will automatically switch off after 59 munites unless cancelled or switched off manually. SNOOZE The UNIT includes a 9 minute snooze timer. When the Alarm activates, short press the FUNCTION/SNOOZE button to start the Snooze timer. The UNIT goes to Standby.
ALL RIGHTS RESERVED, COPYRIGHT DENVER ELECTRONICS A/S www.denver-electronics.com Electric and electronic equipment contains materials, components and substances that can be hazardous to your health and the environment, if the waste material (discarded electric and electronic equipment) is not handled correctly. Electric and electronic equipment is marked with the crossed out trash can symbol, seen below.