DENVER IPC-1020 DENVER IPC-1030
Packing list: IP camera Mounting bracket Antenna Power Adaptor CD Lan cable Installation guide Screws Note: Some models don’t have a separate antenna. Installation procedure: Start Connect the Hardware Install the Search Tool Login the IP Camera into LAN Wireless Settings Login the IP Camera to the PC Client Access by Mobile End Note: For the first time use of IP Camera, please refer to the procedures above.
IP Camera Internet PC Router LAN WAN Internet Cable Power IP Camera Internet PC Router WAN LAN Internet Cable Power Connect the camera with Internet cable to the router, and with the power cord to the mains, like shown above.
1. Installation of the Search Tool Next Insert the CD and install the following software: 1. Open the File “IPC-1020 & IPC-1030”, click on “OCX setup” — “Next” — “Install” — “Finish” 2. Open the File “Search Tool”, Copy the “Search Tool” to the desktop and launch it. 2. Login of the IP Camera into the LAN After the hardware is connected properly, launch the search tool, and the IP address of the camera will be displayed automatically.
Double click the camera IP address in the search tool. In your default browser a login screen like shown below will be displayed: Note: Both the username and password are “admin” (Please change the account user name and password for safety later) After entering the correct user name and password, the Login screen will be displayed. (It supports 6 visitors watching online at the same time) Note: If the OCX already has been installed you may login directly. If not, please install OCX. A.
Live video 3. Wireless Setting 1. Click on the button to access the “Wireless” settings. 2. Search for the WIFI signals and choose the desired SSID. 3. Make sure that all parameters are the same like in your router, enter the WIFI network key. 4. After 30 seconds click on “Check”, the notification will show you if the WIFI settings are successful. 5. If correct, just go back to select “Apply”, then disconnect the network cable.
Checking the WIFI signal connection status 4.
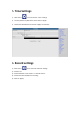
5. Time Settings 1) Click on the icon to access the “Time” settings 2) You may choose any NTP server, then click on “Apply” 3) Choose the desired time and click on “Apply” to activate it 6.
7. Alarm Settings & Motion Detection Configuration 1) First, you should activate the “Motion detection” and choose the display detail that should be monitored (you may alter the detail as require).
8. Alarm Notification Setting & Email, FTP 1) The email configuration screen serves for the preparation of the alarm function. If the motion detect activates your camera is triggered, you will receive an email containing photos. Precondition for this is the correct setup and test of the service. Here the configuration of a Gmail account as example: Note: This function only works if the IP camera is connected to the network. If you use Gmail, you must configure the port as 465, SSL as TLS.
3) Alarm Service Settings, please enter the same settings like in the screenshot below:
9. System log & Net work setting 1). System log is intended for administrators to monitor the system operation 2). In "Network Settings" you may modify the IP address, gateway and port number 10. DDNS Setting 1) Click on the icon and the choose “DDNS Service Settings”. 2) 3) Choose the DDNS server, enter the DDNS user name and password. Submit, refresh, then the DDNS status will be shown as “DDNS Succeed”.
11. PTZ Setting & User Setting 1).
2). Modification of the user password 12.
13. Maintainance & ONVIF 1) With this option you may restore the camera to its factory settings, and perform firmware updates.
14. Auto Snap & Video Mark 1) Capturing of images to the SD card and FTP upload 2) Select the screen detail (you can change the size of the window), click on "Apply" and an obscured screen area appears 15.
FAQ: A. Password forgotten 1) Reset your camera. While the power is on, you must press the RESET button for 10 seconds. The button you will find at the bottom of the camera. With outdoor cameras the white reset button is located at the end of the power cord. 2) After the reset is completed, the camera is reset to the factory settings, then the username and the password is "admin". B.
Enable: Initialize and script ActiveX controls not marked as safe Enable: Run ActiveX controls and plug-ins a. b.
ALL RIGHTS RESERVED, COPYRIGHT DENVER ELECTRONICS A/S Electric and electronic equipment and included batteries contains materials, components and substances that can be hazardous to your health and the environment, if the waste material (discarded electric and electronic equipment and batteries) is not handled correctly. Electric and electronic equipment and batteries is marked with the crossed out trash can symbol, seen below.