9" hd ready led tv with atv and mpeg-4 dvb-t/c + c.i & built-in dvd player + usb input + pvr function Model NO.
Contents Caution Safety Information 1 2 Accessories Technical Specification 3 3 Product Introduction Front View 4 4 Connections 5 Remote Control 6-7 Basic Operation 8 OSD Menu 1. Channel menu 2. Picture menu 3. Sound menu 4. Time menu 5. Lock menu 6.
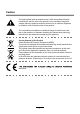
Caution The lightning flash with arrowhead symbol, within an equilateral triangle is intended to alert the user to the presence of un-insulated “dangerous voltage” within the products enclosure that may be of sufficient magnitude to constitute a risk of electric shock to the persons. The exclamation point within an equilateral triangle is intend to alert the user to the presence of important operating and maintenance (servicing) instructions in the literature accompanying the appliance.
Safety Information To ensure reliable and safe operation of this equipment, please read carefully all the instructions in this user guide, especially the safety information below. Electrical safety the label on the mains adaptor. The power cable/disconnect device shall remain easy to operate/disconnect. items of equipment. - Do not place any connecting wires where they may be stepped on or tripped over. - Do not place heavy items on the leads, which may damage them.
Accessories POWER REC LIST MUTE EPG REP CH/LIST SUBTITLE PVR/DVD REC DISPLAY INPUT OK MENU EXIT 1 2 3 5 6 7 9 0 4 8 Mains cable FAV PICTURE NICAM/A2 VOL SOUND SLEEP CH SCREEN User’s Manual TV/TXT CANCEL REVEAL SETUP D-MENU TITLE PRO HOLD SIZE SUBPAGE INDEX LAN A-B GOTO SLOW Remote control Mains adaptor AV Cable Converter cable for YPbPr * Note: The configuration of the components may look different from the following illustration Technical Specification - T
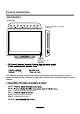
Product Introduction Introduction Front View Insert a 12cm disc according to the silk. Remote Control window POWER to turn on and off. off Null The effective receiving range for the signal is 5-8 metres from the front of the remote control window, and 300 to the left or right side and 200 above or below the remote control window. INPUT: MENU: CH+/-: Press to scan through channels. VOL+/-: PLAY: Play/Pause DVD program. EJECT: Load/eject DVD disc.
Connections Common Interface: CI slot. RF: Connect antenna or cable 75 Ohm coaxial to receive TV signal. R/L in: Connect them to the audio output terminal of DVD.(shared with YPbPr) YPbPr VIDEO: Connect it to video output terminal of DVD. YPbPr: Connect them to the YPbPr video output terminal of DVD with the converter cable. Headphone: Connect it to your headphone or other audio equipment. Coax: Digital coaxial output. USB SCART POWER: Connect to the mains adaptor.
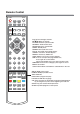
Remote Control The remote control is using Infra-Red(IR). Point it towards the front of the LED TV. The remote control may not work correctly if it is operated out of range or out of angle. POWER REC LIST MUTE EPG REP CH/LIST SUBTITLE PVR/DVD REC DISPLAY INPUT OK POWER: Turn the TV on/standby. MUTE: Press to mute the sound, press again or press VOL+ to unmute. REC LIST: Record List. CH/LIST: Display the programs list. SUBTITLE: Turn on/off the subtitle display in DTV mode and DVD mode.
Remote Control POWER REC LIST MUTE EPG REP CH/LIST SUBTITLE PVR/DVD REC DISPLAY INPUT OK MENU EXIT 1 2 3 4 5 6 7 8 9 0 FAV PICTURE NICAM/A2 VOL SOUND CH / : Scan through channels. VOL / : Adjust the volume. PICTURE: Select the picture mode. NICAM/A2: TV Nicam/A2 select. SOUND: Select the sound mode. SLEEP: Standby timer. SCREEN: Turn on/off the screen. TV/TXT: Turn off/on the Teletext display. CANCEL: Cancel the Teletext display. REVEAL: Reveal any hidden text.
Basic Operation Power on/off 1. Connect to the power supply with a power cord and an adaptor. 2. -To turn on the TV Press POWER button on the TV or remote control. -To turn off theTV Press POWER button on the TV or remote control. Input Source select Press INPUT button on the TV set or remote control to display input button source menu, and use CH+/- button on the TV set or on remote control to select the input source, press OK button on the remote control to enter.
OSD Menu 1. CHANNEL menu Auto Tuning ATV Manual Tuning DTV Manual Tuning Programme Edit Signal Information CI Information Software Update (OAD) On Description Auto Tuning Press OK button to enter the hint menu, and Press / button to select the Tune Type, then press button, and use / / / button to select the Country for the TV, then press OK button to start auto tuning. ATV Manual Tuning Press OK button to enter the ATV Manual Tuning menu. Current CH: Select a Channel for storing the programme.
OSD Menu Programme Edit Press OK button to enter the Programme Edit menu as the following picture. Delete: Select a channel and press RED button, then press RED button again, the program will be deleted. Rename: Select an ATV channel and press the GREEN button to change the name of the channel by buttons. Move: Select an ATV channel, and press YELLOW button, then you can use and buttons to change the position of the program, press YELLOW again to confirm the change.
OSD Menu 2. PICTURE menu Description Picture Mode: Choose from Standard, Dynamic,Personal and Mild. Note: Contrast, Brightness, Colour and sharpness are only available and can be adjusted in the User mode option in the Picture Mode Settings. Contrast: Controls the difference between the brightest and darkest regions of the picture. Brightness: Controls the overall brightness of the picture. Colour: Control the colour.
OSD Menu 3. SOUND menu Audio Delay Description Sound Mode: Allows you to select among: Standard, Music, Movie, Sports and Personal. Treble(Can be adjusted when the sound mode is Personal) : Controls the relative intensity of higher pitched sounds. Bass (Can be adjusted when the sound mode is set to Personal): Controls the relative intensity of lower pitched sounds. Balance: To adjust the balance of the left and right sound track, or turn off the volume of the left and right sound track.
OSD Menu 4. TIME menu Description Clock: Display the time. Time Zone: Allows you to select the time zone. Sleep Timer: Allows you to setup the sleep timer among: 10min, 20min, 30min, 60min, 90min, 120min,180min, 240min and off. Auto Standby : According to the latest ERP regulation, this unit will switch off itself automatically if no change in status within the last 4 hours of operation. OSD Timer: Allows you to select the time for OSD menu displays on the screen.
OSD Menu 5. LOCK menu Description Lock System: Turn on/off the Lock System function. Note: You should enter the code to operate the menu.(original code is 0000) Set Password: Set pin code. If the Pin code has been changed you must enter the present code. New : Enter the new password. Confirm: Enter the new password.
OSD Menu Block Program: You must enter the password to view channels that have been locked. Use and buttons to select the channel and press the GREEN button on the remote control to lock the channel. Parental Guidance: Allows you to select the Parental Guidance mode. Key Lock: Lock the buttons on the TV set when you turn on the function.
OSD Menu L L Source Lock: DVD V A V MAX V Y r 16
OSD Menu 6. SETUP menu SETUP Description OSD Language: Allows you to select menu language. TT Language: Allows you to select teletext language. Audio Language: Allows you to select audio language. Subtitle Language: Allows you to select subtitle language. Hearing Impaired: Turn on/off the Hearing Impaired function. PVR File System: Setup the PVR file system. Note: The options PVR File System are described on pages. Aspect Ratio: Choose from 4:3, 16:9, Zoom1, Zoom2.
Multimedia Operation Basic Operation 1). Press the INPUT button on the remote control to display the input source menu, select Media source by the / buttons, and press OK button to enter the Multimedia menu seen below. Hints and informations of USB device HDMI1 HDMI2 MAINS MENU: PHOTO MUSIC MOVIE TEXT 2). Select the file type (mains menu) you want to view, and insert USB device, you will find the name of the device display on the screen. 3).
Multimedia Operation 1. Photo Photo viewing Press / button to select the option on the menu, and press OK button to change. Pause: Play/pause the photo view. Prev./Next: View the previous/next photo. Stop: Stop the photo view. Repeat: Select the repeat mode from Repeat All, Repeat 1, Repeat None. Music: Play/Pause the music. Playlist: Display the playlist on the screen and play the file by / button and OK button, you can press button to select “CANCEL”, and press OK button to cancel the list displaying.
Multimedia Operation 3. Movie Play the movie Press / button to select the option on the menu, and press OK button to change. Pause: Play/pause the music. FB/FF: Fast backward/fast forward. Prev./Next: Play the previous/next file. Stop: Stop the music. Repeat: Select the repeat mode from Repeat All, Repeat 1, Repeat None. Set A-B: Select and play the preferable part of the file by setting A and B at the beginning and end. Press OK button to cancel. Playlist: Display the playlist on the screen.
Multimedia Operation USB MULTIMEDIA PLAYBACK FORMAT Media File Codec Ext. Video .mpg MPEG-1, MPEG-2 Remark Audio Max Solution: 1920×1080 Max Data Rate: 40 Mbps DivX, Xvid, MJPEG, .avi MPEG-4 SP/ASP, H.264 .ts MPEG-2, H.264 Max Solution: 1920×1080 MP3, WMA, MPEG-4 SP/ASP, Movie .mov .dat Max Data Rate: 20 Mbps AAC, AC3 H.264 MPEG-1 MPEG-4 SP/ASP, .mp4 H.264 MPEG-1, MPEG-2 Max Solution: 720×576 .vob MPEG-2 Max Data Rate: 40 Mbps .mp3 -- MP3 .
Recording Operation PVR settings 1. PVR File System Press the MENU button, select SETUP menu, and select “PVR File System”, then press OK button to enter the setting menu. SETUP Select Disk: Select the device for the Record files. Check PVR File System: Check the system. USB Disk: Display the USB state. Format: Format the USB device for PVR operating. Time Shift Size: Display the size of the USB device (The device has been formated).
Recording Operation Recording Record and Time shift function buttons REC: Press to start recording. PAUSE: Press to enter the timeshift mode. Stop: Press to stop recording or timeshift. REC: To display the recorder menu. 1) Recording menu When you press REC button in DTV mode, the screen will display the recording menu as below: Note: a. display and exit the navigation menu by pressing the REC. b. Press STOP button to exit the recording mode. c.
DVD Operation Press the Power button on the TV or the remote control, then press the INPUT button to select DVD mode. If there is no disc in the DVD player the screen will show "NO DISC". Insert Disc according to picture next to disc slot. Do not touch the playing surface. Hold the disc around the outside with your fingers and place the disc into the slot. The player will automatically draw the disc into the player.
DVD Operation 25
DVD Operation 26
DVD Operation Spdif Setup 27
DVD Operation or NO disc 28
DVD Operation 29
DVD Operation 30
DVD Operation 31
Simple Troubleshooting If the display fails or performance dramatically deteriorates check the Display in accordance with the following instructions.Remember to check the peripherals topinpiont the source of the failure. If the display still fails to perform as expected,connect your helpline for assistance. No power - Check all connections to the TV. - Press either the power button or the Standby button on the Remote control. No picture or sound - Ensure that the TV is plugged in and the power is on.
ENERG Y IJA ̛̖̦̖̬̐́ ɸʆɸʌɶɸɿɲ IE IA DENVER LDD-1954MC B ENERGIA ʫʻʫˀʧʰ˔ ʫE Wʧ / ʫE Z'/: ʫE Z'z ʫE Z'/ ʫE Z'/ 25 37 kwh/annum tĂƩ 47 cm 2010/1062 - 2011 inch 19 inch
Electric and electronic equipment and included batteries contains materials, components and substances that can be hazardous to your health and the environment, if the waste material (discarded electric and electronic equipment and batteries) is not handled correctly. Electric and electronic equipment and batteries is marked with the crossed out trash can symbol, seen below.