4K UHD LED TV with DVB-T2/S2/DVB-C and H.265/HEVC Support Model: LED-40 7 2T2CS User’s Guide NOTE: Read all of the instructions before using this TV and keep the instruction manual in a safe place for future reference.
Contents Auto Installation Setup 8 OSD MENU 9-15 1.Channel Setting 9-13 2.Picture menu 3.Sound menu 13 14 4.Time menu 14 5.Setup menu 14 6.
1
2
Due to the manufacturing process of components, televisions and other electronic products can have parts that may produce a smell after the product is first turned on and warms up. The smell will usually dissipate within a few days of use and does not return. This is normal and occurs with many electronic products. Please ensure there is sufficient ventilation around the TV and in the room and the odor will dissipate.
Power Switch (LED-4072T2CS) POWER/STANDBY: 4
USB Common Interface Mini YPbPr Mini AV TV1(S2) TV2( T2/C ) HDMI2 PC AUDIO VGA SCART COAX HDMI: Connect DVD/Blu-ray player or other equipment. HDMI 1/2: HDMI 2.0 (HDCP 2.2). Supports UHD 4K (2180P) resolution. HDMI 3: HDMI 1.4a (HDCP 1.4). Supports 1080P resolution only. PC AUDIO Coax: Digital output to AV receiver. TV2(T2/C): USB: Connect to USB device for multimedia (up to 1080P).
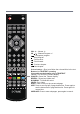
The remote control is using Infra-Red(IR). Point it towards the front of the LED TV. The remote control may not work correctly if it is operated out of range or out of angle. POWER PICTURE MUTE SOUND ASPECT SLEEP EPG FAV SUBTITLE CH.LIST TV/RADIO INPUT POWER(red button): Turn the TV on/standby. MUTE: Press to mute the sound, press again or press VOL+ to unmute. PICTURE: Select the picture mode. SOUND: Select the sound mode.
POWER PICTURE MUTE SOUND ASPECT SLEEP EPG FAV SUBTITLE CH.LIST TV/RADIO INPUT OK MENU EXIT 1 2 3 4 5 6 7 8 DISPLAY 9 0 VOL TV/TXT INDEX CH CANCEL REVEAL HOLD SIZE NICAM/A2 SUBPAGE VOL +/- : Volume +/-. CH / : Channel/Program +/-. : Play/pause program. : Stop program. : Fast reverse. : Fast forward. : Previous chapter. : Next chapter. Colour buttons : Short cuts-follow the coloured links in the text. Buttons for TELETEXT operating You could use the buttons only in TELETEXT .
blue 1.Press the Menu button on the remote control on your LED TV to select the Setup menu. 2.Press the buttons to select the First Time Installation. First Time Installation Language < English > Country < Germany > Energy Mode < Home Mode > Auto Standby < OK 4H > Auto Tuning Use the Left/Right/Down keys to select your Language, Country and Energy Model.
Channel Setting Antenna ATV Manual Tuning CHANNEL ATV Manual Tuning Digital Type Antenna > DVB-T > Auto Tuning > DVB-C > ATV Manual Tuning > Sound System DTV Manual Tuning > Fine-Tune < - Current CH 1 Colour System Programme Edit > AFC Signal Information > Search CI Information > +> PAL BG 48.25 MHz On You can manually tune ATV Manual Tuning in the CHANNEL Menu. 1.Press the Menu button on the remote control on your LED TV to select the Channel menu. 2.
Programme Edit Programme Edit Power-Off-No-Signal-Down If no valid input signal is detected,the TV set will toggle to standby mode automatically after approx.10 minutes. Auto-Power-Down 4 hours maximum after the last user interaction and/or the last channel switching,the TV set will automatically toggle from On to standby mode.Prior to this autonatic toggling,a message will be displayed allowing you to extend the delay time for another 4 hours.
Satellite edit menu Satellite Tuning Select “Dish Setup” item to enter the satellite system setting menu and the user operation interface as following: Operations in satellite edit menu are shown in the following table : Option Satellite Longitude Direct ion Value Enter Satellite Rename edit menu East ,West Longitude Angle Press num key to set the Angle Band C,Ku band choose satellite Seach menu Operations in Satellite List Menu are shown in the following table: Key Stroke KEY_UP KEY_DOW N KEY_LEFT
Transponder List Transponder Edit menu Operations in Transponder List Menu are shown in the following table: Operations in Transponder Edit menu are shown in the following table: Key Action Stroke KEY_UP use cursor to up KEY_DOW N use cursor to down KEY_LEFT switch operation to Satellite list KEY_RIGH switch operation to satellite system parameters setting T list KEY_ENTE R Option Select/unselect cursor item Transponder. KEY_MENU Back to Satellite list. KEY_EXIT Exit Main Menu.
Operations in Setting item menu are shown in the following table: PICTURE PICTURE Picture Mode < LNB Type Noise Reduction > Medium > Contrast 50 SCREEN Brightness 50 Dynamic CR < On > Colour 50 Face Color < 0 > Tint 50 MoCom < On > Sharpness 50 Aspect Ratio < Off > Blue Screen < Off > Colour Temp Option Standard > < Normal > Value 9750/10600,9750/10750,05150,05750, 5150/5750,09750,10600,10750,11300,1 1475,User Single,User Dual LNB Power On,Off 22KHz Auto,off,on
Hearing Impaired < Off > Import DefaultDate Version Hearing Impaired: Available options: ON or Off.
LOCK System Lock Off Set Password > > Channel Lock Hotel Mode Off Key Lock Off Hotel Mode 45 Hotel Mode BackLight: Controls the BackLight.
Media Player 2. Music In the option of Media Player on MainMenu,Press [OK] to enter the Media Player menu, see the picture as follows: Press [LEFT]/[RIGHT] to select Movie, Music or Photo. In the same way, on Media Player menu, move cursor to Music, press [OK] button to enter into FileSelector menu. Select the file you want to play, press [PLAY/PAUSE] to enter into full screen play. Press [LEFT] /[ RIGHT] button to move cursor, and operate according to different hint.
Simple Troubleshooting If the display fails or performance dramatically deteriorates check the Display in accordance with the following instructions.Remember to check the peripherals topinpiont the source of the failure. If the display still fails to perform as expected,connect your helpline for assistance. No power - Check all connections to the TV. - Press either the power button or the Standby button on the Remote control. No picture or sound - Ensure that the TV is plugged in and the power is on.
ALL RIGHTS RESERVED, COPYRIGHT DENVER ELECTRONICS A/S Electric and electronic equipment and included batteries contains materials, components and substances that can be hazardous to your health and the environment, if the waste material (discarded electric and electronic equipment and batteries) is not handled correctly. Electric and electronic equipment and batteries is marked with the crossed out trash can symbol, seen below.
LED-4072T2CS 55 80 40 102 2017